Matches in Nanopublications for { ?s <http://schema.org/description> ?o ?g. }
- a6376631-ef64-4c7a-b242-893d096fd33b description "The research object refers to the Variational data assimilation with deep prior (CIRC23) notebook published in the Environmental Data Science book." assertion.
- 007d800b-a7b7-4fc5-b18b-549648b77006 description "Contains outputs, (figures, models and results), generated in the Jupyter notebook of Variational data assimilation with deep prior (CIRC23)" assertion.
- 176438b9-54bb-4878-9a80-4a40b2a98877 description "Related publication of the modelling presented in the Jupyter notebook" assertion.
- 28318869-f7cb-43fa-bbf4-44ad75a37cdf description "Contains input Codebase of the reproduced paper used in the Jupyter notebook of Variational data assimilation with deep prior (CIRC23)" assertion.
- 5864b695-06f0-4cbb-8249-dfd58c6840e0 description "Lock conda file of the Jupyter notebook hosted by the Environmental Data Science Book" assertion.
- 96bda249-e769-4853-acf8-9989326765f5 description "Jupyter Notebook hosted by the Environmental Data Science Book" assertion.
- a8665cdc-b1de-4c19-b18b-2793a0fe77e2 description "Rendered version of the Jupyter Notebook hosted by the Environmental Data Science Book" assertion.
- b76ff147-ca03-4d55-aeaf-3533398b4547 description "Conda environment when user want to have the same libraries installed without concerns of package versions" assertion.
- f58b5532-99d4-44fd-aa97-188e9885e0e7 description "Analise for usage of Software for SME Business in Ferizaj." assertion.
- da3e1263-e472-48be-9f0e-a287ad4ca28b description "Creating and streamlining virtual environments with **OpenMP** to use parallelization with **Fortran** code on the field of theoretical solid state physics." assertion.
- 5298 description "" assertion.
- 709 description "" assertion.
- 58507a37-ee00-4173-9c7d-f0bd8effa41d description "The aim of this project is to evaluate the perceptions and approaches of parents toward childhood vaccines and especially children's vaccination with covid-19 vaccines." assertion.
- 5881 description "" assertion.
- c53c0d20-4754-45a3-b863-93d11e653520 description "> Research"  of digitalisation and AI integration in employee engagement in SMEs," assertion.
- 38051187-5ecf-4bcd-86a2-2110bda04a83 description "Description for this test project" assertion.
- 81930c86-66d9-40aa-922e-3eb71a7520ef description "The research object refers to the Concatenating a gridded rainfall reanalysis dataset into a time series notebook published in the Environmental Data Science book." assertion.
- 0fa56f9b-073f-4cfa-9af7-c4fc97561bef description "Contains outputs, (figures), generated in the Jupyter notebook of Concatenating a gridded rainfall reanalysis dataset into a time series" assertion.
- 26a79ea5-8a6d-49ab-a586-0667f0e61bab description "Related publication of the exploration presented in the Jupyter notebook" assertion.
- 55beb690-5dc3-4b73-8d48-282d2cd80e5d description "Conda environment when user want to have the same libraries installed without concerns of package versions" assertion.
- 6810340b-a8e6-455f-8852-87027145f60d description "Rendered version of the Jupyter Notebook hosted by the Environmental Data Science Book" assertion.
- 72464c70-1c24-41c7-8cbb-f1ce006286e6 description "Jupyter Notebook hosted by the Environmental Data Science Book" assertion.
- 75a693fc-75cb-42cf-960a-0de69034c9ae description "Pip requirements file containing libraries to install after conda lock" assertion.
- ac40c997-ba8e-42a7-a8b0-1a56211dd2df description "Related publication of the exploration presented in the Jupyter notebook" assertion.
- b58c7815-b88e-4098-ab5b-56333cd46028 description "Lock conda file for osx-64 OS of the Jupyter notebook hosted by the Environmental Data Science Book" assertion.
- c1f6b632-95e1-4872-a619-11a4e042e530 description "Contains input of the Jupyter Notebook - Concatenating a gridded rainfall reanalysis dataset into a time series used in the Jupyter notebook of Concatenating a gridded rainfall reanalysis dataset into a time series" assertion.
- 075e9430-5949-4a09-8622-d20916994eaa description "## Rationale From 1st January 2020 the global upper limit on the sulphur content of ships' fuel oil was reduced from 3.50% to 0.50%, which represents an ~86% cut (from [https://www.imo.org/en/MediaCentre/PressBriefings/pages/34-IMO-2020-sulphur-limit-.aspx](https://www.imo.org/en/MediaCentre/PressBriefings/pages/34-IMO-2020-sulphur-limit-.aspx)).  *Image from [IMO 2020 - cleaner shipping for cleaner air, 20 December 2019](https://www.imo.org/en/MediaCentre/PressBriefings/pages/34-IMO-2020-sulphur-limit-.aspx)* According to the [International Maritime Organization (IMO)](https://www.imo.org/) the new limit should lead to a 77% drop in overall SOx emissions from ships. The Figure below shows the 5 key beneficial changes from IMO's **Sulphur Limit** for Ships' fuel oil: 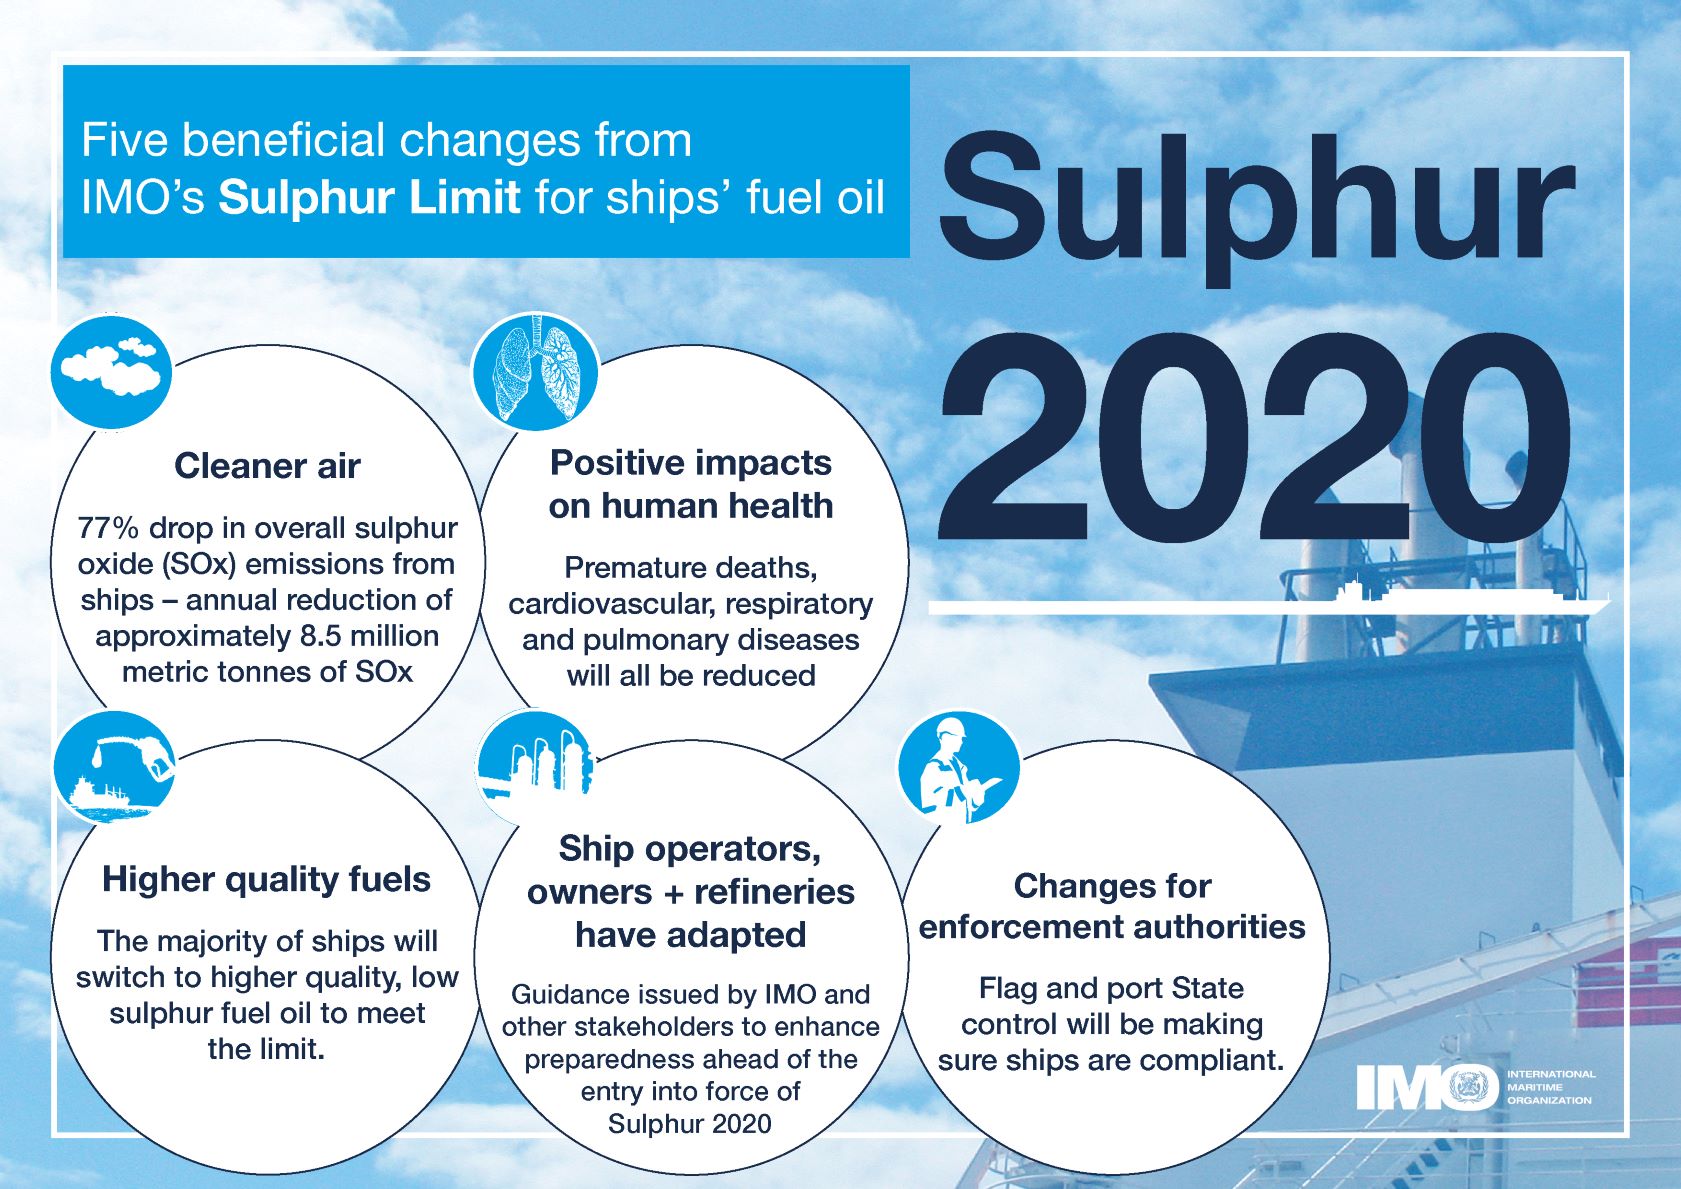 *Five beneficial changes from IMO’s Sulphur Limit for ships’ fuel oil* ## This Research Object's purpose In this work we look as the **actual impact of these measures on air pollution along shipping routes in Europe** based on Copernicus air quality data. [Copernicus Atmosphere Monitoring Service (CAMS)](https://ads.atmosphere.copernicus.eu/cdsapp#!/home) uses satellite data and other observations, together with computer models, to track the accumulation and movement of air pollutants around the planet (see [https://atmosphere.copernicus.eu/air-quality](https://atmosphere.copernicus.eu/air-quality)). ### Rohub - Adam plateform integration Some of this CAMS data is available from the [Adam platform](https://adamplatform.eu) and can be imported into a [Research Object](https://www.researchobject.org).  *Example of data (here daily temperatures) displayed on the Adam plateform* It is also possible, from the Research Object, to open the resource in the Adam platform, then interactively zoom into a particular geographical area (say to the right of the Strait of Gibraltar, along the track presumably followed by cargo ships to/from the Suez Canal) and change the date (for example between 2018-07-19 and 2023-07-19) to appreciate the change. #### To go further Obviously **a more detailed statistical analysis** would be required to minimize the effect of external factors (meteorological condition, level of cargo traffic, etc.) over a longer period of time to derive meaningful conclusions, however it does not seem that the high level of sulfur dioxide concentration from the pre-IMO regulation was reached after. ##### Looking at other pollutants Besides SOx the new regulation also contributed to decrease atmospheric concentrations in nitric oxides (NOx) as well as particulate matter (PM). ### References - [IMO 2020 - cleaner shipping for cleaner air, 20 December 2019](https://www.imo.org/en/MediaCentre/PressBriefings/pages/34-IMO-2020-sulphur-limit-.aspx)" assertion.
- 075e9430-5949-4a09-8622-d20916994eaa description "## Rationale From 1st January 2020 the global upper limit on the sulphur content of ships' fuel oil was reduced from 3.50% to 0.50%, which represents an ~86% cut (from [https://www.imo.org/en/MediaCentre/PressBriefings/pages/34-IMO-2020-sulphur-limit-.aspx](https://www.imo.org/en/MediaCentre/PressBriefings/pages/34-IMO-2020-sulphur-limit-.aspx)).  *Image from [IMO 2020 - cleaner shipping for cleaner air, 20 December 2019](https://www.imo.org/en/MediaCentre/PressBriefings/pages/34-IMO-2020-sulphur-limit-.aspx)* According to the [International Maritime Organization (IMO)](https://www.imo.org/) the new limit should lead to a 77% drop in overall SOx emissions from ships. The Figure below shows the 5 key beneficial changes from IMO's **Sulphur Limit** for Ships' fuel oil:  *Five beneficial changes from IMO’s Sulphur Limit for ships’ fuel oil* ## This Research Object's purpose In this work we look as the **actual impact of these measures on air pollution along shipping routes in Europe** based on Copernicus air quality data. [Copernicus Atmosphere Monitoring Service (CAMS)](https://ads.atmosphere.copernicus.eu/cdsapp#!/home) uses satellite data and other observations, together with computer models, to track the accumulation and movement of air pollutants around the planet (see [https://atmosphere.copernicus.eu/air-quality](https://atmosphere.copernicus.eu/air-quality)). ### Rohub - Adam plateform integration Some of this CAMS data is available from the [Adam platform](https://adamplatform.eu) and can be imported into a [Research Object](https://www.researchobject.org).  *Example of data (here daily temperatures) displayed on the Adam plateform* It is also possible, from the Research Object, to open the resource in the Adam platform, then interactively zoom into a particular geographical area (say to the right of the Strait of Gibraltar, along the track presumably followed by cargo ships to/from the Suez Canal) and change the date (for example between 2018-07-19 and 2023-07-19) to appreciate the change. #### To go further Obviously **a more detailed statistical analysis** would be required to minimize the effect of external factors (meteorological condition, level of cargo traffic, etc.) over a longer period of time to derive meaningful conclusions, however it does not seem that the high level of sulfur dioxide concentration from the pre-IMO regulation was reached after. ##### Looking at other pollutants Besides SOx the new regulation also contributed to decrease atmospheric concentrations in nitric oxides (NOx) as well as particulate matter (PM). ### References - [IMO 2020 - cleaner shipping for cleaner air, 20 December 2019](https://www.imo.org/en/MediaCentre/PressBriefings/pages/34-IMO-2020-sulphur-limit-.aspx)" assertion.
- 373f5793-4997-4854-a0c3-4ef89e0d554d description "The quality of the air we breathe can significantly impact our health and the environment. CAMS monitors and forecasts European air quality and worldwide long-range transport of pollutants." assertion.
- 3a4680dd-67ef-438f-bd0c-3ef031bbec0a description "Five beneficial changes from IMO's Sulphur Limit for ships' fuel oil" assertion.
- 5d873985-fdd4-4ac0-9249-53290fa3c8f5 description "This report examines the potential of electrofuels (e-fuels) to decarbonise long-haul aviation and maritime shipping. E-fuels like hydrogen, ammonia, e-methanol or e-kerosene can be produced from renewable energy and feedstocks and are more economical to deploy in these two modes than direct electrification. The analysis evaluates the challenges and opportunities related to e-fuel production technologies and feedstock options to identify priorities for making e-fuels cheaper and maximising emissions cuts. The research also explores operational requirements for the two sectors to deploy e-fuels and how governments can assist in adopting low-carbon fuels" assertion.
- a219dc91-cd87-455d-a2d6-3f5b83f0892c description "Nitrogen Oxide" assertion.
- ca3936e2-7b25-4776-ae9b-d1f9f5225bb1 description "Sulphur dioxide (SO2) from Copernicus Atmosphere Monitoring Service" assertion.
- e8752e1f-7c59-4b99-b1db-9e3e31e2a45c description "IMI news: Global limit on sulphur in ships' fuel oil reduced from 01 January 2020." assertion.
- ea4e5a1d-3ce7-4438-af08-15fdd453600a description "[](https://snakemake.readthedocs.io) # About SnakeMAGs SnakeMAGs is a workflow to reconstruct prokaryotic genomes from metagenomes. The main purpose of SnakeMAGs is to process Illumina data from raw reads to metagenome-assembled genomes (MAGs). SnakeMAGs is efficient, easy to handle and flexible to different projects. The workflow is CeCILL licensed, implemented in Snakemake (run on multiple cores) and available for Linux. SnakeMAGs performed eight main steps: - Quality filtering of the reads - Adapter trimming - Filtering of the host sequences (optional) - Assembly - Binning - Evaluation of the quality of the bins - Classification of the MAGs - Estimation of the relative abundance of the MAGs  # How to use SnakeMAGs ## Install conda The easiest way to install and run SnakeMAGs is to use [conda](https://www.anaconda.com/products/distribution). These package managers will help you to easily install [Snakemake](https://snakemake.readthedocs.io/en/stable/getting_started/installation.html). ## Install and activate Snakemake environment Note: The workflow was developed with Snakemake 7.0.0 ``` conda activate # First, set up your channel priorities conda config --add channels defaults conda config --add channels bioconda conda config --add channels conda-forge # Then, create a new environment for the Snakemake version you require conda create -n snakemake_7.0.0 snakemake=7.0.0 # And activate it conda activate snakemake_7.0.0 ``` Alternatively, you can also install Snakemake via mamba: ``` # If you do not have mamba yet on your machine, you can install it with: conda install -n base -c conda-forge mamba # Then you can install Snakemake conda activate base mamba create -c conda-forge -c bioconda -n snakemake snakemake # And activate it conda activate snakemake ``` ## SnakeMAGs executable The easiest way to procure SnakeMAGs and its related files is to clone the repository using git: ``` git clone https://github.com/Nachida08/SnakeMAGs.git ``` Alternatively, you can download the relevant files: ``` wget https://github.com/Nachida08/SnakeMAGs/blob/main/SnakeMAGs.smk https://github.com/Nachida08/SnakeMAGs/blob/main/config.yaml ``` ## SnakeMAGs input files - Illumina paired-end reads in FASTQ. - Adapter sequence file ([adapter.fa](https://github.com/Nachida08/SnakeMAGs/blob/main/adapters.fa)). - Host genome sequences in FASTA (if host_genome: "yes"), in case you work with host-associated metagenomes (e.g. human gut metagenome). ## Download Genome Taxonomy Database (GTDB) GTDB-Tk requires ~66G+ of external data (GTDB) that need to be downloaded and unarchived. Because this database is voluminous, we let you decide where you want to store it. SnakeMAGs do not download automatically GTDB, you have to do it: ``` #Download the latest release (tested with release207) #Note: SnakeMAGs uses GTDBtk v2.1.0 and therefore require release 207 as minimum version. See https://ecogenomics.github.io/GTDBTk/installing/index.html#installing for details. wget https://data.gtdb.ecogenomic.org/releases/latest/auxillary_files/gtdbtk_v2_data.tar.gz #Decompress tar -xzvf *tar.gz #This will create a folder called release207_v2 ``` All you have to do now is to indicate the path to the database folder (in our example, the folder is called release207_v2) in the config file, Classification section. ## Download the GUNC database (required if gunc: "yes") GUNC accepts either a progenomes or GTDB based reference database. Both can be downloaded using the ```gunc download_db``` command. For our study we used the default proGenome-derived GUNC database. It requires less resources with similar performance. ``` conda activate # Install and activate GUNC environment conda create --prefix /path/to/gunc_env conda install -c bioconda metabat2 --prefix /path/to/gunc_env source activate /path/to/gunc_env #Download the proGenome-derived GUNC database (tested with gunc_db_progenomes2.1) #Note: SnakeMAGs uses GUNC v1.0.5 gunc download_db -db progenomes /path/to/GUNC_DB ``` All you have to do now is to indicate the path to the GUNC database file in the config file, Bins quality section. ## Edit config file You need to edit the config.yaml file. In particular, you need to set the correct paths: for the working directory, to specify where are your fastq files, where you want to place the conda environments (that will be created using the provided .yaml files available in [SnakeMAGs_conda_env directory](https://github.com/Nachida08/SnakeMAGs/tree/main/SnakeMAGs_conda_env)), where are the adapters, where is GTDB and optionally where is the GUNC database and where is your host genome reference. Lastly, you need to allocate the proper computational resources (threads, memory) for each of the main steps. These can be optimized according to your hardware. Here is an example of a config file: ``` ##################################################################################################### ##### _____ ___ _ _ _ ______ __ __ _______ _____ ##### ##### / ___| | \ | | /\ | | / / | ____| | \ / | /\ / _____| / ___| ##### ##### | (___ | |\ \ | | / \ | |/ / | |____ | \/ | / \ | | __ | (___ ##### ##### \___ \ | | \ \| | / /\ \ | |\ \ | ____| | |\ /| | / /\ \ | | |_ | \___ \ ##### ##### ____) | | | \ | / /__\ \ | | \ \ | |____ | | \/ | | / /__\ \ | |____|| ____) | ##### ##### |_____/ |_| \__| /_/ \_\ |_| \_\ |______| |_| |_| /_/ \_\ \______/ |_____/ ##### ##### ##### ##################################################################################################### ############################ ### Execution parameters ### ############################ working_dir: /path/to/working/directory/ #The main directory for the project raw_fastq: /path/to/raw_fastq/ #The directory that contains all the fastq files of all the samples (eg. sample1_R1.fastq & sample1_R2.fastq, sample2_R1.fastq & sample2_R2.fastq...) suffix_1: "_R1.fastq" #Main type of suffix for forward reads file (eg. _1.fastq or _R1.fastq or _r1.fastq or _1.fq or _R1.fq or _r1.fq ) suffix_2: "_R2.fastq" #Main type of suffix for reverse reads file (eg. _2.fastq or _R2.fastq or _r2.fastq or _2.fq or _R2.fq or _r2.fq ) ########################### ### Conda environnemnts ### ########################### conda_env: "/path/to/SnakeMAGs_conda_env/" #Path to the provided SnakeMAGs_conda_env directory which contains the yaml file for each conda environment ######################### ### Quality filtering ### ######################### email: name.surname@your-univ.com #Your e-mail address threads_filter: 10 #The number of threads to run this process. To be adjusted according to your hardware resources_filter: 150 #Memory according to tools need (in GB) ######################## ### Adapter trimming ### ######################## adapters: /path/to/working/directory/adapters.fa #A fasta file contanning a set of various Illumina adaptors (this file is provided and is also available on github) trim_params: "2:40:15" #For further details, see the Trimmomatic documentation threads_trim: 10 #The number of threads to run this process. To be adjusted according to your hardware resources_trim: 150 #Memory according to tools need (in GB) ###################### ### Host filtering ### ###################### host_genome: "yes" #yes or no. An optional step for host-associated samples (eg. termite, human, plant...) threads_bowtie2: 50 #The number of threads to run this process. To be adjusted according to your hardware host_genomes_directory: /path/to/working/host_genomes/ #the directory where the host genome is stored host_genomes: /path/to/working/host_genomes/host_genomes.fa #A fasta file containing the DNA sequences of the host genome(s) threads_samtools: 50 #The number of threads to run this process. To be adjusted according to your hardware resources_host_filtering: 150 #Memory according to tools need (in GB) ################ ### Assembly ### ################ threads_megahit: 50 #The number of threads to run this process. To be adjusted according to your hardware min_contig_len: 1000 #Minimum length (in bp) of the assembled contigs k_list: "21,31,41,51,61,71,81,91,99,109,119" #Kmer size (for further details, see the megahit documentation) resources_megahit: 250 #Memory according to tools need (in GB) ############### ### Binning ### ############### threads_bwa: 50 #The number of threads to run this process. To be adjusted according to your hardware resources_bwa: 150 #Memory according to tools need (in GB) threads_samtools: 50 #The number of threads to run this process. To be adjusted according to your hardware resources_samtools: 150 #Memory according to tools need (in GB) seed: 19860615 #Seed number for reproducible results threads_metabat: 50 #The number of threads to run this process. To be adjusted according to your hardware minContig: 2500 #Minimum length (in bp) of the contigs resources_binning: 250 #Memory according to tools need (in GB) #################### ### Bins quality ### #################### #checkM threads_checkm: 50 #The number of threads to run this process. To be adjusted according to your hardware resources_checkm: 250 #Memory according to tools need (in GB) #bins_quality_filtering completion: 50 #The minimum completion rate of bins contamination: 10 #The maximum contamination rate of bins parks_quality_score: "yes" #yes or no. If yes bins are filtered according to the Parks quality score (completion-5*contamination >= 50) #GUNC gunc: "yes" #yes or no. An optional step to detect and discard chimeric and contaminated genomes using the GUNC tool threads_gunc: 50 #The number of threads to run this process. To be adjusted according to your hardware resources_gunc: 250 #Memory according to tools need (in GB) GUNC_db: /path/to/GUNC_DB/gunc_db_progenomes2.1.dmnd #Path to the downloaded GUNC database (see the readme file) ###################### ### Classification ### ###################### GTDB_data_ref: /path/to/downloaded/GTDB #Path to uncompressed GTDB-Tk reference data (GTDB) threads_gtdb: 10 #The number of threads to run this process. To be adjusted according to your hardware resources_gtdb: 250 #Memory according to tools need (in GB) ################## ### Abundances ### ################## threads_coverM: 10 #The number of threads to run this process. To be adjusted according to your hardware resources_coverM: 150 #Memory according to tools need (in GB) ``` # Run SnakeMAGs If you are using a workstation with Ubuntu (tested on Ubuntu 22.04): ```{bash} snakemake --cores 30 --snakefile SnakeMAGs.smk --use-conda --conda-prefix /path/to/SnakeMAGs_conda_env/ --configfile /path/to/config.yaml --keep-going --latency-wait 180 ``` If you are working on a cluster with Slurm (tested with version 18.08.7): ```{bash} snakemake --snakefile SnakeMAGs.smk --cluster 'sbatch -p --mem -c -o "cluster_logs/{wildcards}.{rule}.{jobid}.out" -e "cluster_logs/{wildcards}.{rule}.{jobid}.err" ' --jobs --use-conda --conda-frontend conda --conda-prefix /path/to/SnakeMAGs_conda_env/ --jobname "{rule}.{wildcards}.{jobid}" --latency-wait 180 --configfile /path/to/config.yaml --keep-going ``` If you are working on a cluster with SGE (tested with version 8.1.9): ```{bash} snakemake --snakefile SnakeMAGs.smk --cluster "qsub -cwd -V -q -pe thread {threads} -e cluster_logs/{rule}.e{jobid} -o cluster_logs/{rule}.o{jobid}" --jobs --use-conda --conda-frontend conda --conda-prefix /path/to/SnakeMAGs_conda_env/ --jobname "{rule}.{wildcards}.{jobid}" --latency-wait 180 --configfile /path/to/config.yaml --keep-going ``` # Test We provide you a small data set in the [test](https://github.com/Nachida08/SnakeMAGs/tree/main/test) directory which will allow you to validate your instalation and take your first steps with SnakeMAGs. This data set is a subset from [ZymoBiomics Mock Community](https://www.zymoresearch.com/blogs/blog/zymobiomics-microbial-standards-optimize-your-microbiomics-workflow) (250K reads) used in this tutoriel [metagenomics_tutorial](https://github.com/pjtorres/metagenomics_tutorial). 1. Before getting started make sure you have cloned the SnakeMAGs repository or you have downloaded all the necessary files (SnakeMAGs.smk, config.yaml, chr19.fa.gz, insub732_2_R1.fastq.gz, insub732_2_R2.fastq.gz). See the [SnakeMAGs executable](#snakemags-executable) section. 2. Unzip the fastq files and the host sequences file. ``` gunzip fastqs/insub732_2_R1.fastq.gz fastqs/insub732_2_R2.fastq.gz host_genomes/chr19.fa.gz ``` 3. For better organisation put all the read files in the same directory (eg. fastqs) and the host sequences file in a separate directory (eg. host_genomes) 4. Edit the config file (see [Edit config file](#edit-config-file) section) 5. Run the test (see [Run SnakeMAGs](#run-snakemags) section) Note: the analysis of these files took 1159.32 secondes to complete on a Ubuntu 22.04 LTS with an Intel(R) Xeon(R) Silver 4210 CPU @ 2.20GHz x 40 processor, 96GB of RAM. # Genome reference for host reads filtering For host-associated samples, one can remove host sequences from the metagenomic reads by mapping these reads against a reference genome. In the case of termite gut metagenomes, we are providing [here](https://zenodo.org/record/6908287#.YuAdFXZBx8M) the relevant files (fasta and index files) from termite genomes. Upon request, we can help you to generate these files for your own reference genome and make them available to the community. NB. These steps of mapping generate voluminous files such as .bam and .sam. Depending on your disk space, you might want to delete these files after use. # Use case During the test phase of the development of SnakeMAGs, we used this workflow to process 10 publicly available termite gut metagenomes generated by Illumina sequencing, to ultimately reconstruct prokaryotic MAGs. These metagenomes were retrieved from the NCBI database using the following accession numbers: SRR10402454; SRR14739927; SRR8296321; SRR8296327; SRR8296329; SRR8296337; SRR8296343; DRR097505; SRR7466794; SRR7466795. They come from five different studies: Waidele et al, 2019; Tokuda et al, 2018; Romero Victorica et al, 2020; Moreira et al, 2021; and Calusinska et al, 2020. ## Download the Illumina pair-end reads We use fasterq-dump tool to extract data in FASTQ-format from SRA-accessions. It is a commandline-tool which offers a faster solution for downloading those large files. ``` # Install and activate sra-tools environment ## Note: For this study we used sra-tools 2.11.0 conda activate conda install -c bioconda sra-tools conda activate sra-tools # Download fastqs in a single directory mkdir raw_fastq cd raw_fastq fasterq-dump --threads --skip-technical --split-3 ``` ## Download Genome reference for host reads filtering ``` mkdir host_genomes cd host_genomes wget https://zenodo.org/record/6908287/files/termite_genomes.fasta.gz gunzip termite_genomes.fasta.gz ``` ## Edit the config file See [Edit config file](#edit-config-file) section. ## Run SnakeMAGs ``` conda activate snakemake_7.0.0 mkdir cluster_logs snakemake --snakefile SnakeMAGs.smk --cluster 'sbatch -p --mem -c -o "cluster_logs/{wildcards}.{rule}.{jobid}.out" -e "cluster_logs/{wildcards}.{rule}.{jobid}.err" ' --jobs --use-conda --conda-frontend conda --conda-prefix /path/to/SnakeMAGs_conda_env/ --jobname "{rule}.{wildcards}.{jobid}" --latency-wait 180 --configfile /path/to/config.yaml --keep-going ``` ## Study results The MAGs reconstructed from each metagenome and their taxonomic classification are available in this [repository](https://doi.org/10.5281/zenodo.7661004). # Citations If you use SnakeMAGs, please cite: > Tadrent N, Dedeine F and Hervé V. SnakeMAGs: a simple, efficient, flexible and scalable workflow to reconstruct prokaryotic genomes from metagenomes [version 2; peer review: 2 approved]. F1000Research 2023, 11:1522 (https://doi.org/10.12688/f1000research.128091.2) Please also cite the dependencies: - [Snakemake](https://doi.org/10.12688/f1000research.29032.2) : Mölder, F., Jablonski, K. P., Letcher, B., Hall, M. B., Tomkins-tinch, C. H., Sochat, V., Forster, J., Lee, S., Twardziok, S. O., Kanitz, A., Wilm, A., Holtgrewe, M., Rahmann, S., Nahnsen, S., & Köster, J. (2021) Sustainable data analysis with Snakemake [version 2; peer review: 2 approved]. *F1000Research* 2021, 10:33. - [illumina-utils](https://doi.org/10.1371/journal.pone.0066643) : Murat Eren, A., Vineis, J. H., Morrison, H. G., & Sogin, M. L. (2013). A Filtering Method to Generate High Quality Short Reads Using Illumina Paired-End Technology. *PloS ONE*, 8(6), e66643. - [Trimmomatic](https://doi.org/10.1093/bioinformatics/btu170) : Bolger, A. M., Lohse, M., & Usadel, B. (2014). Genome analysis Trimmomatic: a flexible trimmer for Illumina sequence data. *Bioinformatics*, 30(15), 2114-2120. - [Bowtie2](https://doi.org/10.1038/nmeth.1923) : Langmead, B., & Salzberg, S. L. (2012). Fast gapped-read alignment with Bowtie 2. *Nature Methods*, 9(4), 357–359. - [SAMtools](https://doi.org/10.1093/bioinformatics/btp352) : Li, H., Handsaker, B., Wysoker, A., Fennell, T., Ruan, J., Homer, N., Marth, G., Abecasis, G., & Durbin, R. (2009). The Sequence Alignment/Map format and SAMtools. *Bioinformatics*, 25(16), 2078–2079. - [BEDtools](https://doi.org/10.1093/bioinformatics/btq033) : Quinlan, A. R., & Hall, I. M. (2010). BEDTools: A flexible suite of utilities for comparing genomic features. *Bioinformatics*, 26(6), 841–842. - [MEGAHIT](https://doi.org/10.1093/bioinformatics/btv033) : Li, D., Liu, C. M., Luo, R., Sadakane, K., & Lam, T. W. (2015). MEGAHIT: An ultra-fast single-node solution for large and complex metagenomics assembly via succinct de Bruijn graph. *Bioinformatics*, 31(10), 1674–1676. - [bwa](https://doi.org/10.1093/bioinformatics/btp324) : Li, H., & Durbin, R. (2009). Fast and accurate short read alignment with Burrows-Wheeler transform. *Bioinformatics*, 25(14), 1754–1760. - [MetaBAT2](https://doi.org/10.7717/peerj.7359) : Kang, D. D., Li, F., Kirton, E., Thomas, A., Egan, R., An, H., & Wang, Z. (2019). MetaBAT 2: An adaptive binning algorithm for robust and efficient genome reconstruction from metagenome assemblies. *PeerJ*, 2019(7), 1–13. - [CheckM](https://doi.org/10.1101/gr.186072.114) : Parks, D. H., Imelfort, M., Skennerton, C. T., Hugenholtz, P., & Tyson, G. W. (2015). CheckM: Assessing the quality of microbial genomes recovered from isolates, single cells, and metagenomes. *Genome Research*, 25(7), 1043–1055. - [GTDB-Tk](https://doi.org/10.1093/BIOINFORMATICS/BTAC672) : Chaumeil, P.-A., Mussig, A. J., Hugenholtz, P., Parks, D. H. (2022). GTDB-Tk v2: memory friendly classification with the genome taxonomy database. *Bioinformatics*. - [CoverM](https://github.com/wwood/CoverM) - [Waidele et al, 2019](https://doi.org/10.1101/526038) : Waidele, L., Korb, J., Voolstra, C. R., Dedeine, F., & Staubach, F. (2019). Ecological specificity of the metagenome in a set of lower termite species supports contribution of the microbiome to adaptation of the host. *Animal Microbiome*, 1(1), 1–13. - [Tokuda et al, 2018](https://doi.org/10.1073/pnas.1810550115) : Tokuda, G., Mikaelyan, A., Fukui, C., Matsuura, Y., Watanabe, H., Fujishima, M., & Brune, A. (2018). Fiber-associated spirochetes are major agents of hemicellulose degradation in the hindgut of wood-feeding higher termites. *Proceedings of the National Academy of Sciences of the United States of America*, 115(51), E11996–E12004. - [Romero Victorica et al, 2020](https://doi.org/10.1038/s41598-020-60850-5) : Romero Victorica, M., Soria, M. A., Batista-García, R. A., Ceja-Navarro, J. A., Vikram, S., Ortiz, M., Ontañon, O., Ghio, S., Martínez-Ávila, L., Quintero García, O. J., Etcheverry, C., Campos, E., Cowan, D., Arneodo, J., & Talia, P. M. (2020). Neotropical termite microbiomes as sources of novel plant cell wall degrading enzymes. *Scientific Reports*, 10(1), 1–14. - [Moreira et al, 2021](https://doi.org/10.3389/fevo.2021.632590) : Moreira, E. A., Persinoti, G. F., Menezes, L. R., Paixão, D. A. A., Alvarez, T. M., Cairo, J. P. L. F., Squina, F. M., Costa-Leonardo, A. M., Rodrigues, A., Sillam-Dussès, D., & Arab, A. (2021). Complementary contribution of Fungi and Bacteria to lignocellulose digestion in the food stored by a neotropical higher termite. *Frontiers in Ecology and Evolution*, 9(April), 1–12. - [Calusinska et al, 2020](https://doi.org/10.1038/s42003-020-1004-3) : Calusinska, M., Marynowska, M., Bertucci, M., Untereiner, B., Klimek, D., Goux, X., Sillam-Dussès, D., Gawron, P., Halder, R., Wilmes, P., Ferrer, P., Gerin, P., Roisin, Y., & Delfosse, P. (2020). Integrative omics analysis of the termite gut system adaptation to Miscanthus diet identifies lignocellulose degradation enzymes. *Communications Biology*, 3(1), 1–12. - [Orakov et al, 2021](https://doi.org/10.1186/s13059-021-02393-0) : Orakov, A., Fullam, A., Coelho, L. P., Khedkar, S., Szklarczyk, D., Mende, D. R., Schmidt, T. S. B., & Bork, P. (2021). GUNC: detection of chimerism and contamination in prokaryotic genomes. *Genome Biology*, 22(1). - [Parks et al, 2015](https://doi.org/10.1101/gr.186072.114) : Parks, D. H., Imelfort, M., Skennerton, C. T., Hugenholtz, P., & Tyson, G. W. (2015). CheckM: Assessing the quality of microbial genomes recovered from isolates, single cells, and metagenomes. *Genome Research*, 25(7), 1043–1055. # License This project is licensed under the CeCILL License - see the [LICENSE](https://github.com/Nachida08/SnakeMAGs/blob/main/LICENCE) file for details. Developed by Nachida Tadrent at the Insect Biology Research Institute ([IRBI](https://irbi.univ-tours.fr/)), under the supervision of Franck Dedeine and Vincent Hervé." assertion.
- ea4e5a1d-3ce7-4438-af08-15fdd453600a description "[](https://snakemake.readthedocs.io) # About SnakeMAGs SnakeMAGs is a workflow to reconstruct prokaryotic genomes from metagenomes. The main purpose of SnakeMAGs is to process Illumina data from raw reads to metagenome-assembled genomes (MAGs). SnakeMAGs is efficient, easy to handle and flexible to different projects. The workflow is CeCILL licensed, implemented in Snakemake (run on multiple cores) and available for Linux. SnakeMAGs performed eight main steps: - Quality filtering of the reads - Adapter trimming - Filtering of the host sequences (optional) - Assembly - Binning - Evaluation of the quality of the bins - Classification of the MAGs - Estimation of the relative abundance of the MAGs  # How to use SnakeMAGs ## Install conda The easiest way to install and run SnakeMAGs is to use [conda](https://www.anaconda.com/products/distribution). These package managers will help you to easily install [Snakemake](https://snakemake.readthedocs.io/en/stable/getting_started/installation.html). ## Install and activate Snakemake environment Note: The workflow was developed with Snakemake 7.0.0 ``` conda activate # First, set up your channel priorities conda config --add channels defaults conda config --add channels bioconda conda config --add channels conda-forge # Then, create a new environment for the Snakemake version you require conda create -n snakemake_7.0.0 snakemake=7.0.0 # And activate it conda activate snakemake_7.0.0 ``` Alternatively, you can also install Snakemake via mamba: ``` # If you do not have mamba yet on your machine, you can install it with: conda install -n base -c conda-forge mamba # Then you can install Snakemake conda activate base mamba create -c conda-forge -c bioconda -n snakemake snakemake # And activate it conda activate snakemake ``` ## SnakeMAGs executable The easiest way to procure SnakeMAGs and its related files is to clone the repository using git: ``` git clone https://github.com/Nachida08/SnakeMAGs.git ``` Alternatively, you can download the relevant files: ``` wget https://github.com/Nachida08/SnakeMAGs/blob/main/SnakeMAGs.smk https://github.com/Nachida08/SnakeMAGs/blob/main/config.yaml ``` ## SnakeMAGs input files - Illumina paired-end reads in FASTQ. - Adapter sequence file ([adapter.fa](https://github.com/Nachida08/SnakeMAGs/blob/main/adapters.fa)). - Host genome sequences in FASTA (if host_genome: "yes"), in case you work with host-associated metagenomes (e.g. human gut metagenome). ## Download Genome Taxonomy Database (GTDB) GTDB-Tk requires ~66G+ of external data (GTDB) that need to be downloaded and unarchived. Because this database is voluminous, we let you decide where you want to store it. SnakeMAGs do not download automatically GTDB, you have to do it: ``` #Download the latest release (tested with release207) #Note: SnakeMAGs uses GTDBtk v2.1.0 and therefore require release 207 as minimum version. See https://ecogenomics.github.io/GTDBTk/installing/index.html#installing for details. wget https://data.gtdb.ecogenomic.org/releases/latest/auxillary_files/gtdbtk_v2_data.tar.gz #Decompress tar -xzvf *tar.gz #This will create a folder called release207_v2 ``` All you have to do now is to indicate the path to the database folder (in our example, the folder is called release207_v2) in the config file, Classification section. ## Download the GUNC database (required if gunc: "yes") GUNC accepts either a progenomes or GTDB based reference database. Both can be downloaded using the ```gunc download_db``` command. For our study we used the default proGenome-derived GUNC database. It requires less resources with similar performance. ``` conda activate # Install and activate GUNC environment conda create --prefix /path/to/gunc_env conda install -c bioconda metabat2 --prefix /path/to/gunc_env source activate /path/to/gunc_env #Download the proGenome-derived GUNC database (tested with gunc_db_progenomes2.1) #Note: SnakeMAGs uses GUNC v1.0.5 gunc download_db -db progenomes /path/to/GUNC_DB ``` All you have to do now is to indicate the path to the GUNC database file in the config file, Bins quality section. ## Edit config file You need to edit the config.yaml file. In particular, you need to set the correct paths: for the working directory, to specify where are your fastq files, where you want to place the conda environments (that will be created using the provided .yaml files available in [SnakeMAGs_conda_env directory](https://github.com/Nachida08/SnakeMAGs/tree/main/SnakeMAGs_conda_env)), where are the adapters, where is GTDB and optionally where is the GUNC database and where is your host genome reference. Lastly, you need to allocate the proper computational resources (threads, memory) for each of the main steps. These can be optimized according to your hardware. Here is an example of a config file: ``` ##################################################################################################### ##### _____ ___ _ _ _ ______ __ __ _______ _____ ##### ##### / ___| | \ | | /\ | | / / | ____| | \ / | /\ / _____| / ___| ##### ##### | (___ | |\ \ | | / \ | |/ / | |____ | \/ | / \ | | __ | (___ ##### ##### \___ \ | | \ \| | / /\ \ | |\ \ | ____| | |\ /| | / /\ \ | | |_ | \___ \ ##### ##### ____) | | | \ | / /__\ \ | | \ \ | |____ | | \/ | | / /__\ \ | |____|| ____) | ##### ##### |_____/ |_| \__| /_/ \_\ |_| \_\ |______| |_| |_| /_/ \_\ \______/ |_____/ ##### ##### ##### ##################################################################################################### ############################ ### Execution parameters ### ############################ working_dir: /path/to/working/directory/ #The main directory for the project raw_fastq: /path/to/raw_fastq/ #The directory that contains all the fastq files of all the samples (eg. sample1_R1.fastq & sample1_R2.fastq, sample2_R1.fastq & sample2_R2.fastq...) suffix_1: "_R1.fastq" #Main type of suffix for forward reads file (eg. _1.fastq or _R1.fastq or _r1.fastq or _1.fq or _R1.fq or _r1.fq ) suffix_2: "_R2.fastq" #Main type of suffix for reverse reads file (eg. _2.fastq or _R2.fastq or _r2.fastq or _2.fq or _R2.fq or _r2.fq ) ########################### ### Conda environnemnts ### ########################### conda_env: "/path/to/SnakeMAGs_conda_env/" #Path to the provided SnakeMAGs_conda_env directory which contains the yaml file for each conda environment ######################### ### Quality filtering ### ######################### email: name.surname@your-univ.com #Your e-mail address threads_filter: 10 #The number of threads to run this process. To be adjusted according to your hardware resources_filter: 150 #Memory according to tools need (in GB) ######################## ### Adapter trimming ### ######################## adapters: /path/to/working/directory/adapters.fa #A fasta file contanning a set of various Illumina adaptors (this file is provided and is also available on github) trim_params: "2:40:15" #For further details, see the Trimmomatic documentation threads_trim: 10 #The number of threads to run this process. To be adjusted according to your hardware resources_trim: 150 #Memory according to tools need (in GB) ###################### ### Host filtering ### ###################### host_genome: "yes" #yes or no. An optional step for host-associated samples (eg. termite, human, plant...) threads_bowtie2: 50 #The number of threads to run this process. To be adjusted according to your hardware host_genomes_directory: /path/to/working/host_genomes/ #the directory where the host genome is stored host_genomes: /path/to/working/host_genomes/host_genomes.fa #A fasta file containing the DNA sequences of the host genome(s) threads_samtools: 50 #The number of threads to run this process. To be adjusted according to your hardware resources_host_filtering: 150 #Memory according to tools need (in GB) ################ ### Assembly ### ################ threads_megahit: 50 #The number of threads to run this process. To be adjusted according to your hardware min_contig_len: 1000 #Minimum length (in bp) of the assembled contigs k_list: "21,31,41,51,61,71,81,91,99,109,119" #Kmer size (for further details, see the megahit documentation) resources_megahit: 250 #Memory according to tools need (in GB) ############### ### Binning ### ############### threads_bwa: 50 #The number of threads to run this process. To be adjusted according to your hardware resources_bwa: 150 #Memory according to tools need (in GB) threads_samtools: 50 #The number of threads to run this process. To be adjusted according to your hardware resources_samtools: 150 #Memory according to tools need (in GB) seed: 19860615 #Seed number for reproducible results threads_metabat: 50 #The number of threads to run this process. To be adjusted according to your hardware minContig: 2500 #Minimum length (in bp) of the contigs resources_binning: 250 #Memory according to tools need (in GB) #################### ### Bins quality ### #################### #checkM threads_checkm: 50 #The number of threads to run this process. To be adjusted according to your hardware resources_checkm: 250 #Memory according to tools need (in GB) #bins_quality_filtering completion: 50 #The minimum completion rate of bins contamination: 10 #The maximum contamination rate of bins parks_quality_score: "yes" #yes or no. If yes bins are filtered according to the Parks quality score (completion-5*contamination >= 50) #GUNC gunc: "yes" #yes or no. An optional step to detect and discard chimeric and contaminated genomes using the GUNC tool threads_gunc: 50 #The number of threads to run this process. To be adjusted according to your hardware resources_gunc: 250 #Memory according to tools need (in GB) GUNC_db: /path/to/GUNC_DB/gunc_db_progenomes2.1.dmnd #Path to the downloaded GUNC database (see the readme file) ###################### ### Classification ### ###################### GTDB_data_ref: /path/to/downloaded/GTDB #Path to uncompressed GTDB-Tk reference data (GTDB) threads_gtdb: 10 #The number of threads to run this process. To be adjusted according to your hardware resources_gtdb: 250 #Memory according to tools need (in GB) ################## ### Abundances ### ################## threads_coverM: 10 #The number of threads to run this process. To be adjusted according to your hardware resources_coverM: 150 #Memory according to tools need (in GB) ``` # Run SnakeMAGs If you are using a workstation with Ubuntu (tested on Ubuntu 22.04): ```{bash} snakemake --cores 30 --snakefile SnakeMAGs.smk --use-conda --conda-prefix /path/to/SnakeMAGs_conda_env/ --configfile /path/to/config.yaml --keep-going --latency-wait 180 ``` If you are working on a cluster with Slurm (tested with version 18.08.7): ```{bash} snakemake --snakefile SnakeMAGs.smk --cluster 'sbatch -p --mem -c -o "cluster_logs/{wildcards}.{rule}.{jobid}.out" -e "cluster_logs/{wildcards}.{rule}.{jobid}.err" ' --jobs --use-conda --conda-frontend conda --conda-prefix /path/to/SnakeMAGs_conda_env/ --jobname "{rule}.{wildcards}.{jobid}" --latency-wait 180 --configfile /path/to/config.yaml --keep-going ``` If you are working on a cluster with SGE (tested with version 8.1.9): ```{bash} snakemake --snakefile SnakeMAGs.smk --cluster "qsub -cwd -V -q -pe thread {threads} -e cluster_logs/{rule}.e{jobid} -o cluster_logs/{rule}.o{jobid}" --jobs --use-conda --conda-frontend conda --conda-prefix /path/to/SnakeMAGs_conda_env/ --jobname "{rule}.{wildcards}.{jobid}" --latency-wait 180 --configfile /path/to/config.yaml --keep-going ``` # Test We provide you a small data set in the [test](https://github.com/Nachida08/SnakeMAGs/tree/main/test) directory which will allow you to validate your instalation and take your first steps with SnakeMAGs. This data set is a subset from [ZymoBiomics Mock Community](https://www.zymoresearch.com/blogs/blog/zymobiomics-microbial-standards-optimize-your-microbiomics-workflow) (250K reads) used in this tutoriel [metagenomics_tutorial](https://github.com/pjtorres/metagenomics_tutorial). 1. Before getting started make sure you have cloned the SnakeMAGs repository or you have downloaded all the necessary files (SnakeMAGs.smk, config.yaml, chr19.fa.gz, insub732_2_R1.fastq.gz, insub732_2_R2.fastq.gz). See the [SnakeMAGs executable](#snakemags-executable) section. 2. Unzip the fastq files and the host sequences file. ``` gunzip fastqs/insub732_2_R1.fastq.gz fastqs/insub732_2_R2.fastq.gz host_genomes/chr19.fa.gz ``` 3. For better organisation put all the read files in the same directory (eg. fastqs) and the host sequences file in a separate directory (eg. host_genomes) 4. Edit the config file (see [Edit config file](#edit-config-file) section) 5. Run the test (see [Run SnakeMAGs](#run-snakemags) section) Note: the analysis of these files took 1159.32 secondes to complete on a Ubuntu 22.04 LTS with an Intel(R) Xeon(R) Silver 4210 CPU @ 2.20GHz x 40 processor, 96GB of RAM. # Genome reference for host reads filtering For host-associated samples, one can remove host sequences from the metagenomic reads by mapping these reads against a reference genome. In the case of termite gut metagenomes, we are providing [here](https://zenodo.org/record/6908287#.YuAdFXZBx8M) the relevant files (fasta and index files) from termite genomes. Upon request, we can help you to generate these files for your own reference genome and make them available to the community. NB. These steps of mapping generate voluminous files such as .bam and .sam. Depending on your disk space, you might want to delete these files after use. # Use case During the test phase of the development of SnakeMAGs, we used this workflow to process 10 publicly available termite gut metagenomes generated by Illumina sequencing, to ultimately reconstruct prokaryotic MAGs. These metagenomes were retrieved from the NCBI database using the following accession numbers: SRR10402454; SRR14739927; SRR8296321; SRR8296327; SRR8296329; SRR8296337; SRR8296343; DRR097505; SRR7466794; SRR7466795. They come from five different studies: Waidele et al, 2019; Tokuda et al, 2018; Romero Victorica et al, 2020; Moreira et al, 2021; and Calusinska et al, 2020. ## Download the Illumina pair-end reads We use fasterq-dump tool to extract data in FASTQ-format from SRA-accessions. It is a commandline-tool which offers a faster solution for downloading those large files. ``` # Install and activate sra-tools environment ## Note: For this study we used sra-tools 2.11.0 conda activate conda install -c bioconda sra-tools conda activate sra-tools # Download fastqs in a single directory mkdir raw_fastq cd raw_fastq fasterq-dump --threads --skip-technical --split-3 ``` ## Download Genome reference for host reads filtering ``` mkdir host_genomes cd host_genomes wget https://zenodo.org/record/6908287/files/termite_genomes.fasta.gz gunzip termite_genomes.fasta.gz ``` ## Edit the config file See [Edit config file](#edit-config-file) section. ## Run SnakeMAGs ``` conda activate snakemake_7.0.0 mkdir cluster_logs snakemake --snakefile SnakeMAGs.smk --cluster 'sbatch -p --mem -c -o "cluster_logs/{wildcards}.{rule}.{jobid}.out" -e "cluster_logs/{wildcards}.{rule}.{jobid}.err" ' --jobs --use-conda --conda-frontend conda --conda-prefix /path/to/SnakeMAGs_conda_env/ --jobname "{rule}.{wildcards}.{jobid}" --latency-wait 180 --configfile /path/to/config.yaml --keep-going ``` ## Study results The MAGs reconstructed from each metagenome and their taxonomic classification are available in this [repository](https://doi.org/10.5281/zenodo.7661004). # Citations If you use SnakeMAGs, please cite: > Tadrent N, Dedeine F and Hervé V. SnakeMAGs: a simple, efficient, flexible and scalable workflow to reconstruct prokaryotic genomes from metagenomes [version 2; peer review: 2 approved]. F1000Research 2023, 11:1522 (https://doi.org/10.12688/f1000research.128091.2) Please also cite the dependencies: - [Snakemake](https://doi.org/10.12688/f1000research.29032.2) : Mölder, F., Jablonski, K. P., Letcher, B., Hall, M. B., Tomkins-tinch, C. H., Sochat, V., Forster, J., Lee, S., Twardziok, S. O., Kanitz, A., Wilm, A., Holtgrewe, M., Rahmann, S., Nahnsen, S., & Köster, J. (2021) Sustainable data analysis with Snakemake [version 2; peer review: 2 approved]. *F1000Research* 2021, 10:33. - [illumina-utils](https://doi.org/10.1371/journal.pone.0066643) : Murat Eren, A., Vineis, J. H., Morrison, H. G., & Sogin, M. L. (2013). A Filtering Method to Generate High Quality Short Reads Using Illumina Paired-End Technology. *PloS ONE*, 8(6), e66643. - [Trimmomatic](https://doi.org/10.1093/bioinformatics/btu170) : Bolger, A. M., Lohse, M., & Usadel, B. (2014). Genome analysis Trimmomatic: a flexible trimmer for Illumina sequence data. *Bioinformatics*, 30(15), 2114-2120. - [Bowtie2](https://doi.org/10.1038/nmeth.1923) : Langmead, B., & Salzberg, S. L. (2012). Fast gapped-read alignment with Bowtie 2. *Nature Methods*, 9(4), 357–359. - [SAMtools](https://doi.org/10.1093/bioinformatics/btp352) : Li, H., Handsaker, B., Wysoker, A., Fennell, T., Ruan, J., Homer, N., Marth, G., Abecasis, G., & Durbin, R. (2009). The Sequence Alignment/Map format and SAMtools. *Bioinformatics*, 25(16), 2078–2079. - [BEDtools](https://doi.org/10.1093/bioinformatics/btq033) : Quinlan, A. R., & Hall, I. M. (2010). BEDTools: A flexible suite of utilities for comparing genomic features. *Bioinformatics*, 26(6), 841–842. - [MEGAHIT](https://doi.org/10.1093/bioinformatics/btv033) : Li, D., Liu, C. M., Luo, R., Sadakane, K., & Lam, T. W. (2015). MEGAHIT: An ultra-fast single-node solution for large and complex metagenomics assembly via succinct de Bruijn graph. *Bioinformatics*, 31(10), 1674–1676. - [bwa](https://doi.org/10.1093/bioinformatics/btp324) : Li, H., & Durbin, R. (2009). Fast and accurate short read alignment with Burrows-Wheeler transform. *Bioinformatics*, 25(14), 1754–1760. - [MetaBAT2](https://doi.org/10.7717/peerj.7359) : Kang, D. D., Li, F., Kirton, E., Thomas, A., Egan, R., An, H., & Wang, Z. (2019). MetaBAT 2: An adaptive binning algorithm for robust and efficient genome reconstruction from metagenome assemblies. *PeerJ*, 2019(7), 1–13. - [CheckM](https://doi.org/10.1101/gr.186072.114) : Parks, D. H., Imelfort, M., Skennerton, C. T., Hugenholtz, P., & Tyson, G. W. (2015). CheckM: Assessing the quality of microbial genomes recovered from isolates, single cells, and metagenomes. *Genome Research*, 25(7), 1043–1055. - [GTDB-Tk](https://doi.org/10.1093/BIOINFORMATICS/BTAC672) : Chaumeil, P.-A., Mussig, A. J., Hugenholtz, P., Parks, D. H. (2022). GTDB-Tk v2: memory friendly classification with the genome taxonomy database. *Bioinformatics*. - [CoverM](https://github.com/wwood/CoverM) - [Waidele et al, 2019](https://doi.org/10.1101/526038) : Waidele, L., Korb, J., Voolstra, C. R., Dedeine, F., & Staubach, F. (2019). Ecological specificity of the metagenome in a set of lower termite species supports contribution of the microbiome to adaptation of the host. *Animal Microbiome*, 1(1), 1–13. - [Tokuda et al, 2018](https://doi.org/10.1073/pnas.1810550115) : Tokuda, G., Mikaelyan, A., Fukui, C., Matsuura, Y., Watanabe, H., Fujishima, M., & Brune, A. (2018). Fiber-associated spirochetes are major agents of hemicellulose degradation in the hindgut of wood-feeding higher termites. *Proceedings of the National Academy of Sciences of the United States of America*, 115(51), E11996–E12004. - [Romero Victorica et al, 2020](https://doi.org/10.1038/s41598-020-60850-5) : Romero Victorica, M., Soria, M. A., Batista-García, R. A., Ceja-Navarro, J. A., Vikram, S., Ortiz, M., Ontañon, O., Ghio, S., Martínez-Ávila, L., Quintero García, O. J., Etcheverry, C., Campos, E., Cowan, D., Arneodo, J., & Talia, P. M. (2020). Neotropical termite microbiomes as sources of novel plant cell wall degrading enzymes. *Scientific Reports*, 10(1), 1–14. - [Moreira et al, 2021](https://doi.org/10.3389/fevo.2021.632590) : Moreira, E. A., Persinoti, G. F., Menezes, L. R., Paixão, D. A. A., Alvarez, T. M., Cairo, J. P. L. F., Squina, F. M., Costa-Leonardo, A. M., Rodrigues, A., Sillam-Dussès, D., & Arab, A. (2021). Complementary contribution of Fungi and Bacteria to lignocellulose digestion in the food stored by a neotropical higher termite. *Frontiers in Ecology and Evolution*, 9(April), 1–12. - [Calusinska et al, 2020](https://doi.org/10.1038/s42003-020-1004-3) : Calusinska, M., Marynowska, M., Bertucci, M., Untereiner, B., Klimek, D., Goux, X., Sillam-Dussès, D., Gawron, P., Halder, R., Wilmes, P., Ferrer, P., Gerin, P., Roisin, Y., & Delfosse, P. (2020). Integrative omics analysis of the termite gut system adaptation to Miscanthus diet identifies lignocellulose degradation enzymes. *Communications Biology*, 3(1), 1–12. - [Orakov et al, 2021](https://doi.org/10.1186/s13059-021-02393-0) : Orakov, A., Fullam, A., Coelho, L. P., Khedkar, S., Szklarczyk, D., Mende, D. R., Schmidt, T. S. B., & Bork, P. (2021). GUNC: detection of chimerism and contamination in prokaryotic genomes. *Genome Biology*, 22(1). - [Parks et al, 2015](https://doi.org/10.1101/gr.186072.114) : Parks, D. H., Imelfort, M., Skennerton, C. T., Hugenholtz, P., & Tyson, G. W. (2015). CheckM: Assessing the quality of microbial genomes recovered from isolates, single cells, and metagenomes. *Genome Research*, 25(7), 1043–1055. # License This project is licensed under the CeCILL License - see the [LICENSE](https://github.com/Nachida08/SnakeMAGs/blob/main/LICENCE) file for details. Developed by Nachida Tadrent at the Insect Biology Research Institute ([IRBI](https://irbi.univ-tours.fr/)), under the supervision of Franck Dedeine and Vincent Hervé. " assertion.
- b1322e11-1226-4817-8a5e-a283a8def83a description "[](https://snakemake.readthedocs.io) # About SnakeMAGs SnakeMAGs is a workflow to reconstruct prokaryotic genomes from metagenomes. The main purpose of SnakeMAGs is to process Illumina data from raw reads to metagenome-assembled genomes (MAGs). SnakeMAGs is efficient, easy to handle and flexible to different projects. The workflow is CeCILL licensed, implemented in Snakemake (run on multiple cores) and available for Linux. SnakeMAGs performed eight main steps: - Quality filtering of the reads - Adapter trimming - Filtering of the host sequences (optional) - Assembly - Binning - Evaluation of the quality of the bins - Classification of the MAGs - Estimation of the relative abundance of the MAGs  # How to use SnakeMAGs ## Install conda The easiest way to install and run SnakeMAGs is to use [conda](https://www.anaconda.com/products/distribution). These package managers will help you to easily install [Snakemake](https://snakemake.readthedocs.io/en/stable/getting_started/installation.html). ## Install and activate Snakemake environment Note: The workflow was developed with Snakemake 7.0.0 ``` conda activate # First, set up your channel priorities conda config --add channels defaults conda config --add channels bioconda conda config --add channels conda-forge # Then, create a new environment for the Snakemake version you require conda create -n snakemake_7.0.0 snakemake=7.0.0 # And activate it conda activate snakemake_7.0.0 ``` Alternatively, you can also install Snakemake via mamba: ``` # If you do not have mamba yet on your machine, you can install it with: conda install -n base -c conda-forge mamba # Then you can install Snakemake conda activate base mamba create -c conda-forge -c bioconda -n snakemake snakemake # And activate it conda activate snakemake ``` ## SnakeMAGs executable The easiest way to procure SnakeMAGs and its related files is to clone the repository using git: ``` git clone https://github.com/Nachida08/SnakeMAGs.git ``` Alternatively, you can download the relevant files: ``` wget https://github.com/Nachida08/SnakeMAGs/blob/main/SnakeMAGs.smk https://github.com/Nachida08/SnakeMAGs/blob/main/config.yaml ``` ## SnakeMAGs input files - Illumina paired-end reads in FASTQ. - Adapter sequence file ([adapter.fa](https://github.com/Nachida08/SnakeMAGs/blob/main/adapters.fa)). - Host genome sequences in FASTA (if host_genome: "yes"), in case you work with host-associated metagenomes (e.g. human gut metagenome). ## Download Genome Taxonomy Database (GTDB) GTDB-Tk requires ~66G+ of external data (GTDB) that need to be downloaded and unarchived. Because this database is voluminous, we let you decide where you want to store it. SnakeMAGs do not download automatically GTDB, you have to do it: ``` #Download the latest release (tested with release207) #Note: SnakeMAGs uses GTDBtk v2.1.0 and therefore require release 207 as minimum version. See https://ecogenomics.github.io/GTDBTk/installing/index.html#installing for details. wget https://data.gtdb.ecogenomic.org/releases/latest/auxillary_files/gtdbtk_v2_data.tar.gz #Decompress tar -xzvf *tar.gz #This will create a folder called release207_v2 ``` All you have to do now is to indicate the path to the database folder (in our example, the folder is called release207_v2) in the config file, Classification section. ## Download the GUNC database (required if gunc: "yes") GUNC accepts either a progenomes or GTDB based reference database. Both can be downloaded using the ```gunc download_db``` command. For our study we used the default proGenome-derived GUNC database. It requires less resources with similar performance. ``` conda activate # Install and activate GUNC environment conda create --prefix /path/to/gunc_env conda install -c bioconda metabat2 --prefix /path/to/gunc_env source activate /path/to/gunc_env #Download the proGenome-derived GUNC database (tested with gunc_db_progenomes2.1) #Note: SnakeMAGs uses GUNC v1.0.5 gunc download_db -db progenomes /path/to/GUNC_DB ``` All you have to do now is to indicate the path to the GUNC database file in the config file, Bins quality section. ## Edit config file You need to edit the config.yaml file. In particular, you need to set the correct paths: for the working directory, to specify where are your fastq files, where you want to place the conda environments (that will be created using the provided .yaml files available in [SnakeMAGs_conda_env directory](https://github.com/Nachida08/SnakeMAGs/tree/main/SnakeMAGs_conda_env)), where are the adapters, where is GTDB and optionally where is the GUNC database and where is your host genome reference. Lastly, you need to allocate the proper computational resources (threads, memory) for each of the main steps. These can be optimized according to your hardware. Here is an example of a config file: ``` ##################################################################################################### ##### _____ ___ _ _ _ ______ __ __ _______ _____ ##### ##### / ___| | \ | | /\ | | / / | ____| | \ / | /\ / _____| / ___| ##### ##### | (___ | |\ \ | | / \ | |/ / | |____ | \/ | / \ | | __ | (___ ##### ##### \___ \ | | \ \| | / /\ \ | |\ \ | ____| | |\ /| | / /\ \ | | |_ | \___ \ ##### ##### ____) | | | \ | / /__\ \ | | \ \ | |____ | | \/ | | / /__\ \ | |____|| ____) | ##### ##### |_____/ |_| \__| /_/ \_\ |_| \_\ |______| |_| |_| /_/ \_\ \______/ |_____/ ##### ##### ##### ##################################################################################################### ############################ ### Execution parameters ### ############################ working_dir: /path/to/working/directory/ #The main directory for the project raw_fastq: /path/to/raw_fastq/ #The directory that contains all the fastq files of all the samples (eg. sample1_R1.fastq & sample1_R2.fastq, sample2_R1.fastq & sample2_R2.fastq...) suffix_1: "_R1.fastq" #Main type of suffix for forward reads file (eg. _1.fastq or _R1.fastq or _r1.fastq or _1.fq or _R1.fq or _r1.fq ) suffix_2: "_R2.fastq" #Main type of suffix for reverse reads file (eg. _2.fastq or _R2.fastq or _r2.fastq or _2.fq or _R2.fq or _r2.fq ) ########################### ### Conda environnemnts ### ########################### conda_env: "/path/to/SnakeMAGs_conda_env/" #Path to the provided SnakeMAGs_conda_env directory which contains the yaml file for each conda environment ######################### ### Quality filtering ### ######################### email: name.surname@your-univ.com #Your e-mail address threads_filter: 10 #The number of threads to run this process. To be adjusted according to your hardware resources_filter: 150 #Memory according to tools need (in GB) ######################## ### Adapter trimming ### ######################## adapters: /path/to/working/directory/adapters.fa #A fasta file contanning a set of various Illumina adaptors (this file is provided and is also available on github) trim_params: "2:40:15" #For further details, see the Trimmomatic documentation threads_trim: 10 #The number of threads to run this process. To be adjusted according to your hardware resources_trim: 150 #Memory according to tools need (in GB) ###################### ### Host filtering ### ###################### host_genome: "yes" #yes or no. An optional step for host-associated samples (eg. termite, human, plant...) threads_bowtie2: 50 #The number of threads to run this process. To be adjusted according to your hardware host_genomes_directory: /path/to/working/host_genomes/ #the directory where the host genome is stored host_genomes: /path/to/working/host_genomes/host_genomes.fa #A fasta file containing the DNA sequences of the host genome(s) threads_samtools: 50 #The number of threads to run this process. To be adjusted according to your hardware resources_host_filtering: 150 #Memory according to tools need (in GB) ################ ### Assembly ### ################ threads_megahit: 50 #The number of threads to run this process. To be adjusted according to your hardware min_contig_len: 1000 #Minimum length (in bp) of the assembled contigs k_list: "21,31,41,51,61,71,81,91,99,109,119" #Kmer size (for further details, see the megahit documentation) resources_megahit: 250 #Memory according to tools need (in GB) ############### ### Binning ### ############### threads_bwa: 50 #The number of threads to run this process. To be adjusted according to your hardware resources_bwa: 150 #Memory according to tools need (in GB) threads_samtools: 50 #The number of threads to run this process. To be adjusted according to your hardware resources_samtools: 150 #Memory according to tools need (in GB) seed: 19860615 #Seed number for reproducible results threads_metabat: 50 #The number of threads to run this process. To be adjusted according to your hardware minContig: 2500 #Minimum length (in bp) of the contigs resources_binning: 250 #Memory according to tools need (in GB) #################### ### Bins quality ### #################### #checkM threads_checkm: 50 #The number of threads to run this process. To be adjusted according to your hardware resources_checkm: 250 #Memory according to tools need (in GB) #bins_quality_filtering completion: 50 #The minimum completion rate of bins contamination: 10 #The maximum contamination rate of bins parks_quality_score: "yes" #yes or no. If yes bins are filtered according to the Parks quality score (completion-5*contamination >= 50) #GUNC gunc: "yes" #yes or no. An optional step to detect and discard chimeric and contaminated genomes using the GUNC tool threads_gunc: 50 #The number of threads to run this process. To be adjusted according to your hardware resources_gunc: 250 #Memory according to tools need (in GB) GUNC_db: /path/to/GUNC_DB/gunc_db_progenomes2.1.dmnd #Path to the downloaded GUNC database (see the readme file) ###################### ### Classification ### ###################### GTDB_data_ref: /path/to/downloaded/GTDB #Path to uncompressed GTDB-Tk reference data (GTDB) threads_gtdb: 10 #The number of threads to run this process. To be adjusted according to your hardware resources_gtdb: 250 #Memory according to tools need (in GB) ################## ### Abundances ### ################## threads_coverM: 10 #The number of threads to run this process. To be adjusted according to your hardware resources_coverM: 150 #Memory according to tools need (in GB) ``` # Run SnakeMAGs If you are using a workstation with Ubuntu (tested on Ubuntu 22.04): ```{bash} snakemake --cores 30 --snakefile SnakeMAGs.smk --use-conda --conda-prefix /path/to/SnakeMAGs_conda_env/ --configfile /path/to/config.yaml --keep-going --latency-wait 180 ``` If you are working on a cluster with Slurm (tested with version 18.08.7): ```{bash} snakemake --snakefile SnakeMAGs.smk --cluster 'sbatch -p --mem -c -o "cluster_logs/{wildcards}.{rule}.{jobid}.out" -e "cluster_logs/{wildcards}.{rule}.{jobid}.err" ' --jobs --use-conda --conda-frontend conda --conda-prefix /path/to/SnakeMAGs_conda_env/ --jobname "{rule}.{wildcards}.{jobid}" --latency-wait 180 --configfile /path/to/config.yaml --keep-going ``` If you are working on a cluster with SGE (tested with version 8.1.9): ```{bash} snakemake --snakefile SnakeMAGs.smk --cluster "qsub -cwd -V -q -pe thread {threads} -e cluster_logs/{rule}.e{jobid} -o cluster_logs/{rule}.o{jobid}" --jobs --use-conda --conda-frontend conda --conda-prefix /path/to/SnakeMAGs_conda_env/ --jobname "{rule}.{wildcards}.{jobid}" --latency-wait 180 --configfile /path/to/config.yaml --keep-going ``` # Test We provide you a small data set in the [test](https://github.com/Nachida08/SnakeMAGs/tree/main/test) directory which will allow you to validate your instalation and take your first steps with SnakeMAGs. This data set is a subset from [ZymoBiomics Mock Community](https://www.zymoresearch.com/blogs/blog/zymobiomics-microbial-standards-optimize-your-microbiomics-workflow) (250K reads) used in this tutoriel [metagenomics_tutorial](https://github.com/pjtorres/metagenomics_tutorial). 1. Before getting started make sure you have cloned the SnakeMAGs repository or you have downloaded all the necessary files (SnakeMAGs.smk, config.yaml, chr19.fa.gz, insub732_2_R1.fastq.gz, insub732_2_R2.fastq.gz). See the [SnakeMAGs executable](#snakemags-executable) section. 2. Unzip the fastq files and the host sequences file. ``` gunzip fastqs/insub732_2_R1.fastq.gz fastqs/insub732_2_R2.fastq.gz host_genomes/chr19.fa.gz ``` 3. For better organisation put all the read files in the same directory (eg. fastqs) and the host sequences file in a separate directory (eg. host_genomes) 4. Edit the config file (see [Edit config file](#edit-config-file) section) 5. Run the test (see [Run SnakeMAGs](#run-snakemags) section) Note: the analysis of these files took 1159.32 secondes to complete on a Ubuntu 22.04 LTS with an Intel(R) Xeon(R) Silver 4210 CPU @ 2.20GHz x 40 processor, 96GB of RAM. # Genome reference for host reads filtering For host-associated samples, one can remove host sequences from the metagenomic reads by mapping these reads against a reference genome. In the case of termite gut metagenomes, we are providing [here](https://zenodo.org/record/6908287#.YuAdFXZBx8M) the relevant files (fasta and index files) from termite genomes. Upon request, we can help you to generate these files for your own reference genome and make them available to the community. NB. These steps of mapping generate voluminous files such as .bam and .sam. Depending on your disk space, you might want to delete these files after use. # Use case During the test phase of the development of SnakeMAGs, we used this workflow to process 10 publicly available termite gut metagenomes generated by Illumina sequencing, to ultimately reconstruct prokaryotic MAGs. These metagenomes were retrieved from the NCBI database using the following accession numbers: SRR10402454; SRR14739927; SRR8296321; SRR8296327; SRR8296329; SRR8296337; SRR8296343; DRR097505; SRR7466794; SRR7466795. They come from five different studies: Waidele et al, 2019; Tokuda et al, 2018; Romero Victorica et al, 2020; Moreira et al, 2021; and Calusinska et al, 2020. ## Download the Illumina pair-end reads We use fasterq-dump tool to extract data in FASTQ-format from SRA-accessions. It is a commandline-tool which offers a faster solution for downloading those large files. ``` # Install and activate sra-tools environment ## Note: For this study we used sra-tools 2.11.0 conda activate conda install -c bioconda sra-tools conda activate sra-tools # Download fastqs in a single directory mkdir raw_fastq cd raw_fastq fasterq-dump --threads --skip-technical --split-3 ``` ## Download Genome reference for host reads filtering ``` mkdir host_genomes cd host_genomes wget https://zenodo.org/record/6908287/files/termite_genomes.fasta.gz gunzip termite_genomes.fasta.gz ``` ## Edit the config file See [Edit config file](#edit-config-file) section. ## Run SnakeMAGs ``` conda activate snakemake_7.0.0 mkdir cluster_logs snakemake --snakefile SnakeMAGs.smk --cluster 'sbatch -p --mem -c -o "cluster_logs/{wildcards}.{rule}.{jobid}.out" -e "cluster_logs/{wildcards}.{rule}.{jobid}.err" ' --jobs --use-conda --conda-frontend conda --conda-prefix /path/to/SnakeMAGs_conda_env/ --jobname "{rule}.{wildcards}.{jobid}" --latency-wait 180 --configfile /path/to/config.yaml --keep-going ``` ## Study results The MAGs reconstructed from each metagenome and their taxonomic classification are available in this [repository](https://doi.org/10.5281/zenodo.7661004). # Citations If you use SnakeMAGs, please cite: > Tadrent N, Dedeine F and Hervé V. SnakeMAGs: a simple, efficient, flexible and scalable workflow to reconstruct prokaryotic genomes from metagenomes [version 2; peer review: 2 approved]. F1000Research 2023, 11:1522 (https://doi.org/10.12688/f1000research.128091.2) Please also cite the dependencies: - [Snakemake](https://doi.org/10.12688/f1000research.29032.2) : Mölder, F., Jablonski, K. P., Letcher, B., Hall, M. B., Tomkins-tinch, C. H., Sochat, V., Forster, J., Lee, S., Twardziok, S. O., Kanitz, A., Wilm, A., Holtgrewe, M., Rahmann, S., Nahnsen, S., & Köster, J. (2021) Sustainable data analysis with Snakemake [version 2; peer review: 2 approved]. *F1000Research* 2021, 10:33. - [illumina-utils](https://doi.org/10.1371/journal.pone.0066643) : Murat Eren, A., Vineis, J. H., Morrison, H. G., & Sogin, M. L. (2013). A Filtering Method to Generate High Quality Short Reads Using Illumina Paired-End Technology. *PloS ONE*, 8(6), e66643. - [Trimmomatic](https://doi.org/10.1093/bioinformatics/btu170) : Bolger, A. M., Lohse, M., & Usadel, B. (2014). Genome analysis Trimmomatic: a flexible trimmer for Illumina sequence data. *Bioinformatics*, 30(15), 2114-2120. - [Bowtie2](https://doi.org/10.1038/nmeth.1923) : Langmead, B., & Salzberg, S. L. (2012). Fast gapped-read alignment with Bowtie 2. *Nature Methods*, 9(4), 357–359. - [SAMtools](https://doi.org/10.1093/bioinformatics/btp352) : Li, H., Handsaker, B., Wysoker, A., Fennell, T., Ruan, J., Homer, N., Marth, G., Abecasis, G., & Durbin, R. (2009). The Sequence Alignment/Map format and SAMtools. *Bioinformatics*, 25(16), 2078–2079. - [BEDtools](https://doi.org/10.1093/bioinformatics/btq033) : Quinlan, A. R., & Hall, I. M. (2010). BEDTools: A flexible suite of utilities for comparing genomic features. *Bioinformatics*, 26(6), 841–842. - [MEGAHIT](https://doi.org/10.1093/bioinformatics/btv033) : Li, D., Liu, C. M., Luo, R., Sadakane, K., & Lam, T. W. (2015). MEGAHIT: An ultra-fast single-node solution for large and complex metagenomics assembly via succinct de Bruijn graph. *Bioinformatics*, 31(10), 1674–1676. - [bwa](https://doi.org/10.1093/bioinformatics/btp324) : Li, H., & Durbin, R. (2009). Fast and accurate short read alignment with Burrows-Wheeler transform. *Bioinformatics*, 25(14), 1754–1760. - [MetaBAT2](https://doi.org/10.7717/peerj.7359) : Kang, D. D., Li, F., Kirton, E., Thomas, A., Egan, R., An, H., & Wang, Z. (2019). MetaBAT 2: An adaptive binning algorithm for robust and efficient genome reconstruction from metagenome assemblies. *PeerJ*, 2019(7), 1–13. - [CheckM](https://doi.org/10.1101/gr.186072.114) : Parks, D. H., Imelfort, M., Skennerton, C. T., Hugenholtz, P., & Tyson, G. W. (2015). CheckM: Assessing the quality of microbial genomes recovered from isolates, single cells, and metagenomes. *Genome Research*, 25(7), 1043–1055. - [GTDB-Tk](https://doi.org/10.1093/BIOINFORMATICS/BTAC672) : Chaumeil, P.-A., Mussig, A. J., Hugenholtz, P., Parks, D. H. (2022). GTDB-Tk v2: memory friendly classification with the genome taxonomy database. *Bioinformatics*. - [CoverM](https://github.com/wwood/CoverM) - [Waidele et al, 2019](https://doi.org/10.1101/526038) : Waidele, L., Korb, J., Voolstra, C. R., Dedeine, F., & Staubach, F. (2019). Ecological specificity of the metagenome in a set of lower termite species supports contribution of the microbiome to adaptation of the host. *Animal Microbiome*, 1(1), 1–13. - [Tokuda et al, 2018](https://doi.org/10.1073/pnas.1810550115) : Tokuda, G., Mikaelyan, A., Fukui, C., Matsuura, Y., Watanabe, H., Fujishima, M., & Brune, A. (2018). Fiber-associated spirochetes are major agents of hemicellulose degradation in the hindgut of wood-feeding higher termites. *Proceedings of the National Academy of Sciences of the United States of America*, 115(51), E11996–E12004. - [Romero Victorica et al, 2020](https://doi.org/10.1038/s41598-020-60850-5) : Romero Victorica, M., Soria, M. A., Batista-García, R. A., Ceja-Navarro, J. A., Vikram, S., Ortiz, M., Ontañon, O., Ghio, S., Martínez-Ávila, L., Quintero García, O. J., Etcheverry, C., Campos, E., Cowan, D., Arneodo, J., & Talia, P. M. (2020). Neotropical termite microbiomes as sources of novel plant cell wall degrading enzymes. *Scientific Reports*, 10(1), 1–14. - [Moreira et al, 2021](https://doi.org/10.3389/fevo.2021.632590) : Moreira, E. A., Persinoti, G. F., Menezes, L. R., Paixão, D. A. A., Alvarez, T. M., Cairo, J. P. L. F., Squina, F. M., Costa-Leonardo, A. M., Rodrigues, A., Sillam-Dussès, D., & Arab, A. (2021). Complementary contribution of Fungi and Bacteria to lignocellulose digestion in the food stored by a neotropical higher termite. *Frontiers in Ecology and Evolution*, 9(April), 1–12. - [Calusinska et al, 2020](https://doi.org/10.1038/s42003-020-1004-3) : Calusinska, M., Marynowska, M., Bertucci, M., Untereiner, B., Klimek, D., Goux, X., Sillam-Dussès, D., Gawron, P., Halder, R., Wilmes, P., Ferrer, P., Gerin, P., Roisin, Y., & Delfosse, P. (2020). Integrative omics analysis of the termite gut system adaptation to Miscanthus diet identifies lignocellulose degradation enzymes. *Communications Biology*, 3(1), 1–12. - [Orakov et al, 2021](https://doi.org/10.1186/s13059-021-02393-0) : Orakov, A., Fullam, A., Coelho, L. P., Khedkar, S., Szklarczyk, D., Mende, D. R., Schmidt, T. S. B., & Bork, P. (2021). GUNC: detection of chimerism and contamination in prokaryotic genomes. *Genome Biology*, 22(1). - [Parks et al, 2015](https://doi.org/10.1101/gr.186072.114) : Parks, D. H., Imelfort, M., Skennerton, C. T., Hugenholtz, P., & Tyson, G. W. (2015). CheckM: Assessing the quality of microbial genomes recovered from isolates, single cells, and metagenomes. *Genome Research*, 25(7), 1043–1055. # License This project is licensed under the CeCILL License - see the [LICENSE](https://github.com/Nachida08/SnakeMAGs/blob/main/LICENCE) file for details. Developed by Nachida Tadrent at the Insect Biology Research Institute ([IRBI](https://irbi.univ-tours.fr/)), under the supervision of Franck Dedeine and Vincent Hervé." assertion.
- 99f82558-26e6-4c3b-9282-e50d172dee93 description "# Macromolecular Coarse-Grained Flexibility (FlexServ) tutorial using BioExcel Building Blocks (biobb) This tutorial aims to illustrate the process of generating protein conformational ensembles from 3D structures and analysing its molecular flexibility, step by step, using the BioExcel Building Blocks library (biobb). *** ## Copyright & Licensing This software has been developed in the [MMB group](http://mmb.irbbarcelona.org) at the [BSC](http://www.bsc.es/) & [IRB](https://www.irbbarcelona.org/) for the [European BioExcel](http://bioexcel.eu/), funded by the European Commission (EU H2020 [823830](http://cordis.europa.eu/projects/823830), EU H2020 [675728](http://cordis.europa.eu/projects/675728)). * (c) 2015-2023 [Barcelona Supercomputing Center](https://www.bsc.es/) * (c) 2015-2023 [Institute for Research in Biomedicine](https://www.irbbarcelona.org/) Licensed under the [Apache License 2.0](https://www.apache.org/licenses/LICENSE-2.0), see the file LICENSE for details. " assertion.
- 4e5a4359-d246-4e33-938a-40940b1fe9aa description "# Macromolecular Coarse-Grained Flexibility (FlexServ) tutorial using BioExcel Building Blocks (biobb) This tutorial aims to illustrate the process of generating protein conformational ensembles from 3D structures and analysing its molecular flexibility, step by step, using the BioExcel Building Blocks library (biobb). *** ## Copyright & Licensing This software has been developed in the [MMB group](http://mmb.irbbarcelona.org) at the [BSC](http://www.bsc.es/) & [IRB](https://www.irbbarcelona.org/) for the [European BioExcel](http://bioexcel.eu/), funded by the European Commission (EU H2020 [823830](http://cordis.europa.eu/projects/823830), EU H2020 [675728](http://cordis.europa.eu/projects/675728)). * (c) 2015-2023 [Barcelona Supercomputing Center](https://www.bsc.es/) * (c) 2015-2023 [Institute for Research in Biomedicine](https://www.irbbarcelona.org/) Licensed under the [Apache License 2.0](https://www.apache.org/licenses/LICENSE-2.0), see the file LICENSE for details. " assertion.
- 5a22516f-8ab0-412a-b9c0-cdd64dfa01db description "# Protein Conformational Transitions calculations tutorial using BioExcel Building Blocks (biobb) and GOdMD This tutorial aims to illustrate the process of computing a conformational transition between two known structural conformations of a protein, step by step, using the BioExcel Building Blocks library (biobb). *** ## Copyright & Licensing This software has been developed in the [MMB group](http://mmb.irbbarcelona.org) at the [BSC](http://www.bsc.es/) & [IRB](https://www.irbbarcelona.org/) for the [European BioExcel](http://bioexcel.eu/), funded by the European Commission (EU H2020 [823830](http://cordis.europa.eu/projects/823830), EU H2020 [675728](http://cordis.europa.eu/projects/675728)). * (c) 2015-2023 [Barcelona Supercomputing Center](https://www.bsc.es/) * (c) 2015-2023 [Institute for Research in Biomedicine](https://www.irbbarcelona.org/) Licensed under the [Apache License 2.0](https://www.apache.org/licenses/LICENSE-2.0), see the file LICENSE for details. " assertion.
- ba0c3a65-210e-4dc4-8f0a-c80ded0a3d5f description "# Protein Conformational Transitions calculations tutorial using BioExcel Building Blocks (biobb) and GOdMD This tutorial aims to illustrate the process of computing a conformational transition between two known structural conformations of a protein, step by step, using the BioExcel Building Blocks library (biobb). *** ## Copyright & Licensing This software has been developed in the [MMB group](http://mmb.irbbarcelona.org) at the [BSC](http://www.bsc.es/) & [IRB](https://www.irbbarcelona.org/) for the [European BioExcel](http://bioexcel.eu/), funded by the European Commission (EU H2020 [823830](http://cordis.europa.eu/projects/823830), EU H2020 [675728](http://cordis.europa.eu/projects/675728)). * (c) 2015-2023 [Barcelona Supercomputing Center](https://www.bsc.es/) * (c) 2015-2023 [Institute for Research in Biomedicine](https://www.irbbarcelona.org/) Licensed under the [Apache License 2.0](https://www.apache.org/licenses/LICENSE-2.0), see the file LICENSE for details. " assertion.
- 892d05bf-da84-4be9-9ab7-60eba5f73c70 description "# GERONIMO ## Introduction GERONIMO is a bioinformatics pipeline designed to conduct high-throughput homology searches of structural genes using covariance models. These models are based on the alignment of sequences and the consensus of secondary structures. The pipeline is built using Snakemake, a workflow management tool that allows for the reproducible execution of analyses on various computational platforms. The idea for developing GERONIMO emerged from a comprehensive search for [telomerase RNA in lower plants] and was subsequently refined through an [expanded search of telomerase RNA across Insecta]. GERONIMO can test hundreds of genomes and ensures the stability and reproducibility of the analyses performed. [telomerase RNA in lower plants]: https://doi.org/10.1093/nar/gkab545 [expanded search of telomerase RNA across Insecta]: https://doi.org/10.1093/nar/gkac1202 ## Scope The GERONIMO tool utilises covariance models (CMs) to conduct homology searches of RNA sequences across a wide range of gene families in a broad evolutionary context. Specifically, it can be utilised to: * Detect RNA sequences that share a common evolutionary ancestor * Identify and align orthologous RNA sequences among closely related species, as well as paralogous sequences within a single species * Identify conserved non-coding RNAs in a genome, and extract upstream genomic regions to characterise potential promoter regions. It is important to note that GERONIMO is a computational tool, and as such, it is intended to be run on a computer with a small amount of data. Appropriate computational infrastructure is necessary for analysing hundreds of genomes. Although GERONIMO was primarily designed for Telomerase RNA identification, its functionality extends to include the detection and alignment of other RNA gene families, including **rRNA**, **tRNA**, **snRNA**, **miRNA**, and **lncRNA**. This can aid in identifying paralogs and orthologs across different species that may carry specific functions, making it useful for phylogenetic analyses. It is crucial to remember that some gene families may exhibit similar characteristics but different functions. Therefore, analysing the data and functional annotation after conducting the search is essential to characterise the sequences properly. ## Pipeline overview By default, the GERONIMO pipeline conducts high-throughput searches of homology sequences in downloaded genomes utilizing covariance models. If a significant similarity is detected between the model and genome sequence, the pipeline extracts the upstream region, making it convenient to identify the promoter of the discovered gene. In brief, the pipeline: - Compiles a list of genomes using the NCBI's [Entrez] database based on a specified query, *e.g. "Rhodophyta"[Organism]* - Downloads and decompresses the requested genomes using *rsync* and *gunzip*, respectively - *Optionally*, generates a covariance model based on a provided alignment using [Infernal] - Conducts searches among the genomes using the covariance model [Infernal] - Supplements genome information with taxonomy data using [rentrez] - Expands the significant hits sequence by extracting upstream genomic regions using [*blastcmd*] - Compiles the results, organizes them into a tabular format, and generates a visual summary of the performed analysis. [Entrez]: https://www.ncbi.nlm.nih.gov/books/NBK179288/ [Infernal]: http://eddylab.org/infernal/ [rentrez]: https://github.com/ropensci/rentrez [*blastcmd*]: https://www.ncbi.nlm.nih.gov/books/NBK569853/ ## Quick start The GERONIMO is available as a `snakemake pipeline` running on Linux and Windows operating systems. ### Windows 10 Instal Linux on Windows 10 (WSL) according to [instructions], which bottling down to opening PowerShell or Windows Command Prompt in *administrator mode* and pasting the following: ```shell wsl --install wsl.exe --install UBUNTU ``` Then restart the machine and follow the instructions for setting up the Linux environment. [instructions]: https://learn.microsoft.com/en-us/windows/wsl/install ### Linux: #### Check whether the conda is installed: ```shell conda -V ``` > GERONIMO was tested on conda 23.3.1 #### 1) If you do not have installed `conda`, please install `miniconda` Please follow the instructions for installing [miniconda] [miniconda]: https://conda.io/projects/conda/en/stable/user-guide/install/linux.html #### 2) Continue with installing `mamba` (recommended but optional) ```shell conda install -n base -c conda-forge mamba ``` #### 3) Install `snakemake` ```shell conda activate base mamba create -p env_snakemake -c conda-forge -c bioconda snakemake mamba activate env_snakemake snakemake --help ``` In case of complications, please check the section `Questions & Answers` below or follow the [official documentation] for troubleshooting. [official documentation]: https://snakemake.readthedocs.io/en/stable/getting_started/installation.html ### Clone the GERONIMO repository Go to the path in which you want to run the analysis and clone the repository: ```shell cd git clone https://github.com/amkilar/GERONIMO.git ``` ### Run sample analysis to ensure GERONIMO installation was successful All files are prepared for the sample analysis as a default. Please execute the line below: ```shell snakemake -s GERONIMO.sm --cores 1 --use-conda results/summary_table.xlsx ``` This will prompt GERONIMO to quickly scan all modules, verifying the correct setup of the pipeline without executing any analysis. You should see the message `Building DAG of jobs...`, followed by `Nothing to be done (all requested files are present and up to date).`, when successfully completed. If you want to run the sample analysis fully, please remove the folder `results` from the GERONIMO directory and execute GERONIMO again with: `snakemake -s GERONIMO.sm --cores 1 --use-conda results/summary_table.xlsx` > You might consider allowing more cores to speed up the analysis, which might take up to several hours. #### You might want to clean `GERONIMO/` directory from the files produced by the example analysis. You can safely remove the following: - `GERONIMO/results` - `GERONIMO/database` - `GERONIMO/taxonomy` - `GERONIMO/temp` - `.create_genome_list.touch` - `list_of_genomes.txt` ## Setup the inputs ### 1) Prepare the `covariance models`: #### Browse the collection of available `covariance models` at [Rfam] (*You can find the covariance model in the tab `Curation`.*) Paste the covariance model to the folder `GERONIMO/models` and ensure its name follows the convention: `cov_model_` [Rfam]: https://rfam.org/ #### **OR** #### Prepare your own `covariance model` using [LocARNA] 1. Paste or upload your sequences to the web server and download the `.stk` file with the alignment result. > *Please note that the `.stk` file format is crucial for the analysis, containing sequence alignment and secondary structure consensus.* > The LocARNA web service allows you to align 30 sequences at once - if you need to align more sequences, please use the standalone version available [here] > After installation run: ```shell mlocarna my_fasta_sequences.fasta ``` 2. Paste the `.stk` alignment file to the folder `GERONIMO/model_to_build` and ensure its name follows the convention: `.stk` > Please check the example `heterotrichea.stk` format in `GERONIMO/models_to_built` for reference [LocARNA]: http://rna.informatik.uni-freiburg.de/LocARNA/Input.jsp [here]: http://www.bioinf.uni-freiburg.de/Software/LocARNA/ ### 2) Adjust the `config.yaml` file Please adjust the analysis specifications, as in the following example: > - database: ' [Organism]' (in case of difficulties with defining the database query, please follow the instructions below) > - extract_genomic_region-length: (here you can determine how long the upstream genomic region should be extracted; tested for 200) > - models: ["", ""] (here specify the names of models that should be used to perform analysis) > > *Here you can also insert the name of the covariance model you want to build with GERONIMO - just be sure you placed `.stk` file in `GERONIMO/models_to_build` before starting analysis* > - CPU_for_model_building: (specify the number of available CPUs devoted to the process of building model (cannot exceed the CPU number allowed to snakemake with `--cores`) > > *You might ignore this parameter when you do not need to create a new covariance model* Keep in mind that the covariance models and alignments must be present in the respective GERONIMO folders. ### 3) Remove folder `results`, which contains example analysis output ### 4) **Please ensure you have enough storage capacity to download all the requested genomes (in the `GERONIMO/` directory)** ## Run GERONIMO ```shell mamba activate env_snakemake cd ~/GERONIMO snakemake -s GERONIMO.sm --cores --use-conda results/summary_table.xlsx ``` ## Example results ### Outputs characterisation #### A) Summary table The Excel table contains the results arranged by taxonomy information and hit significance. The specific columns include: * family, organism_name, class, order, phylum (taxonomy context) * GCA_id - corresponds to the genome assembly in the *NCBI database* * model - describes which covariance model identified the result * label - follows the *Infernal* convention of categorizing hits * number - the counter of the result * e_value - indicates the significance level of the hit * HIT_sequence - the exact HIT sequence found by *Infernal*, which corresponds to the covariance model * HIT_ID - describes in which part of the genome assembly the hit was found, which may help publish novel sequences * extended_genomic_region - upstream sequence, which may contain a possible promoter sequence * secondary_structure - the secondary structure consensus of the covariance model #### B) Significant Hits Distribution Across Taxonomy Families The plot provides an overview of the number of genomes in which at least one significant hit was identified, grouped by family. The bold black line corresponds to the number of genomes present in each family, helping to minimize bias regarding unequal data representation across the taxonomy. #### C) Hits Distribution in Genomes Across Families The heatmap provides information about the most significant hits from the genome, identified by a specific covariance model. Genomes are grouped by families (on the right). Hits are classified into three categories based on their e-values. Generally, these categories correspond to hit classifications ("HIT," "MAYBE," "NO HIT"). The "HIT" category is further divided to distinguish between highly significant hits and moderately significant ones. ### GERONIMO directory structure The GERONIMO directory structure is designed to produce files in a highly structured manner, ensuring clear insight and facilitating the analysis of results. During a successful run, GERONIMO produces the following folders: * `/database` - which contains genome assemblies that were downloaded from the *NCBI database* and grouped in subfolders * `/taxonomy` - where taxonomy information is gathered and stored in the form of tables * `/results` - the main folder containing all produced results: * `/infernal_raw` - contains the raw results produced by *Infernal* * `/infernal` - contains restructured results of *Infernal* in table format * `/cmdBLAST` - contains results of *cmdblast*, which extracts the extended genomic region * `/summary` - contains summary files that join results from *Infernal*, *cmdblast*, and attach taxonomy context * `/plots` - contains two types of summary plots * `/temp` - folder contains the information necessary to download genome assemblies from *NCBI database* * `/env` - stores instructions for dependency installation * `/models` - where calibrated covariance models can be pasted, *for example, from the Rfam database* * `/modes_to_built` - where multiple alignments in *.stk* format can be pasted * `/scripts` - contains developed scripts that perform results structurization #### The example GERONIMO directory structure: ```shell GERONIMO ├── database │ ├── GCA_000091205.1_ASM9120v1_genomic │ ├── GCA_000341285.1_ASM34128v1_genomic │ ├── GCA_000350225.2_ASM35022v2_genomic │ └── ... ├── env ├── models ├── model_to_build ├── results │ ├── cmdBLAST │ │ ├── MRP │ │ │ ├── GCA_000091205.1_ASM9120v1_genomic │ │ │ │ ├── extended │ │ │ │ └── filtered │ │ │ ├── GCA_000341285.1_ASM34128v1_genomic │ │ │ │ ├── extended │ │ │ │ └── filtered │ │ │ ├── GCA_000350225.2_ASM35022v2_genomic │ │ │ │ ├── extended │ │ │ │ └── filtered │ │ │ └── ... │ │ ├── SRP │ │ │ ├── GCA_000091205.1_ASM9120v1_genomic │ │ │ │ ├── extended │ │ │ │ └── filtered │ │ │ ├── GCA_000341285.1_ASM34128v1_genomic │ │ │ │ ├── extended │ │ │ │ └── filtered │ │ │ ├── GCA_000350225.2_ASM35022v2_genomic │ │ │ │ ├── extended │ │ │ │ └── filtered │ │ │ └── ... │ │ ├── ... │ ├── infernal │ │ ├── MRP │ │ │ ├── GCA_000091205.1_ASM9120v1_genomic │ │ │ ├── GCA_000341285.1_ASM34128v1_genomic │ │ │ ├── GCA_000350225.2_ASM35022v2_genomic │ │ │ ├── ... │ │ ├── SRP │ │ │ ├── GCA_000091205.1_ASM9120v1_genomic │ │ │ ├── GCA_000341285.1_ASM34128v1_genomic │ │ │ ├── GCA_000350225.2_ASM35022v2_genomic │ │ │ ├── ... │ ├── plots │ ├── raw_infernal │ │ ├── MRP │ │ │ ├── GCA_000091205.1_ASM9120v1_genomic │ │ │ ├── GCA_000341285.1_ASM34128v1_genomic │ │ │ ├── GCA_000350225.2_ASM35022v2_genomic │ │ │ ├── ... │ │ ├── SRP │ │ │ ├── GCA_000091205.1_ASM9120v1_genomic │ │ │ ├── GCA_000341285.1_ASM34128v1_genomic │ │ │ ├── GCA_000350225.2_ASM35022v2_genomic │ │ │ ├── ... │ └── summary │ ├── GCA_000091205.1_ASM9120v1_genomic │ ├── GCA_000341285.1_ASM34128v1_genomic │ ├── GCA_000350225.2_ASM35022v2_genomic │ ├── ... ├── scripts ├── taxonomy └── temp ``` ## GERONIMO applicability ### Expanding the evolutionary context To add new genomes or database queries to an existing analysis, please follow the instructions: 1) Rename the `list_of_genomes.txt` file to `previous_list_of_genomes.txt` or any other preferred name. 2) Modify the `config.yaml` file by replacing the previous database query with the new one. 3) Delete: - `summary_table.xlsx`, `part_summary_table.csv`, `summary_table_models.xlsx` files located in the `GERONIMO\results` directory - `.create_genome_list.touch` file 5) Run GERONIMO to calculate new results using the command: ```shell snakemake -s GERONIMO.sm --cores --use-conda results/summary_table.xlsx ``` 7) Once the new results are generated, reviewing them before merging them with the original results is recommended. 8) Copy the contents of the `previous_list_of_genomes.txt` file and paste them into the current `list_of_genomes.txt`. 9) Delete: - `summary_table.xlsx` located in the `GERONIMO\results` directory - `.create_genome_list.touch` file 10) Run GERONIMO to merge the results from both analyses using the command: ```shell snakemake -s GERONIMO.sm --cores 1 --use-conda results/summary_table.xlsx ``` ### Incorporating new covariance models into existing analysis 1) Copy the new covariance model to `GERONIMO/models` 2) Modify the `config.yaml` file by adding the name of the new model to the line `models: [...]` 3) Run GERONIMO to see the updated analysis outcome ### Building a new covariance model With GERONIMO, building a new covariance model from multiple sequence alignment in the `.stk` format is possible. To do so, simply paste `.stk` file to `GERONIMO/models_to_build` and paste the name of the new covariance model to `config.yaml` file to the line `models: [""]` and run GERONIMO. ## Questions & Answers ### How to specify the database query? - Visit the [NCBI Assemblies] website. - Follow the instruction on the graphic below: [NCBI Assemblies]: https://www.ncbi.nlm.nih.gov/assembly/?term= ### WSL: problem with creating `snakemake_env` In the case of an error similar to the one below: > CondaError: Unable to create prefix directory '/mnt/c/Windows/system32/env_snakemake'. > Check that you have sufficient permissions. You might try to delete the cache with: `rm -r ~/.cache/` and try again. ### When `snakemake` does not seem to be installed properly In the case of the following error: > Command 'snakemake' not found ... Check whether the `env_snakemake` is activated. > It should result in a change from (base) to (env_snakemake) before your login name in the command line window. If you still see `(base)` before your login name, please try to activate the environment with conda: `conda activate env_snakemake` Please note that you might need to specify the full path to the `env_snakemake`, like /home/your user name/env_snakemake ### How to browse GERONIMO results obtained in WSL? You can easily access the results obtained on WSL from your Windows environment by opening `File Explorer` and pasting the following line into the search bar: `\\wsl.localhost\Ubuntu\home\`. This will reveal a folder with your username, as specified during the configuration of your Ubuntu system. To locate the GERONIMO results, simply navigate to the folder with your username and then to the `home` folder. (`\\wsl.localhost\Ubuntu\home\\home\GERONIMO`) ### GERONIMO occupies a lot of storage space Through genome downloads, GERONIMO can potentially consume storage space, rapidly leading to a shortage. Currently, downloading genomes is an essential step for optimal GERONIMO performance. Regrettably, if the analysis is rerun without the `/database` folder, it will result in the need to redownload genomes, which is a highly time-consuming process. Nevertheless, if you do not intend to repeat the analysis and have no requirement for additional genomes or models, you are welcome to retain your results tables and plots while removing the remaining files. It is strongly advised against using local machines for extensive analyses. If you lack access to external storage space, it is recommended to divide the analysis into smaller segments, which can be later merged, as explained in the section titled `Expanding the evolutionary context`. Considering this limitation, I am currently working on implementing a solution that will help circumvent the need for redundant genome downloads without compromising GERONIMO performance in the future. You might consider deleting the `.snakemake` folder to free up storage space. However, please note that deleting this folder will require the reinstallation of GERONIMO dependencies when the analysis is rerun. ## License Copyright (c) 2023 Agata M. Kilar Permission is hereby granted, free of charge, to any person obtaining a copy of this software and associated documentation files (the "Software"), to deal in the Software without restriction, including without limitation the rights to use, copy, modify, merge, publish, distribute, sublicense, and/or sell copies of the Software, and to permit persons to whom the Software is furnished to do so, subject to the following conditions: The above copyright notice and this permission notice shall be included in all copies or substantial portions of the Software. THE SOFTWARE IS PROVIDED "AS IS", WITHOUT WARRANTY OF ANY KIND, EXPRESS OR IMPLIED, INCLUDING BUT NOT LIMITED TO THE WARRANTIES OF MERCHANTABILITY, FITNESS FOR A PARTICULAR PURPOSE AND NONINFRINGEMENT. IN NO EVENT SHALL THE AUTHORS OR COPYRIGHT HOLDERS BE LIABLE FOR ANY CLAIM, DAMAGES OR OTHER LIABILITY, WHETHER IN AN ACTION OF CONTRACT, TORT OR OTHERWISE, ARISING FROM, OUT OF OR IN CONNECTION WITH THE SOFTWARE OR THE USE OR OTHER DEALINGS IN THE SOFTWARE. ## Contact mgr inż. Agata Magdalena Kilar, PhD (agata.kilar@gmail.com) " assertion.
- 892d05bf-da84-4be9-9ab7-60eba5f73c70 description "# GERONIMO ## Introduction GERONIMO is a bioinformatics pipeline designed to conduct high-throughput homology searches of structural genes using covariance models. These models are based on the alignment of sequences and the consensus of secondary structures. The pipeline is built using Snakemake, a workflow management tool that allows for the reproducible execution of analyses on various computational platforms. The idea for developing GERONIMO emerged from a comprehensive search for [telomerase RNA in lower plants] and was subsequently refined through an [expanded search of telomerase RNA across Insecta]. GERONIMO can test hundreds of genomes and ensures the stability and reproducibility of the analyses performed. [telomerase RNA in lower plants]: https://doi.org/10.1093/nar/gkab545 [expanded search of telomerase RNA across Insecta]: https://doi.org/10.1093/nar/gkac1202 ## Scope The GERONIMO tool utilises covariance models (CMs) to conduct homology searches of RNA sequences across a wide range of gene families in a broad evolutionary context. Specifically, it can be utilised to: * Detect RNA sequences that share a common evolutionary ancestor * Identify and align orthologous RNA sequences among closely related species, as well as paralogous sequences within a single species * Identify conserved non-coding RNAs in a genome, and extract upstream genomic regions to characterise potential promoter regions. It is important to note that GERONIMO is a computational tool, and as such, it is intended to be run on a computer with a small amount of data. Appropriate computational infrastructure is necessary for analysing hundreds of genomes. Although GERONIMO was primarily designed for Telomerase RNA identification, its functionality extends to include the detection and alignment of other RNA gene families, including **rRNA**, **tRNA**, **snRNA**, **miRNA**, and **lncRNA**. This can aid in identifying paralogs and orthologs across different species that may carry specific functions, making it useful for phylogenetic analyses. It is crucial to remember that some gene families may exhibit similar characteristics but different functions. Therefore, analysing the data and functional annotation after conducting the search is essential to characterise the sequences properly. ## Pipeline overview By default, the GERONIMO pipeline conducts high-throughput searches of homology sequences in downloaded genomes utilizing covariance models. If a significant similarity is detected between the model and genome sequence, the pipeline extracts the upstream region, making it convenient to identify the promoter of the discovered gene. In brief, the pipeline: - Compiles a list of genomes using the NCBI's [Entrez] database based on a specified query, *e.g. "Rhodophyta"[Organism]* - Downloads and decompresses the requested genomes using *rsync* and *gunzip*, respectively - *Optionally*, generates a covariance model based on a provided alignment using [Infernal] - Conducts searches among the genomes using the covariance model [Infernal] - Supplements genome information with taxonomy data using [rentrez] - Expands the significant hits sequence by extracting upstream genomic regions using [*blastcmd*] - Compiles the results, organizes them into a tabular format, and generates a visual summary of the performed analysis. [Entrez]: https://www.ncbi.nlm.nih.gov/books/NBK179288/ [Infernal]: http://eddylab.org/infernal/ [rentrez]: https://github.com/ropensci/rentrez [*blastcmd*]: https://www.ncbi.nlm.nih.gov/books/NBK569853/ ## Quick start The GERONIMO is available as a `snakemake pipeline` running on Linux and Windows operating systems. ### Windows 10 Instal Linux on Windows 10 (WSL) according to [instructions], which bottling down to opening PowerShell or Windows Command Prompt in *administrator mode* and pasting the following: ```shell wsl --install wsl.exe --install UBUNTU ``` Then restart the machine and follow the instructions for setting up the Linux environment. [instructions]: https://learn.microsoft.com/en-us/windows/wsl/install ### Linux: #### Check whether the conda is installed: ```shell conda -V ``` > GERONIMO was tested on conda 23.3.1 #### 1) If you do not have installed `conda`, please install `miniconda` Please follow the instructions for installing [miniconda] [miniconda]: https://conda.io/projects/conda/en/stable/user-guide/install/linux.html #### 2) Continue with installing `mamba` (recommended but optional) ```shell conda install -n base -c conda-forge mamba ``` #### 3) Install `snakemake` ```shell conda activate base mamba create -p env_snakemake -c conda-forge -c bioconda snakemake mamba activate env_snakemake snakemake --help ``` In case of complications, please check the section `Questions & Answers` below or follow the [official documentation] for troubleshooting. [official documentation]: https://snakemake.readthedocs.io/en/stable/getting_started/installation.html ### Clone the GERONIMO repository Go to the path in which you want to run the analysis and clone the repository: ```shell cd git clone https://github.com/amkilar/GERONIMO.git ``` ### Run sample analysis to ensure GERONIMO installation was successful All files are prepared for the sample analysis as a default. Please execute the line below: ```shell snakemake -s GERONIMO.sm --cores 1 --use-conda results/summary_table.xlsx ``` This will prompt GERONIMO to quickly scan all modules, verifying the correct setup of the pipeline without executing any analysis. You should see the message `Building DAG of jobs...`, followed by `Nothing to be done (all requested files are present and up to date).`, when successfully completed. If you want to run the sample analysis fully, please remove the folder `results` from the GERONIMO directory and execute GERONIMO again with: `snakemake -s GERONIMO.sm --cores 1 --use-conda results/summary_table.xlsx` > You might consider allowing more cores to speed up the analysis, which might take up to several hours. #### You might want to clean `GERONIMO/` directory from the files produced by the example analysis. You can safely remove the following: - `GERONIMO/results` - `GERONIMO/database` - `GERONIMO/taxonomy` - `GERONIMO/temp` - `.create_genome_list.touch` - `list_of_genomes.txt` ## Setup the inputs ### 1) Prepare the `covariance models`: #### Browse the collection of available `covariance models` at [Rfam] (*You can find the covariance model in the tab `Curation`.*) Paste the covariance model to the folder `GERONIMO/models` and ensure its name follows the convention: `cov_model_` [Rfam]: https://rfam.org/ #### **OR** #### Prepare your own `covariance model` using [LocARNA] 1. Paste or upload your sequences to the web server and download the `.stk` file with the alignment result. > *Please note that the `.stk` file format is crucial for the analysis, containing sequence alignment and secondary structure consensus.* > The LocARNA web service allows you to align 30 sequences at once - if you need to align more sequences, please use the standalone version available [here] > After installation run: ```shell mlocarna my_fasta_sequences.fasta ``` 2. Paste the `.stk` alignment file to the folder `GERONIMO/model_to_build` and ensure its name follows the convention: `.stk` > Please check the example `heterotrichea.stk` format in `GERONIMO/models_to_built` for reference [LocARNA]: http://rna.informatik.uni-freiburg.de/LocARNA/Input.jsp [here]: http://www.bioinf.uni-freiburg.de/Software/LocARNA/ ### 2) Adjust the `config.yaml` file Please adjust the analysis specifications, as in the following example: > - database: ' [Organism]' (in case of difficulties with defining the database query, please follow the instructions below) > - extract_genomic_region-length: (here you can determine how long the upstream genomic region should be extracted; tested for 200) > - models: ["", ""] (here specify the names of models that should be used to perform analysis) > > *Here you can also insert the name of the covariance model you want to build with GERONIMO - just be sure you placed `.stk` file in `GERONIMO/models_to_build` before starting analysis* > - CPU_for_model_building: (specify the number of available CPUs devoted to the process of building model (cannot exceed the CPU number allowed to snakemake with `--cores`) > > *You might ignore this parameter when you do not need to create a new covariance model* Keep in mind that the covariance models and alignments must be present in the respective GERONIMO folders. ### 3) Remove folder `results`, which contains example analysis output ### 4) **Please ensure you have enough storage capacity to download all the requested genomes (in the `GERONIMO/` directory)** ## Run GERONIMO ```shell mamba activate env_snakemake cd ~/GERONIMO snakemake -s GERONIMO.sm --cores --use-conda results/summary_table.xlsx ``` ## Example results ### Outputs characterisation #### A) Summary table The Excel table contains the results arranged by taxonomy information and hit significance. The specific columns include: * family, organism_name, class, order, phylum (taxonomy context) * GCA_id - corresponds to the genome assembly in the *NCBI database* * model - describes which covariance model identified the result * label - follows the *Infernal* convention of categorizing hits * number - the counter of the result * e_value - indicates the significance level of the hit * HIT_sequence - the exact HIT sequence found by *Infernal*, which corresponds to the covariance model * HIT_ID - describes in which part of the genome assembly the hit was found, which may help publish novel sequences * extended_genomic_region - upstream sequence, which may contain a possible promoter sequence * secondary_structure - the secondary structure consensus of the covariance model #### B) Significant Hits Distribution Across Taxonomy Families The plot provides an overview of the number of genomes in which at least one significant hit was identified, grouped by family. The bold black line corresponds to the number of genomes present in each family, helping to minimize bias regarding unequal data representation across the taxonomy. #### C) Hits Distribution in Genomes Across Families The heatmap provides information about the most significant hits from the genome, identified by a specific covariance model. Genomes are grouped by families (on the right). Hits are classified into three categories based on their e-values. Generally, these categories correspond to hit classifications ("HIT," "MAYBE," "NO HIT"). The "HIT" category is further divided to distinguish between highly significant hits and moderately significant ones. ### GERONIMO directory structure The GERONIMO directory structure is designed to produce files in a highly structured manner, ensuring clear insight and facilitating the analysis of results. During a successful run, GERONIMO produces the following folders: * `/database` - which contains genome assemblies that were downloaded from the *NCBI database* and grouped in subfolders * `/taxonomy` - where taxonomy information is gathered and stored in the form of tables * `/results` - the main folder containing all produced results: * `/infernal_raw` - contains the raw results produced by *Infernal* * `/infernal` - contains restructured results of *Infernal* in table format * `/cmdBLAST` - contains results of *cmdblast*, which extracts the extended genomic region * `/summary` - contains summary files that join results from *Infernal*, *cmdblast*, and attach taxonomy context * `/plots` - contains two types of summary plots * `/temp` - folder contains the information necessary to download genome assemblies from *NCBI database* * `/env` - stores instructions for dependency installation * `/models` - where calibrated covariance models can be pasted, *for example, from the Rfam database* * `/modes_to_built` - where multiple alignments in *.stk* format can be pasted * `/scripts` - contains developed scripts that perform results structurization #### The example GERONIMO directory structure: ```shell GERONIMO ├── database │ ├── GCA_000091205.1_ASM9120v1_genomic │ ├── GCA_000341285.1_ASM34128v1_genomic │ ├── GCA_000350225.2_ASM35022v2_genomic │ └── ... ├── env ├── models ├── model_to_build ├── results │ ├── cmdBLAST │ │ ├── MRP │ │ │ ├── GCA_000091205.1_ASM9120v1_genomic │ │ │ │ ├── extended │ │ │ │ └── filtered │ │ │ ├── GCA_000341285.1_ASM34128v1_genomic │ │ │ │ ├── extended │ │ │ │ └── filtered │ │ │ ├── GCA_000350225.2_ASM35022v2_genomic │ │ │ │ ├── extended │ │ │ │ └── filtered │ │ │ └── ... │ │ ├── SRP │ │ │ ├── GCA_000091205.1_ASM9120v1_genomic │ │ │ │ ├── extended │�� │ │ │ └── filtered │ │ │ ├── GCA_000341285.1_ASM34128v1_genomic │ │ │ │ ├── extended │ │ │ │ └── filtered │ │ │ ├── GCA_000350225.2_ASM35022v2_genomic │ │ │ │ ├── extended │ │ │ │ └── filtered │ │ │ └── ... │ │ ├── ... │ ├── infernal │ │ ├── MRP │ │ │ ├── GCA_000091205.1_ASM9120v1_genomic │ │ │ ├── GCA_000341285.1_ASM34128v1_genomic │ │ │ ├── GCA_000350225.2_ASM35022v2_genomic │ │ │ ├── ... │ │ ├── SRP │ │ │ ├── GCA_000091205.1_ASM9120v1_genomic │ │ │ ├── GCA_000341285.1_ASM34128v1_genomic │ │ │ ├── GCA_000350225.2_ASM35022v2_genomic │ │ │ ├── ... │ ├── plots │ ├── raw_infernal │ │ ├── MRP │ │ │ ├── GCA_000091205.1_ASM9120v1_genomic │ │ │ ├── GCA_000341285.1_ASM34128v1_genomic │ │ │ ├── GCA_000350225.2_ASM35022v2_genomic │ │ │ ├── ... │ │ ├── SRP │ │ │ ├── GCA_000091205.1_ASM9120v1_genomic │ │ │ ├── GCA_000341285.1_ASM34128v1_genomic │ │ │ ├── GCA_000350225.2_ASM35022v2_genomic │ │ │ ├── ... │ └── summary │ ├── GCA_000091205.1_ASM9120v1_genomic │ ├── GCA_000341285.1_ASM34128v1_genomic │ ├── GCA_000350225.2_ASM35022v2_genomic │ ├── ... ├── scripts ├── taxonomy └── temp ``` ## GERONIMO applicability ### Expanding the evolutionary context To add new genomes or database queries to an existing analysis, please follow the instructions: 1) Rename the `list_of_genomes.txt` file to `previous_list_of_genomes.txt` or any other preferred name. 2) Modify the `config.yaml` file by replacing the previous database query with the new one. 3) Delete: - `summary_table.xlsx`, `part_summary_table.csv`, `summary_table_models.xlsx` files located in the `GERONIMO\results` directory - `.create_genome_list.touch` file 5) Run GERONIMO to calculate new results using the command: ```shell snakemake -s GERONIMO.sm --cores --use-conda results/summary_table.xlsx ``` 7) Once the new results are generated, reviewing them before merging them with the original results is recommended. 8) Copy the contents of the `previous_list_of_genomes.txt` file and paste them into the current `list_of_genomes.txt`. 9) Delete: - `summary_table.xlsx` located in the `GERONIMO\results` directory - `.create_genome_list.touch` file 10) Run GERONIMO to merge the results from both analyses using the command: ```shell snakemake -s GERONIMO.sm --cores 1 --use-conda results/summary_table.xlsx ``` ### Incorporating new covariance models into existing analysis 1) Copy the new covariance model to `GERONIMO/models` 2) Modify the `config.yaml` file by adding the name of the new model to the line `models: [...]` 3) Run GERONIMO to see the updated analysis outcome ### Building a new covariance model With GERONIMO, building a new covariance model from multiple sequence alignment in the `.stk` format is possible. To do so, simply paste `.stk` file to `GERONIMO/models_to_build` and paste the name of the new covariance model to `config.yaml` file to the line `models: [""]` and run GERONIMO. ## Questions & Answers ### How to specify the database query? - Visit the [NCBI Assemblies] website. - Follow the instruction on the graphic below: [NCBI Assemblies]: https://www.ncbi.nlm.nih.gov/assembly/?term= ### WSL: problem with creating `snakemake_env` In the case of an error similar to the one below: > CondaError: Unable to create prefix directory '/mnt/c/Windows/system32/env_snakemake'. > Check that you have sufficient permissions. You might try to delete the cache with: `rm -r ~/.cache/` and try again. ### When `snakemake` does not seem to be installed properly In the case of the following error: > Command 'snakemake' not found ... Check whether the `env_snakemake` is activated. > It should result in a change from (base) to (env_snakemake) before your login name in the command line window. If you still see `(base)` before your login name, please try to activate the environment with conda: `conda activate env_snakemake` Please note that you might need to specify the full path to the `env_snakemake`, like /home/your user name/env_snakemake ### How to browse GERONIMO results obtained in WSL? You can easily access the results obtained on WSL from your Windows environment by opening `File Explorer` and pasting the following line into the search bar: `\\wsl.localhost\Ubuntu\home\`. This will reveal a folder with your username, as specified during the configuration of your Ubuntu system. To locate the GERONIMO results, simply navigate to the folder with your username and then to the `home` folder. (`\\wsl.localhost\Ubuntu\home\\home\GERONIMO`) ### GERONIMO occupies a lot of storage space Through genome downloads, GERONIMO can potentially consume storage space, rapidly leading to a shortage. Currently, downloading genomes is an essential step for optimal GERONIMO performance. Regrettably, if the analysis is rerun without the `/database` folder, it will result in the need to redownload genomes, which is a highly time-consuming process. Nevertheless, if you do not intend to repeat the analysis and have no requirement for additional genomes or models, you are welcome to retain your results tables and plots while removing the remaining files. It is strongly advised against using local machines for extensive analyses. If you lack access to external storage space, it is recommended to divide the analysis into smaller segments, which can be later merged, as explained in the section titled `Expanding the evolutionary context`. Considering this limitation, I am currently working on implementing a solution that will help circumvent the need for redundant genome downloads without compromising GERONIMO performance in the future. You might consider deleting the `.snakemake` folder to free up storage space. However, please note that deleting this folder will require the reinstallation of GERONIMO dependencies when the analysis is rerun. ## License Copyright (c) 2023 Agata M. Kilar Permission is hereby granted, free of charge, to any person obtaining a copy of this software and associated documentation files (the "Software"), to deal in the Software without restriction, including without limitation the rights to use, copy, modify, merge, publish, distribute, sublicense, and/or sell copies of the Software, and to permit persons to whom the Software is furnished to do so, subject to the following conditions: The above copyright notice and this permission notice shall be included in all copies or substantial portions of the Software. THE SOFTWARE IS PROVIDED "AS IS", WITHOUT WARRANTY OF ANY KIND, EXPRESS OR IMPLIED, INCLUDING BUT NOT LIMITED TO THE WARRANTIES OF MERCHANTABILITY, FITNESS FOR A PARTICULAR PURPOSE AND NONINFRINGEMENT. IN NO EVENT SHALL THE AUTHORS OR COPYRIGHT HOLDERS BE LIABLE FOR ANY CLAIM, DAMAGES OR OTHER LIABILITY, WHETHER IN AN ACTION OF CONTRACT, TORT OR OTHERWISE, ARISING FROM, OUT OF OR IN CONNECTION WITH THE SOFTWARE OR THE USE OR OTHER DEALINGS IN THE SOFTWARE. ## Contact mgr inż. Agata Magdalena Kilar, PhD (agata.kilar@gmail.com)" assertion.
- 34d6227c-e493-4c4d-a841-67685c68be6d description "# GERONIMO ## Introduction GERONIMO is a bioinformatics pipeline designed to conduct high-throughput homology searches of structural genes using covariance models. These models are based on the alignment of sequences and the consensus of secondary structures. The pipeline is built using Snakemake, a workflow management tool that allows for the reproducible execution of analyses on various computational platforms. The idea for developing GERONIMO emerged from a comprehensive search for [telomerase RNA in lower plants] and was subsequently refined through an [expanded search of telomerase RNA across Insecta]. GERONIMO can test hundreds of genomes and ensures the stability and reproducibility of the analyses performed. [telomerase RNA in lower plants]: https://doi.org/10.1093/nar/gkab545 [expanded search of telomerase RNA across Insecta]: https://doi.org/10.1093/nar/gkac1202 ## Scope The GERONIMO tool utilises covariance models (CMs) to conduct homology searches of RNA sequences across a wide range of gene families in a broad evolutionary context. Specifically, it can be utilised to: * Detect RNA sequences that share a common evolutionary ancestor * Identify and align orthologous RNA sequences among closely related species, as well as paralogous sequences within a single species * Identify conserved non-coding RNAs in a genome, and extract upstream genomic regions to characterise potential promoter regions. It is important to note that GERONIMO is a computational tool, and as such, it is intended to be run on a computer with a small amount of data. Appropriate computational infrastructure is necessary for analysing hundreds of genomes. Although GERONIMO was primarily designed for Telomerase RNA identification, its functionality extends to include the detection and alignment of other RNA gene families, including **rRNA**, **tRNA**, **snRNA**, **miRNA**, and **lncRNA**. This can aid in identifying paralogs and orthologs across different species that may carry specific functions, making it useful for phylogenetic analyses. It is crucial to remember that some gene families may exhibit similar characteristics but different functions. Therefore, analysing the data and functional annotation after conducting the search is essential to characterise the sequences properly. ## Pipeline overview By default, the GERONIMO pipeline conducts high-throughput searches of homology sequences in downloaded genomes utilizing covariance models. If a significant similarity is detected between the model and genome sequence, the pipeline extracts the upstream region, making it convenient to identify the promoter of the discovered gene. In brief, the pipeline: - Compiles a list of genomes using the NCBI's [Entrez] database based on a specified query, *e.g. "Rhodophyta"[Organism]* - Downloads and decompresses the requested genomes using *rsync* and *gunzip*, respectively - *Optionally*, generates a covariance model based on a provided alignment using [Infernal] - Conducts searches among the genomes using the covariance model [Infernal] - Supplements genome information with taxonomy data using [rentrez] - Expands the significant hits sequence by extracting upstream genomic regions using [*blastcmd*] - Compiles the results, organizes them into a tabular format, and generates a visual summary of the performed analysis. [Entrez]: https://www.ncbi.nlm.nih.gov/books/NBK179288/ [Infernal]: http://eddylab.org/infernal/ [rentrez]: https://github.com/ropensci/rentrez [*blastcmd*]: https://www.ncbi.nlm.nih.gov/books/NBK569853/ ## Quick start The GERONIMO is available as a `snakemake pipeline` running on Linux and Windows operating systems. ### Windows 10 Instal Linux on Windows 10 (WSL) according to [instructions], which bottling down to opening PowerShell or Windows Command Prompt in *administrator mode* and pasting the following: ```shell wsl --install wsl.exe --install UBUNTU ``` Then restart the machine and follow the instructions for setting up the Linux environment. [instructions]: https://learn.microsoft.com/en-us/windows/wsl/install ### Linux: #### Check whether the conda is installed: ```shell conda -V ``` > GERONIMO was tested on conda 23.3.1 #### 1) If you do not have installed `conda`, please install `miniconda` Please follow the instructions for installing [miniconda] [miniconda]: https://conda.io/projects/conda/en/stable/user-guide/install/linux.html #### 2) Continue with installing `mamba` (recommended but optional) ```shell conda install -n base -c conda-forge mamba ``` #### 3) Install `snakemake` ```shell conda activate base mamba create -p env_snakemake -c conda-forge -c bioconda snakemake mamba activate env_snakemake snakemake --help ``` In case of complications, please check the section `Questions & Answers` below or follow the [official documentation] for troubleshooting. [official documentation]: https://snakemake.readthedocs.io/en/stable/getting_started/installation.html ### Clone the GERONIMO repository Go to the path in which you want to run the analysis and clone the repository: ```shell cd git clone https://github.com/amkilar/GERONIMO.git ``` ### Run sample analysis to ensure GERONIMO installation was successful All files are prepared for the sample analysis as a default. Please execute the line below: ```shell snakemake -s GERONIMO.sm --cores 1 --use-conda results/summary_table.xlsx ``` This will prompt GERONIMO to quickly scan all modules, verifying the correct setup of the pipeline without executing any analysis. You should see the message `Building DAG of jobs...`, followed by `Nothing to be done (all requested files are present and up to date).`, when successfully completed. If you want to run the sample analysis fully, please remove the folder `results` from the GERONIMO directory and execute GERONIMO again with: `snakemake -s GERONIMO.sm --cores 1 --use-conda results/summary_table.xlsx` > You might consider allowing more cores to speed up the analysis, which might take up to several hours. #### You might want to clean `GERONIMO/` directory from the files produced by the example analysis. You can safely remove the following: - `GERONIMO/results` - `GERONIMO/database` - `GERONIMO/taxonomy` - `GERONIMO/temp` - `.create_genome_list.touch` - `list_of_genomes.txt` ## Setup the inputs ### 1) Prepare the `covariance models`: #### Browse the collection of available `covariance models` at [Rfam] (*You can find the covariance model in the tab `Curation`.*) Paste the covariance model to the folder `GERONIMO/models` and ensure its name follows the convention: `cov_model_` [Rfam]: https://rfam.org/ #### **OR** #### Prepare your own `covariance model` using [LocARNA] 1. Paste or upload your sequences to the web server and download the `.stk` file with the alignment result. > *Please note that the `.stk` file format is crucial for the analysis, containing sequence alignment and secondary structure consensus.* > The LocARNA web service allows you to align 30 sequences at once - if you need to align more sequences, please use the standalone version available [here] > After installation run: ```shell mlocarna my_fasta_sequences.fasta ``` 2. Paste the `.stk` alignment file to the folder `GERONIMO/model_to_build` and ensure its name follows the convention: `.stk` > Please check the example `heterotrichea.stk` format in `GERONIMO/models_to_built` for reference [LocARNA]: http://rna.informatik.uni-freiburg.de/LocARNA/Input.jsp [here]: http://www.bioinf.uni-freiburg.de/Software/LocARNA/ ### 2) Adjust the `config.yaml` file Please adjust the analysis specifications, as in the following example: > - database: ' [Organism]' (in case of difficulties with defining the database query, please follow the instructions below) > - extract_genomic_region-length: (here you can determine how long the upstream genomic region should be extracted; tested for 200) > - models: ["", ""] (here specify the names of models that should be used to perform analysis) > > *Here you can also insert the name of the covariance model you want to build with GERONIMO - just be sure you placed `.stk` file in `GERONIMO/models_to_build` before starting analysis* > - CPU_for_model_building: (specify the number of available CPUs devoted to the process of building model (cannot exceed the CPU number allowed to snakemake with `--cores`) > > *You might ignore this parameter when you do not need to create a new covariance model* Keep in mind that the covariance models and alignments must be present in the respective GERONIMO folders. ### 3) Remove folder `results`, which contains example analysis output ### 4) **Please ensure you have enough storage capacity to download all the requested genomes (in the `GERONIMO/` directory)** ## Run GERONIMO ```shell mamba activate env_snakemake cd ~/GERONIMO snakemake -s GERONIMO.sm --cores --use-conda results/summary_table.xlsx ``` ## Example results ### Outputs characterisation #### A) Summary table The Excel table contains the results arranged by taxonomy information and hit significance. The specific columns include: * family, organism_name, class, order, phylum (taxonomy context) * GCA_id - corresponds to the genome assembly in the *NCBI database* * model - describes which covariance model identified the result * label - follows the *Infernal* convention of categorizing hits * number - the counter of the result * e_value - indicates the significance level of the hit * HIT_sequence - the exact HIT sequence found by *Infernal*, which corresponds to the covariance model * HIT_ID - describes in which part of the genome assembly the hit was found, which may help publish novel sequences * extended_genomic_region - upstream sequence, which may contain a possible promoter sequence * secondary_structure - the secondary structure consensus of the covariance model #### B) Significant Hits Distribution Across Taxonomy Families The plot provides an overview of the number of genomes in which at least one significant hit was identified, grouped by family. The bold black line corresponds to the number of genomes present in each family, helping to minimize bias regarding unequal data representation across the taxonomy. #### C) Hits Distribution in Genomes Across Families The heatmap provides information about the most significant hits from the genome, identified by a specific covariance model. Genomes are grouped by families (on the right). Hits are classified into three categories based on their e-values. Generally, these categories correspond to hit classifications ("HIT," "MAYBE," "NO HIT"). The "HIT" category is further divided to distinguish between highly significant hits and moderately significant ones. ### GERONIMO directory structure The GERONIMO directory structure is designed to produce files in a highly structured manner, ensuring clear insight and facilitating the analysis of results. During a successful run, GERONIMO produces the following folders: * `/database` - which contains genome assemblies that were downloaded from the *NCBI database* and grouped in subfolders * `/taxonomy` - where taxonomy information is gathered and stored in the form of tables * `/results` - the main folder containing all produced results: * `/infernal_raw` - contains the raw results produced by *Infernal* * `/infernal` - contains restructured results of *Infernal* in table format * `/cmdBLAST` - contains results of *cmdblast*, which extracts the extended genomic region * `/summary` - contains summary files that join results from *Infernal*, *cmdblast*, and attach taxonomy context * `/plots` - contains two types of summary plots * `/temp` - folder contains the information necessary to download genome assemblies from *NCBI database* * `/env` - stores instructions for dependency installation * `/models` - where calibrated covariance models can be pasted, *for example, from the Rfam database* * `/modes_to_built` - where multiple alignments in *.stk* format can be pasted * `/scripts` - contains developed scripts that perform results structurization #### The example GERONIMO directory structure: ```shell GERONIMO ├── database │ ├── GCA_000091205.1_ASM9120v1_genomic │ ├── GCA_000341285.1_ASM34128v1_genomic │ ├── GCA_000350225.2_ASM35022v2_genomic │ └── ... ├── env ├── models ├── model_to_build ├── results │ ├── cmdBLAST │ │ ├── MRP │ │ │ ├── GCA_000091205.1_ASM9120v1_genomic │ │ │ │ ├── extended │ │ │ │ └── filtered │ │ │ ├── GCA_000341285.1_ASM34128v1_genomic │ │ │ │ ├── extended │ │ │ │ └── filtered │ │ │ ├── GCA_000350225.2_ASM35022v2_genomic │ │ │ │ ├── extended │ │ │ │ └── filtered │ │ │ └── ... │ │ ├── SRP │ │ │ ├── GCA_000091205.1_ASM9120v1_genomic │ │ │ │ ├── extended │ │ │ │ └── filtered │ │ │ ├── GCA_000341285.1_ASM34128v1_genomic │ │ │ │ ├── extended │ │ │ │ └── filtered │ │ │ ├── GCA_000350225.2_ASM35022v2_genomic │ │ │ │ ├── extended │ │ │ │ └── filtered │ │ │ └── ... │ │ ├── ... │ ├── infernal │ │ ├── MRP │ │ │ ├── GCA_000091205.1_ASM9120v1_genomic │ │ │ ├── GCA_000341285.1_ASM34128v1_genomic │ │ │ ├── GCA_000350225.2_ASM35022v2_genomic │ │ │ ├── ... │ │ ├── SRP │ │ │ ├── GCA_000091205.1_ASM9120v1_genomic │ │ │ ├── GCA_000341285.1_ASM34128v1_genomic │ │ │ ├── GCA_000350225.2_ASM35022v2_genomic │ │ │ ├── ... │ ├── plots │ ├── raw_infernal │ │ ├── MRP │ │ │ ├── GCA_000091205.1_ASM9120v1_genomic │ │ │ ├── GCA_000341285.1_ASM34128v1_genomic │ │ │ ├── GCA_000350225.2_ASM35022v2_genomic │ │ │ ├── ... │ │ ├── SRP │ │ │ ├── GCA_000091205.1_ASM9120v1_genomic │ │ │ ├── GCA_000341285.1_ASM34128v1_genomic │ │ │ ├── GCA_000350225.2_ASM35022v2_genomic │ │ │ ├── ... │ └── summary │ ├── GCA_000091205.1_ASM9120v1_genomic │ ├── GCA_000341285.1_ASM34128v1_genomic │ ├── GCA_000350225.2_ASM35022v2_genomic │ ├── ... ├── scripts ├── taxonomy └── temp ``` ## GERONIMO applicability ### Expanding the evolutionary context To add new genomes or database queries to an existing analysis, please follow the instructions: 1) Rename the `list_of_genomes.txt` file to `previous_list_of_genomes.txt` or any other preferred name. 2) Modify the `config.yaml` file by replacing the previous database query with the new one. 3) Delete: - `summary_table.xlsx`, `part_summary_table.csv`, `summary_table_models.xlsx` files located in the `GERONIMO\results` directory - `.create_genome_list.touch` file 5) Run GERONIMO to calculate new results using the command: ```shell snakemake -s GERONIMO.sm --cores --use-conda results/summary_table.xlsx ``` 7) Once the new results are generated, reviewing them before merging them with the original results is recommended. 8) Copy the contents of the `previous_list_of_genomes.txt` file and paste them into the current `list_of_genomes.txt`. 9) Delete: - `summary_table.xlsx` located in the `GERONIMO\results` directory - `.create_genome_list.touch` file 10) Run GERONIMO to merge the results from both analyses using the command: ```shell snakemake -s GERONIMO.sm --cores 1 --use-conda results/summary_table.xlsx ``` ### Incorporating new covariance models into existing analysis 1) Copy the new covariance model to `GERONIMO/models` 2) Modify the `config.yaml` file by adding the name of the new model to the line `models: [...]` 3) Run GERONIMO to see the updated analysis outcome ### Building a new covariance model With GERONIMO, building a new covariance model from multiple sequence alignment in the `.stk` format is possible. To do so, simply paste `.stk` file to `GERONIMO/models_to_build` and paste the name of the new covariance model to `config.yaml` file to the line `models: [""]` and run GERONIMO. ## Questions & Answers ### How to specify the database query? - Visit the [NCBI Assemblies] website. - Follow the instruction on the graphic below: [NCBI Assemblies]: https://www.ncbi.nlm.nih.gov/assembly/?term= ### WSL: problem with creating `snakemake_env` In the case of an error similar to the one below: > CondaError: Unable to create prefix directory '/mnt/c/Windows/system32/env_snakemake'. > Check that you have sufficient permissions. You might try to delete the cache with: `rm -r ~/.cache/` and try again. ### When `snakemake` does not seem to be installed properly In the case of the following error: > Command 'snakemake' not found ... Check whether the `env_snakemake` is activated. > It should result in a change from (base) to (env_snakemake) before your login name in the command line window. If you still see `(base)` before your login name, please try to activate the environment with conda: `conda activate env_snakemake` Please note that you might need to specify the full path to the `env_snakemake`, like /home/your user name/env_snakemake ### How to browse GERONIMO results obtained in WSL? You can easily access the results obtained on WSL from your Windows environment by opening `File Explorer` and pasting the following line into the search bar: `\\wsl.localhost\Ubuntu\home\`. This will reveal a folder with your username, as specified during the configuration of your Ubuntu system. To locate the GERONIMO results, simply navigate to the folder with your username and then to the `home` folder. (`\\wsl.localhost\Ubuntu\home\\home\GERONIMO`) ### GERONIMO occupies a lot of storage space Through genome downloads, GERONIMO can potentially consume storage space, rapidly leading to a shortage. Currently, downloading genomes is an essential step for optimal GERONIMO performance. Regrettably, if the analysis is rerun without the `/database` folder, it will result in the need to redownload genomes, which is a highly time-consuming process. Nevertheless, if you do not intend to repeat the analysis and have no requirement for additional genomes or models, you are welcome to retain your results tables and plots while removing the remaining files. It is strongly advised against using local machines for extensive analyses. If you lack access to external storage space, it is recommended to divide the analysis into smaller segments, which can be later merged, as explained in the section titled `Expanding the evolutionary context`. Considering this limitation, I am currently working on implementing a solution that will help circumvent the need for redundant genome downloads without compromising GERONIMO performance in the future. You might consider deleting the `.snakemake` folder to free up storage space. However, please note that deleting this folder will require the reinstallation of GERONIMO dependencies when the analysis is rerun. ## License Copyright (c) 2023 Agata M. Kilar Permission is hereby granted, free of charge, to any person obtaining a copy of this software and associated documentation files (the "Software"), to deal in the Software without restriction, including without limitation the rights to use, copy, modify, merge, publish, distribute, sublicense, and/or sell copies of the Software, and to permit persons to whom the Software is furnished to do so, subject to the following conditions: The above copyright notice and this permission notice shall be included in all copies or substantial portions of the Software. THE SOFTWARE IS PROVIDED "AS IS", WITHOUT WARRANTY OF ANY KIND, EXPRESS OR IMPLIED, INCLUDING BUT NOT LIMITED TO THE WARRANTIES OF MERCHANTABILITY, FITNESS FOR A PARTICULAR PURPOSE AND NONINFRINGEMENT. IN NO EVENT SHALL THE AUTHORS OR COPYRIGHT HOLDERS BE LIABLE FOR ANY CLAIM, DAMAGES OR OTHER LIABILITY, WHETHER IN AN ACTION OF CONTRACT, TORT OR OTHERWISE, ARISING FROM, OUT OF OR IN CONNECTION WITH THE SOFTWARE OR THE USE OR OTHER DEALINGS IN THE SOFTWARE. ## Contact mgr inż. Agata Magdalena Kilar, PhD (agata.kilar@gmail.com)" assertion.
- 3fdc0374-95f4-4c7d-928c-24dd80fbd26f description 3fdc0374-95f4-4c7d-928c-24dd80fbd26f assertion.
- 3fdc0374-95f4-4c7d-928c-24dd80fbd26f description "# prepareChIPs This is a simple `snakemake` workflow template for preparing **single-end** ChIP-Seq data. The steps implemented are: 1. Download raw fastq files from SRA 2. Trim and Filter raw fastq files using `AdapterRemoval` 3. Align to the supplied genome using `bowtie2` 4. Deduplicate Alignments using `Picard MarkDuplicates` 5. Call Macs2 Peaks using `macs2` A pdf of the rulegraph is available [here](workflow/rules/rulegraph.pdf) Full details for each step are given below. Any additional parameters for tools can be specified using `config/config.yml`, along with many of the requisite paths To run the workflow with default settings, simply run as follows (after editing `config/samples.tsv`) ```bash snakemake --use-conda --cores 16 ``` If running on an HPC cluster, a snakemake profile will required for submission to the queueing system and appropriate resource allocation. Please discuss this will your HPC support team. Nodes may also have restricted internet access and rules which download files may not work on many HPCs. Please see below or discuss this with your support team Whilst no snakemake wrappers are explicitly used in this workflow, the underlying scripts are utilised where possible to minimise any issues with HPC clusters with restrictions on internet access. These scripts are based on `v1.31.1` of the snakemake wrappers ### Important Note Regarding OSX Systems It should be noted that this workflow is **currently incompatible with OSX-based systems**. There are two unsolved issues 1. `fasterq-dump` has a bug which is specific to conda environments. This has been updated in v3.0.3 but this patch has not yet been made available to conda environments for OSX. Please check [here](https://anaconda.org/bioconda/sra-tools) to see if this has been updated. 2. The following error appears in some OSX-based R sessions, in a system-dependent manner: ``` Error in grid.Call(C_textBounds, as.graphicsAnnot(x$label), x$x, x$y, : polygon edge not found ``` The fix for this bug is currently unknown ## Download Raw Data ### Outline The file `samples.tsv` is used to specify all steps for this workflow. This file must contain the columns: `accession`, `target`, `treatment` and `input` 1. `accession` must be an SRA accession. Only single-end data is currently supported by this workflow 2. `target` defines the ChIP target. All files common to a target and treatment will be used to generate summarised coverage in bigWig Files 3. `treatment` defines the treatment group each file belongs to. If only one treatment exists, simply use the value 'control' or similar for every file 4. `input` should contain the accession for the relevant input sample. These will only be downloaded once. Valid input samples are *required* for this workflow As some HPCs restrict internet access for submitted jobs, *it may be prudent to run the initial rules in an interactive session* if at all possible. This can be performed using the following (with 2 cores provided as an example) ```bash snakemake --use-conda --until get_fastq --cores 2 ``` ### Outputs - Downloaded files will be gzipped and written to `data/fastq/raw`. - `FastQC` and `MultiQC` will also be run, with output in `docs/qc/raw` Both of these directories are able to be specified as relative paths in `config.yml` ## Read Filtering ### Outline Read trimming is performed using [AdapterRemoval](https://adapterremoval.readthedocs.io/en/stable/). Default settings are customisable using config.yml, with the defaults set to discard reads shorter than 50nt, and to trim using quality scores with a threshold of Q30. ### Outputs - Trimmed fastq.gz files will be written to `data/fastq/trimmed` - `FastQC` and `MultiQC` will also be run, with output in `docs/qc/trimmed` - AdapterRemoval 'settings' files will be written to `output/adapterremoval` ## Alignments ### Outline Alignment is performed using [`bowtie2`](https://bowtie-bio.sourceforge.net/bowtie2/manual.shtml) and it is assumed that this index is available before running this workflow. The path and prefix must be provided using config.yml This index will also be used to produce the file `chrom.sizes` which is essential for conversion of bedGraph files to the more efficient bigWig files. ### Outputs - Alignments will be written to `data/aligned` - `bowtie2` log files will be written to `output/bowtie2` (not the conenvtional log directory) - The file `chrom.sizes` will be written to `output/annotations` Both sorted and the original unsorted alignments will be returned. However, the unsorted alignments are marked with `temp()` and can be deleted using ```bash snakemake --delete-temp-output --cores 1 ``` ## Deduplication ### Outline Deduplication is performed using [MarkDuplicates](https://gatk.broadinstitute.org/hc/en-us/articles/360037052812-MarkDuplicates-Picard-) from the Picard set of tools. By default, deduplication will remove the duplicates from the set of alignments. All resultant bam files will be sorted and indexed. ### Outputs - Deduplicated alignments are written to `data/deduplicated` and are indexed - DuplicationMetrics files are written to `output/markDuplicates` ## Peak Calling ### Outline This is performed using [`macs2 callpeak`](https://pypi.org/project/MACS2/). - Peak calling will be performed on: a. each sample individually, and b. merged samples for those sharing a common ChIP target and treatment group. - Coverage bigWig files for each individual sample are produced using CPM values (i.e. Signal Per Million Reads, SPMR) - For all combinations of target and treatment coverage bigWig files are also produced, along with fold-enrichment bigWig files ### Outputs - Individual outputs are written to `output/macs2/{accession}` + Peaks are written in `narrowPeak` format along with `summits.bed` + bedGraph files are automatically converted to bigWig files, and the originals are marked with `temp()` for subsequent deletion + callpeak log files are also added to this directory - Merged outputs are written to `output/macs2/{target}/` + bedGraph Files are also converted to bigWig and marked with `temp()` + Fold-Enrichment bigWig files are also created with the original bedGraph files marked with `temp()` " assertion.
- 985f7fa0-bee5-4e8d-88cc-b1aba653c3fd description "# prepareChIPs This is a simple `snakemake` workflow template for preparing **single-end** ChIP-Seq data. The steps implemented are: 1. Download raw fastq files from SRA 2. Trim and Filter raw fastq files using `AdapterRemoval` 3. Align to the supplied genome using `bowtie2` 4. Deduplicate Alignments using `Picard MarkDuplicates` 5. Call Macs2 Peaks using `macs2` A pdf of the rulegraph is available [here](workflow/rules/rulegraph.pdf) Full details for each step are given below. Any additional parameters for tools can be specified using `config/config.yml`, along with many of the requisite paths To run the workflow with default settings, simply run as follows (after editing `config/samples.tsv`) ```bash snakemake --use-conda --cores 16 ``` If running on an HPC cluster, a snakemake profile will required for submission to the queueing system and appropriate resource allocation. Please discuss this will your HPC support team. Nodes may also have restricted internet access and rules which download files may not work on many HPCs. Please see below or discuss this with your support team Whilst no snakemake wrappers are explicitly used in this workflow, the underlying scripts are utilised where possible to minimise any issues with HPC clusters with restrictions on internet access. These scripts are based on `v1.31.1` of the snakemake wrappers ### Important Note Regarding OSX Systems It should be noted that this workflow is **currently incompatible with OSX-based systems**. There are two unsolved issues 1. `fasterq-dump` has a bug which is specific to conda environments. This has been updated in v3.0.3 but this patch has not yet been made available to conda environments for OSX. Please check [here](https://anaconda.org/bioconda/sra-tools) to see if this has been updated. 2. The following error appears in some OSX-based R sessions, in a system-dependent manner: ``` Error in grid.Call(C_textBounds, as.graphicsAnnot(x$label), x$x, x$y, : polygon edge not found ``` The fix for this bug is currently unknown ## Download Raw Data ### Outline The file `samples.tsv` is used to specify all steps for this workflow. This file must contain the columns: `accession`, `target`, `treatment` and `input` 1. `accession` must be an SRA accession. Only single-end data is currently supported by this workflow 2. `target` defines the ChIP target. All files common to a target and treatment will be used to generate summarised coverage in bigWig Files 3. `treatment` defines the treatment group each file belongs to. If only one treatment exists, simply use the value 'control' or similar for every file 4. `input` should contain the accession for the relevant input sample. These will only be downloaded once. Valid input samples are *required* for this workflow As some HPCs restrict internet access for submitted jobs, *it may be prudent to run the initial rules in an interactive session* if at all possible. This can be performed using the following (with 2 cores provided as an example) ```bash snakemake --use-conda --until get_fastq --cores 2 ``` ### Outputs - Downloaded files will be gzipped and written to `data/fastq/raw`. - `FastQC` and `MultiQC` will also be run, with output in `docs/qc/raw` Both of these directories are able to be specified as relative paths in `config.yml` ## Read Filtering ### Outline Read trimming is performed using [AdapterRemoval](https://adapterremoval.readthedocs.io/en/stable/). Default settings are customisable using config.yml, with the defaults set to discard reads shorter than 50nt, and to trim using quality scores with a threshold of Q30. ### Outputs - Trimmed fastq.gz files will be written to `data/fastq/trimmed` - `FastQC` and `MultiQC` will also be run, with output in `docs/qc/trimmed` - AdapterRemoval 'settings' files will be written to `output/adapterremoval` ## Alignments ### Outline Alignment is performed using [`bowtie2`](https://bowtie-bio.sourceforge.net/bowtie2/manual.shtml) and it is assumed that this index is available before running this workflow. The path and prefix must be provided using config.yml This index will also be used to produce the file `chrom.sizes` which is essential for conversion of bedGraph files to the more efficient bigWig files. ### Outputs - Alignments will be written to `data/aligned` - `bowtie2` log files will be written to `output/bowtie2` (not the conenvtional log directory) - The file `chrom.sizes` will be written to `output/annotations` Both sorted and the original unsorted alignments will be returned. However, the unsorted alignments are marked with `temp()` and can be deleted using ```bash snakemake --delete-temp-output --cores 1 ``` ## Deduplication ### Outline Deduplication is performed using [MarkDuplicates](https://gatk.broadinstitute.org/hc/en-us/articles/360037052812-MarkDuplicates-Picard-) from the Picard set of tools. By default, deduplication will remove the duplicates from the set of alignments. All resultant bam files will be sorted and indexed. ### Outputs - Deduplicated alignments are written to `data/deduplicated` and are indexed - DuplicationMetrics files are written to `output/markDuplicates` ## Peak Calling ### Outline This is performed using [`macs2 callpeak`](https://pypi.org/project/MACS2/). - Peak calling will be performed on: a. each sample individually, and b. merged samples for those sharing a common ChIP target and treatment group. - Coverage bigWig files for each individual sample are produced using CPM values (i.e. Signal Per Million Reads, SPMR) - For all combinations of target and treatment coverage bigWig files are also produced, along with fold-enrichment bigWig files ### Outputs - Individual outputs are written to `output/macs2/{accession}` + Peaks are written in `narrowPeak` format along with `summits.bed` + bedGraph files are automatically converted to bigWig files, and the originals are marked with `temp()` for subsequent deletion + callpeak log files are also added to this directory - Merged outputs are written to `output/macs2/{target}/` + bedGraph Files are also converted to bigWig and marked with `temp()` + Fold-Enrichment bigWig files are also created with the original bedGraph files marked with `temp()`" assertion.
- 06cb618c-d858-4b50-88e3-7b737e4d193f description "The project allowed us to manage and build structured code scripts on the Jupyter Notebook, a simple web application which is user-friendly, flexible to use in the research community. The script is developed to address the specific needs of research between different platforms of dataset. These stakeholders have developed their own platforms for the annotation and standardisation of both data and metadata produced within their respective field. -The INFRAFRONTIER - European Mutant Mouse Archive (EMMA) comprises over 7200 mutant mouse lines that are extensively integrated and enriched with other public dataset. -The EU-OpenScreen offers compound screening protocols containing several metadata and will contribute to the development of tools for linking to the chemical entity database. -The IDR Image Data Resource is a public repository of reference image datasets from published scientific studies, where the community can submit, search and access high-quality bio-image data. -The CIM-XNAT is an XNAT deployment of the Molecular Imaging Center at UniTo that offers a suite of tools for uploading preclinical images. To address the challenges of integrating several EU-RI datasets with focus on preclinical and discovery research bioimaging, our aim is to develop cross researching queries through a web based interface to combine the resources of the RIs for integrating the information associated with data belonging to the involved RIs. Furthermore, the open-source tool provides users with free, open access to collections of datasets distributed over multiple sources that result from searches by specific keywords. The script allows the cross research in different fields of research as: Species, Strain, Gene, Cell line, Disease model, Chemical Compound. The novel aspects of this tool are mainly: a) user friendly, e.g. the user has the flexibility to research among the dataset easily with a simple API, intuitive for researchers and biomedical users. b) the possibility of making a research between different platforms and repositories, from a unique simple way. c) the workflow project follows the FAIR principles in the treatment of data and datasets. The access to Notebook Jupyter needs the installation of Anaconda, which consents to open the web application. Inside the Jupyter, the script was built using Python. The query code is also easy to download and share in a .ipynb file. A visual representation of the detailed results (dataset, metadata, information, query results) of the workflow can be printed immediately after the query run." assertion.
- 06cb618c-d858-4b50-88e3-7b737e4d193f description "The project allowed us to manage and build structured code scripts on the Jupyter Notebook, a simple web application which is user-friendly, flexible to use in the research community. The script is developed to address the specific needs of research between different platforms of dataset. These stakeholders have developed their own platforms for the annotation and standardisation of both data and metadata produced within their respective field. -The INFRAFRONTIER - European Mutant Mouse Archive (EMMA) comprises over 7200 mutant mouse lines that are extensively integrated and enriched with other public dataset. -The EU-OpenScreen offers compound screening protocols containing several metadata and will contribute to the development of tools for linking to the chemical entity database. -The IDR Image Data Resource is a public repository of reference image datasets from published scientific studies, where the community can submit, search and access high-quality bio-image data. -The CIM-XNAT is an XNAT deployment of the Molecular Imaging Center at UniTo that offers a suite of tools for uploading preclinical images. To address the challenges of integrating several EU-RI datasets with focus on preclinical and discovery research bioimaging, our aim is to develop cross researching queries through a web based interface to combine the resources of the RIs for integrating the information associated with data belonging to the involved RIs. Furthermore, the open-source tool provides users with free, open access to collections of datasets distributed over multiple sources that result from searches by specific keywords. The script allows the cross research in different fields of research as: Species, Strain, Gene, Cell line, Disease model, Chemical Compound. The novel aspects of this tool are mainly: a) user friendly, e.g. the user has the flexibility to research among the dataset easily with a simple API, intuitive for researchers and biomedical users. b) the possibility of making a research between different platforms and repositories, from a unique simple way. c) the workflow project follows the FAIR principles in the treatment of data and datasets. The access to Notebook Jupyter needs the installation of Anaconda, which consents to open the web application. Inside the Jupyter, the script was built using Python. The query code is also easy to download and share in a .ipynb file. A visual representation of the detailed results (dataset, metadata, information, query results) of the workflow can be printed immediately after the query run. " assertion.
- Cross_-research.ipynb description "The project allowed us to manage and build structured code scripts on the Jupyter Notebook, a simple web application which is user-friendly, flexible to use in the research community. The script is developed to address the specific needs of research between different platforms of dataset. These stakeholders have developed their own platforms for the annotation and standardisation of both data and metadata produced within their respective field. -The INFRAFRONTIER - European Mutant Mouse Archive (EMMA) comprises over 7200 mutant mouse lines that are extensively integrated and enriched with other public dataset. -The EU-OpenScreen offers compound screening protocols containing several metadata and will contribute to the development of tools for linking to the chemical entity database. -The IDR Image Data Resource is a public repository of reference image datasets from published scientific studies, where the community can submit, search and access high-quality bio-image data. -The CIM-XNAT is an XNAT deployment of the Molecular Imaging Center at UniTo that offers a suite of tools for uploading preclinical images. To address the challenges of integrating several EU-RI datasets with focus on preclinical and discovery research bioimaging, our aim is to develop cross researching queries through a web based interface to combine the resources of the RIs for integrating the information associated with data belonging to the involved RIs. Furthermore, the open-source tool provides users with free, open access to collections of datasets distributed over multiple sources that result from searches by specific keywords. The script allows the cross research in different fields of research as: Species, Strain, Gene, Cell line, Disease model, Chemical Compound. The novel aspects of this tool are mainly: a) user friendly, e.g. the user has the flexibility to research among the dataset easily with a simple API, intuitive for researchers and biomedical users. b) the possibility of making a research between different platforms and repositories, from a unique simple way. c) the workflow project follows the FAIR principles in the treatment of data and datasets. The access to Notebook Jupyter needs the installation of Anaconda, which consents to open the web application. Inside the Jupyter, the script was built using Python. The query code is also easy to download and share in a .ipynb file. A visual representation of the detailed results (dataset, metadata, information, query results) of the workflow can be printed immediately after the query run. " assertion.
- 7ab8a5dd-8bc6-46c1-8ca9-a0c245a896ad description "# Drug Synergies Screening Workflow ## Table of Contents - [Drug Synergies Screening Workflow](#drug-synergies-screening-workflow) - [Table of Contents](#table-of-contents) - [Description](#description) - [Contents](#contents) - [Building Blocks](#building-blocks) - [Workflows](#workflows) - [Resources](#resources) - [Tests](#tests) - [Instructions](#instructions) - [Local machine](#local-machine) - [Requirements](#requirements) - [Usage steps](#usage-steps) - [MareNostrum 4](#marenostrum-4) - [Requirements in MN4](#requirements-in-mn4) - [Usage steps in MN4](#usage-steps-in-mn4) - [License](#license) - [Contact](#contact) ## Description This pipeline simulates a drug screening on personalised cell line models. It automatically builds Boolean models of interest, then uses cell lines data (expression, mutations, copy number variations) to personalise them as MaBoSS models. Finally, this pipeline simulates multiple drug intervention on these MaBoSS models, and lists drug synergies of interest. The workflow uses the following building blocks, described in order of execution: 1. Build model from species 2. Personalise patient 3. MaBoSS 4. Print drug results For details on individual workflow steps, see the user documentation for each building block. [`GitHub repository`](https://github.com/PerMedCoE/drug-synergies-workflow>) ## Contents ### Building Blocks The ``BuildingBlocks`` folder contains the script to install the Building Blocks used in the Drug Synergies Workflow. ### Workflows The ``Workflow`` folder contains the workflows implementations. Currently contains the implementation using PyCOMPSs. ### Resources The ``Resources`` folder contains a small dataset for testing purposes. ### Tests The ``Tests`` folder contains the scripts that run each Building Block used in the workflow for a small dataset. They can be executed individually *without PyCOMPSs installed* for testing purposes. ## Instructions ### Local machine This section explains the requirements and usage for the Drug Synergies Workflow in a laptop or desktop computer. #### Requirements - [`permedcoe`](https://github.com/PerMedCoE/permedcoe) package - [PyCOMPSs](https://pycompss.readthedocs.io/en/stable/Sections/00_Quickstart.html) - [Singularity](https://sylabs.io/guides/3.0/user-guide/installation.html) #### Usage steps 1. Clone this repository: ```bash git clone https://github.com/PerMedCoE/drug-synergies-workflow.git ``` 2. Install the Building Blocks required for the COVID19 Workflow: ```bash drug-synergies-workflow/BuildingBlocks/./install_BBs.sh ``` 3. Get the required Building Block images from the project [B2DROP](https://b2drop.bsc.es/index.php/f/444350): - Required images: - PhysiCell-COVID19.singularity - printResults.singularity - MaBoSS_sensitivity.singularity - FromSpeciesToMaBoSSModel.singularity The path where these files are stored **MUST be exported in the `PERMEDCOE_IMAGES`** environment variable. > :warning: **TIP**: These containers can be built manually as follows (be patient since some of them may take some time): 1. Clone the `BuildingBlocks` repository ```bash git clone https://github.com/PerMedCoE/BuildingBlocks.git ``` 2. Build the required Building Block images ```bash cd BuildingBlocks/Resources/images sudo singularity build PhysiCell-COVID19.sif PhysiCell-COVID19.singularity sudo singularity build printResults.sif printResults.singularity sudo singularity build MaBoSS_sensitivity.sif MaBoSS_sensitivity.singularity sudo singularity build FromSpeciesToMaBoSSModel.sif FromSpeciesToMaBoSSModel.singularity cd ../../.. ``` **If using PyCOMPSs in local PC** (make sure that PyCOMPSs in installed): 4. Go to `Workflow/PyCOMPSs` folder ```bash cd Workflows/PyCOMPSs ``` 5. Execute `./run.sh` > **TIP**: If you want to run the workflow with a different dataset, please update the `run.sh` script setting the `dataset` variable to the new dataset folder and their file names. ### MareNostrum 4 This section explains the requirements and usage for the Drug Synergies Workflow in the MareNostrum 4 supercomputer. #### Requirements in MN4 - Access to MN4 All Building Blocks are already installed in MN4, and the Drug Synergies Workflow available. #### Usage steps in MN4 1. Load the `COMPSs`, `Singularity` and `permedcoe` modules ```bash export COMPSS_PYTHON_VERSION=3 module load COMPSs/3.1 module load singularity/3.5.2 module use /apps/modules/modulefiles/tools/COMPSs/libraries module load permedcoe ``` > **TIP**: Include the loading into your `${HOME}/.bashrc` file to load it automatically on the session start. This commands will load COMPSs and the permedcoe package which provides all necessary dependencies, as well as the path to the singularity container images (`PERMEDCOE_IMAGES` environment variable) and testing dataset (`DRUG_SYNERGIES_WORKFLOW_DATASET` environment variable). 2. Get a copy of the pilot workflow into your desired folder ```bash mkdir desired_folder cd desired_folder get_drug_synergies_workflow ``` 3. Go to `Workflow/PyCOMPSs` folder ```bash cd Workflow/PyCOMPSs ``` 4. Execute `./launch.sh` This command will launch a job into the job queuing system (SLURM) requesting 2 nodes (one node acting half master and half worker, and other full worker node) for 20 minutes, and is prepared to use the singularity images that are already deployed in MN4 (located into the `PERMEDCOE_IMAGES` environment variable). It uses the dataset located into `../../Resources/data` folder. > :warning: **TIP**: If you want to run the workflow with a different dataset, please edit the `launch.sh` script and define the appropriate dataset path. After the execution, a `results` folder will be available with with Drug Synergies Workflow results. ## License [Apache 2.0](https://www.apache.org/licenses/LICENSE-2.0) ## Contact This software has been developed for the [PerMedCoE project](https://permedcoe.eu/), funded by the European Commission (EU H2020 [951773](https://cordis.europa.eu/project/id/951773)).  " assertion.
- 7ab8a5dd-8bc6-46c1-8ca9-a0c245a896ad description "# Drug Synergies Screening Workflow ## Table of Contents - [Drug Synergies Screening Workflow](#drug-synergies-screening-workflow) - [Table of Contents](#table-of-contents) - [Description](#description) - [Contents](#contents) - [Building Blocks](#building-blocks) - [Workflows](#workflows) - [Resources](#resources) - [Tests](#tests) - [Instructions](#instructions) - [Local machine](#local-machine) - [Requirements](#requirements) - [Usage steps](#usage-steps) - [MareNostrum 4](#marenostrum-4) - [Requirements in MN4](#requirements-in-mn4) - [Usage steps in MN4](#usage-steps-in-mn4) - [License](#license) - [Contact](#contact) ## Description This pipeline simulates a drug screening on personalised cell line models. It automatically builds Boolean models of interest, then uses cell lines data (expression, mutations, copy number variations) to personalise them as MaBoSS models. Finally, this pipeline simulates multiple drug intervention on these MaBoSS models, and lists drug synergies of interest. The workflow uses the following building blocks, described in order of execution: 1. Build model from species 2. Personalise patient 3. MaBoSS 4. Print drug results For details on individual workflow steps, see the user documentation for each building block. [`GitHub repository`](https://github.com/PerMedCoE/drug-synergies-workflow>) ## Contents ### Building Blocks The ``BuildingBlocks`` folder contains the script to install the Building Blocks used in the Drug Synergies Workflow. ### Workflows The ``Workflow`` folder contains the workflows implementations. Currently contains the implementation using PyCOMPSs. ### Resources The ``Resources`` folder contains a small dataset for testing purposes. ### Tests The ``Tests`` folder contains the scripts that run each Building Block used in the workflow for a small dataset. They can be executed individually *without PyCOMPSs installed* for testing purposes. ## Instructions ### Local machine This section explains the requirements and usage for the Drug Synergies Workflow in a laptop or desktop computer. #### Requirements - [`permedcoe`](https://github.com/PerMedCoE/permedcoe) package - [PyCOMPSs](https://pycompss.readthedocs.io/en/stable/Sections/00_Quickstart.html) - [Singularity](https://sylabs.io/guides/3.0/user-guide/installation.html) #### Usage steps 1. Clone this repository: ```bash git clone https://github.com/PerMedCoE/drug-synergies-workflow.git ``` 2. Install the Building Blocks required for the COVID19 Workflow: ```bash drug-synergies-workflow/BuildingBlocks/./install_BBs.sh ``` 3. Get the required Building Block images from the project [B2DROP](https://b2drop.bsc.es/index.php/f/444350): - Required images: - PhysiCell-COVID19.singularity - printResults.singularity - MaBoSS_sensitivity.singularity - FromSpeciesToMaBoSSModel.singularity The path where these files are stored **MUST be exported in the `PERMEDCOE_IMAGES`** environment variable. > :warning: **TIP**: These containers can be built manually as follows (be patient since some of them may take some time): 1. Clone the `BuildingBlocks` repository ```bash git clone https://github.com/PerMedCoE/BuildingBlocks.git ``` 2. Build the required Building Block images ```bash cd BuildingBlocks/Resources/images sudo singularity build PhysiCell-COVID19.sif PhysiCell-COVID19.singularity sudo singularity build printResults.sif printResults.singularity sudo singularity build MaBoSS_sensitivity.sif MaBoSS_sensitivity.singularity sudo singularity build FromSpeciesToMaBoSSModel.sif FromSpeciesToMaBoSSModel.singularity cd ../../.. ``` **If using PyCOMPSs in local PC** (make sure that PyCOMPSs in installed): 4. Go to `Workflow/PyCOMPSs` folder ```bash cd Workflows/PyCOMPSs ``` 5. Execute `./run.sh` > **TIP**: If you want to run the workflow with a different dataset, please update the `run.sh` script setting the `dataset` variable to the new dataset folder and their file names. ### MareNostrum 4 This section explains the requirements and usage for the Drug Synergies Workflow in the MareNostrum 4 supercomputer. #### Requirements in MN4 - Access to MN4 All Building Blocks are already installed in MN4, and the Drug Synergies Workflow available. #### Usage steps in MN4 1. Load the `COMPSs`, `Singularity` and `permedcoe` modules ```bash export COMPSS_PYTHON_VERSION=3 module load COMPSs/3.1 module load singularity/3.5.2 module use /apps/modules/modulefiles/tools/COMPSs/libraries module load permedcoe ``` > **TIP**: Include the loading into your `${HOME}/.bashrc` file to load it automatically on the session start. This commands will load COMPSs and the permedcoe package which provides all necessary dependencies, as well as the path to the singularity container images (`PERMEDCOE_IMAGES` environment variable) and testing dataset (`DRUG_SYNERGIES_WORKFLOW_DATASET` environment variable). 2. Get a copy of the pilot workflow into your desired folder ```bash mkdir desired_folder cd desired_folder get_drug_synergies_workflow ``` 3. Go to `Workflow/PyCOMPSs` folder ```bash cd Workflow/PyCOMPSs ``` 4. Execute `./launch.sh` This command will launch a job into the job queuing system (SLURM) requesting 2 nodes (one node acting half master and half worker, and other full worker node) for 20 minutes, and is prepared to use the singularity images that are already deployed in MN4 (located into the `PERMEDCOE_IMAGES` environment variable). It uses the dataset located into `../../Resources/data` folder. > :warning: **TIP**: If you want to run the workflow with a different dataset, please edit the `launch.sh` script and define the appropriate dataset path. After the execution, a `results` folder will be available with with Drug Synergies Workflow results. ## License [Apache 2.0](https://www.apache.org/licenses/LICENSE-2.0) ## Contact This software has been developed for the [PerMedCoE project](https://permedcoe.eu/), funded by the European Commission (EU H2020 [951773](https://cordis.europa.eu/project/id/951773)). " assertion.
- d9f38986-7753-486d-aa09-bacf33643dbb description "# Drug Synergies Screening Workflow ## Table of Contents - [Drug Synergies Screening Workflow](#drug-synergies-screening-workflow) - [Table of Contents](#table-of-contents) - [Description](#description) - [Contents](#contents) - [Building Blocks](#building-blocks) - [Workflows](#workflows) - [Resources](#resources) - [Tests](#tests) - [Instructions](#instructions) - [Local machine](#local-machine) - [Requirements](#requirements) - [Usage steps](#usage-steps) - [MareNostrum 4](#marenostrum-4) - [Requirements in MN4](#requirements-in-mn4) - [Usage steps in MN4](#usage-steps-in-mn4) - [License](#license) - [Contact](#contact) ## Description This pipeline simulates a drug screening on personalised cell line models. It automatically builds Boolean models of interest, then uses cell lines data (expression, mutations, copy number variations) to personalise them as MaBoSS models. Finally, this pipeline simulates multiple drug intervention on these MaBoSS models, and lists drug synergies of interest. The workflow uses the following building blocks, described in order of execution: 1. Build model from species 2. Personalise patient 3. MaBoSS 4. Print drug results For details on individual workflow steps, see the user documentation for each building block. [`GitHub repository`](https://github.com/PerMedCoE/drug-synergies-workflow>) ## Contents ### Building Blocks The ``BuildingBlocks`` folder contains the script to install the Building Blocks used in the Drug Synergies Workflow. ### Workflows The ``Workflow`` folder contains the workflows implementations. Currently contains the implementation using PyCOMPSs. ### Resources The ``Resources`` folder contains a small dataset for testing purposes. ### Tests The ``Tests`` folder contains the scripts that run each Building Block used in the workflow for a small dataset. They can be executed individually *without PyCOMPSs installed* for testing purposes. ## Instructions ### Local machine This section explains the requirements and usage for the Drug Synergies Workflow in a laptop or desktop computer. #### Requirements - [`permedcoe`](https://github.com/PerMedCoE/permedcoe) package - [PyCOMPSs](https://pycompss.readthedocs.io/en/stable/Sections/00_Quickstart.html) - [Singularity](https://sylabs.io/guides/3.0/user-guide/installation.html) #### Usage steps 1. Clone this repository: ```bash git clone https://github.com/PerMedCoE/drug-synergies-workflow.git ``` 2. Install the Building Blocks required for the COVID19 Workflow: ```bash drug-synergies-workflow/BuildingBlocks/./install_BBs.sh ``` 3. Get the required Building Block images from the project [B2DROP](https://b2drop.bsc.es/index.php/f/444350): - Required images: - PhysiCell-COVID19.singularity - printResults.singularity - MaBoSS_sensitivity.singularity - FromSpeciesToMaBoSSModel.singularity The path where these files are stored **MUST be exported in the `PERMEDCOE_IMAGES`** environment variable. > :warning: **TIP**: These containers can be built manually as follows (be patient since some of them may take some time): 1. Clone the `BuildingBlocks` repository ```bash git clone https://github.com/PerMedCoE/BuildingBlocks.git ``` 2. Build the required Building Block images ```bash cd BuildingBlocks/Resources/images sudo singularity build PhysiCell-COVID19.sif PhysiCell-COVID19.singularity sudo singularity build printResults.sif printResults.singularity sudo singularity build MaBoSS_sensitivity.sif MaBoSS_sensitivity.singularity sudo singularity build FromSpeciesToMaBoSSModel.sif FromSpeciesToMaBoSSModel.singularity cd ../../.. ``` **If using PyCOMPSs in local PC** (make sure that PyCOMPSs in installed): 4. Go to `Workflow/PyCOMPSs` folder ```bash cd Workflows/PyCOMPSs ``` 5. Execute `./run.sh` > **TIP**: If you want to run the workflow with a different dataset, please update the `run.sh` script setting the `dataset` variable to the new dataset folder and their file names. ### MareNostrum 4 This section explains the requirements and usage for the Drug Synergies Workflow in the MareNostrum 4 supercomputer. #### Requirements in MN4 - Access to MN4 All Building Blocks are already installed in MN4, and the Drug Synergies Workflow available. #### Usage steps in MN4 1. Load the `COMPSs`, `Singularity` and `permedcoe` modules ```bash export COMPSS_PYTHON_VERSION=3 module load COMPSs/3.1 module load singularity/3.5.2 module use /apps/modules/modulefiles/tools/COMPSs/libraries module load permedcoe ``` > **TIP**: Include the loading into your `${HOME}/.bashrc` file to load it automatically on the session start. This commands will load COMPSs and the permedcoe package which provides all necessary dependencies, as well as the path to the singularity container images (`PERMEDCOE_IMAGES` environment variable) and testing dataset (`DRUG_SYNERGIES_WORKFLOW_DATASET` environment variable). 2. Get a copy of the pilot workflow into your desired folder ```bash mkdir desired_folder cd desired_folder get_drug_synergies_workflow ``` 3. Go to `Workflow/PyCOMPSs` folder ```bash cd Workflow/PyCOMPSs ``` 4. Execute `./launch.sh` This command will launch a job into the job queuing system (SLURM) requesting 2 nodes (one node acting half master and half worker, and other full worker node) for 20 minutes, and is prepared to use the singularity images that are already deployed in MN4 (located into the `PERMEDCOE_IMAGES` environment variable). It uses the dataset located into `../../Resources/data` folder. > :warning: **TIP**: If you want to run the workflow with a different dataset, please edit the `launch.sh` script and define the appropriate dataset path. After the execution, a `results` folder will be available with with Drug Synergies Workflow results. ## License [Apache 2.0](https://www.apache.org/licenses/LICENSE-2.0) ## Contact This software has been developed for the [PerMedCoE project](https://permedcoe.eu/), funded by the European Commission (EU H2020 [951773](https://cordis.europa.eu/project/id/951773)). " assertion.
- 356b66d5-921f-41c8-97e3-ebe65ed97084 description "IDR is based on OMERO and thus all what we show in this notebook can be easily adjusted for use against another OMERO server, e.g. your institutional OMERO server instance. The main objective of this notebook is to demonstrate how public resources such as the IDR can be used to train your neural network or validate software tools. The authors of the PLOS Biology paper, "Nessys: A new set of tools for the automated detection of nuclei within intact tissues and dense 3D cultures" published in August 2019: https://doi.org/10.1371/journal.pbio.3000388, considered several image segmenation packages, but they did not use the approach described in this notebook. We will analyse the data using Cellpose and compare the output with the original segmentation produced by the authors. StarDist was not considered by the authors. Our workflow shows how public repository can be accessed and data inside it used to validate software tools or new algorithms. We will use an image (id=6001247) referenced in the paper. The image can be viewed online in the Image Data Resource (IDR). We will use a predefined model from Cellpose as a starting point. Steps to access data from IDR could be re-used if you wish to create a new model (outside the scope of this notebook). ## Launch This notebook uses the [environment_cellpose.yml](https://github.com/ome/EMBL-EBI-imaging-course-05-2023/blob/main/Day_4/environment_cellpose.yml) file. See [Setup](https://github.com/ome/EMBL-EBI-imaging-course-05-2023/blob/main/Day_4/setup.md)." assertion.
- d7444133-eaf9-4f60-86e6-c1f37c97126b description "IDR is based on OMERO and thus all what we show in this notebook can be easily adjusted for use against another OMERO server, e.g. your institutional OMERO server instance. The main objective of this notebook is to demonstrate how public resources such as the IDR can be used to train your neural network or validate software tools. The authors of the PLOS Biology paper, "Nessys: A new set of tools for the automated detection of nuclei within intact tissues and dense 3D cultures" published in August 2019: https://doi.org/10.1371/journal.pbio.3000388, considered several image segmenation packages, but they did not use the approach described in this notebook. We will analyse the data using Cellpose and compare the output with the original segmentation produced by the authors. StarDist was not considered by the authors. Our workflow shows how public repository can be accessed and data inside it used to validate software tools or new algorithms. We will use an image (id=6001247) referenced in the paper. The image can be viewed online in the Image Data Resource (IDR). We will use a predefined model from Cellpose as a starting point. Steps to access data from IDR could be re-used if you wish to create a new model (outside the scope of this notebook). ## Launch This notebook uses the [environment_cellpose.yml](https://github.com/ome/EMBL-EBI-imaging-course-05-2023/blob/main/Day_4/environment_cellpose.yml) file. See [Setup](https://github.com/ome/EMBL-EBI-imaging-course-05-2023/blob/main/Day_4/setup.md)." assertion.
- 91046403-e0b7-41d3-8d60-4b540219ffa7 description "The research object refers to the Deep learning and variational inversion to quantify and attribute climate change (CIRC23) notebook published in the Environmental Data Science book." assertion.
- 03b385c8-ded5-4683-99bf-90ffb6e82f92 description "Contains input Input dataset for paper used in the Jupyter notebook of Deep learning and variational inversion to quantify and attribute climate change (CIRC23)" assertion.
- 055ff8b9-abff-4e58-9cd8-a1637c6858c0 description "Contains outputs, (figures, models and results), generated in the Jupyter notebook of Deep learning and variational inversion to quantify and attribute climate change (CIRC23)" assertion.
- 33b2913e-3372-48ac-8cea-12d962e14259 description "Rendered version of the Jupyter Notebook hosted by the Environmental Data Science Book" assertion.
- 6a4cc43b-8ed5-4439-963f-d3b9dda90747 description "Conda environment when user want to have the same libraries installed without concerns of package versions" assertion.
- 7364b800-97c3-45a5-aca7-fde930cbe460 description "Jupyter Notebook hosted by the Environmental Data Science Book" assertion.
- 75411860-412a-4e54-b840-d71630afb179 description "Lock conda file of the Jupyter notebook hosted by the Environmental Data Science Book" assertion.
- 8930ebd1-3c8e-4592-b5ef-f69759d6826f description "Related publication of the modelling presented in the Jupyter notebook" assertion.
- b078ae9c-2ae3-4c10-8a86-673b55d2b274 description "The research object refers to the Learning the Underlying Physics of a Simulation Model of the Ocean's Temperature (CIRC23) notebook published in the Environmental Data Science book." assertion.
- 4f3a7e5c-335a-4b71-bed2-a4cce8941d0f description "Contains input MITgcm Dataset for paper: Sensitivity analysis of a data-driven model of ocean temperature (v1.1) used in the Jupyter notebook of Learning the Underlying Physics of a Simulation Model of the Ocean's Temperature (CIRC23)" assertion.
- 6bf74de0-59cb-4d01-a4dc-62cec9896270 description "Conda environment when user want to have the same libraries installed without concerns of package versions" assertion.
- 6cb8f287-259b-412a-aa53-07485623c426 description "Related publication of the modelling presented in the Jupyter notebook" assertion.
- 9a7b9a09-46d4-45ea-91c9-08ae4ec65397 description "Contains input Reproducible Challenge - Team 3 - Sensitivity analysis- Models used in the Jupyter notebook of Learning the Underlying Physics of a Simulation Model of the Ocean's Temperature (CIRC23)" assertion.
- b1b1e0b8-9887-4487-8545-9e677c9b9bf1 description "Rendered version of the Jupyter Notebook hosted by the Environmental Data Science Book" assertion.
- c7cb324f-4912-4af6-b448-90120daf2eff description "Lock conda file of the Jupyter notebook hosted by the Environmental Data Science Book" assertion.
- e2bb7c97-8729-4d0f-b513-108722a2baac description "Jupyter Notebook hosted by the Environmental Data Science Book" assertion.
- ec40274f-f5a7-4479-8976-e8f63909129b description "Contains outputs, (figures), generated in the Jupyter notebook of Learning the Underlying Physics of a Simulation Model of the Ocean's Temperature (CIRC23)" assertion.
- 87c92e66-6319-4e2b-8662-6c0e35039fd0 description "RO to verify checklists" assertion.
- d8fae2d3-7277-454b-b663-f8cd5d82b001 description "This Research Object has as a main artefact a presentation (slides) on The Carpentries approach to training. It gives an overview of The Carpentries initiatives, how they operate, how they collaboratively develop and maintain training materials, and how they train their instructors. The Research Object also contains additional links to other presentations and material of interest for learning more about The Carpentries or other similar initiatives." assertion.
- 04390d9a-7638-4f22-a598-355e2f916e8e description "Presentation given by Toby Hodges on 29 April 2021 to reflect on the First round of Lesson Development Study Groups. Toby explains what the training material on "Lesson Development Study Group" is about and how it helps The Carpentries community to co-develop training material." assertion.
- 1cf83eb7-a289-4347-9212-fb9bbfa5fdbc description "CodeRefinery is a community project where you can find Training and e-Infrastructure for Research Software Development." assertion.
- 230367d0-1b89-4424-8570-e0b94e4d4206 description "Galaxy is an open-source platform for data analysis that enables users to: 1) Use tools from various domains (that can be plugged into workflows) through its graphical web interface. Run code in interactive environments (RStudio, Jupyter...) along with other tools or workflows; 2) Manage data by sharing and publishing results, workflows, and visualizations; 3) Ensure reproducibility by capturing the necessary information to repeat and understand data analyses; 4) The Galaxy Community is actively involved in helping the ecosystem improve and sharing scientific discoveries." assertion.
- 2351aa9e-76a3-46d7-aac2-b0a3e6733470 description "A short overview of The Carpentries initiative, how they operate and collaboratively develop, maintain and deliver training on foundational coding and data science skills to researchers worldwide for researchers. Informal presentation given for the GO FAIR Foundation Fellow on July 27th 2023." assertion.
- 4c6fb2d0-a83f-485e-93b5-94826731ff46 description "The Carpentries website is the main page where one can find about The Carpentries initiative. You can find many other links from there, including the Carpentries training material." assertion.
- e8bd18cc-2d6f-4638-a0e0-72f0d4a64e78 description "Website where you can find all the training material for The Galaxy Project with many different topics." assertion.
- fd27e49f-c8c9-4512-b22d-e79b58d3c91e description "Presentation from The Carpentries Community on "The Carpentries Instructor Training" and on how to build skills in a community of practice." assertion.
- a66bbb17-5bfa-4ba1-9199-712bdfbd6b2a description "This Research Object has as a main artefact a presentation (slides) on The Carpentries approach to training. It gives an overview of The Carpentries initiatives, how they operate, how they collaboratively develop and maintain training materials, and how they train their instructors. The Research Object also contains additional links to other presentations and material of interest for learning more about The Carpentries or other similar initiatives." assertion.
- 44d55128-49c8-469c-9fb7-74d6dd6930ff description "Galaxy is an open-source platform for data analysis that enables users to: 1) Use tools from various domains (that can be plugged into workflows) through its graphical web interface. Run code in interactive environments (RStudio, Jupyter...) along with other tools or workflows; 2) Manage data by sharing and publishing results, workflows, and visualizations; 3) Ensure reproducibility by capturing the necessary information to repeat and understand data analyses; 4) The Galaxy Community is actively involved in helping the ecosystem improve and sharing scientific discoveries." assertion.
- 4cb1a1ff-4ed8-4236-b089-33def2f3cb36 description "A short overview of The Carpentries initiative, how they operate and collaboratively develop, maintain and deliver training on foundational coding and data science skills to researchers worldwide for researchers. Informal presentation given for the GO FAIR Foundation Fellow on July 27th 2023." assertion.
- 4cef586a-1a60-45f9-a1aa-0c2daf36c87c description "CodeRefinery is a community project where you can find Training and e-Infrastructure for Research Software Development." assertion.
- 6f18bdc9-ff67-4794-9fee-0c8d5e0a3bcc description "The Carpentries website is the main page where one can find about The Carpentries initiative. You can find many other links from there, including the Carpentries training material." assertion.
- 75e62d08-b3fb-4629-8d9b-679300234228 description "Presentation given by Toby Hodges on 29 April 2021 to reflect on the First round of Lesson Development Study Groups. Toby explains what the training material on "Lesson Development Study Group" is about and how it helps The Carpentries community to co-develop training material." assertion.
- b74debc0-bdf9-4612-ab43-be26268dd53b description "Website where you can find all the training material for The Galaxy Project with many different topics." assertion.
- f214bab9-f752-48a7-9164-69d57dfd9214 description "Presentation from The Carpentries Community on "The Carpentries Instructor Training" and on how to build skills in a community of practice." assertion.
- 7435ba71-48f2-4475-999e-cd818cc941ce description "With this pipeline we aim to provide users with the ability to train spatiotemporally robust machine learning models to detect and monitor wetlands and thus assessing their state over time. Wetlands play a vital role in the ecosystem, but also have critical influence on methane emissions. Methane is around 25 times as powerful in trapping heat in the atmosphere, but because it does not stay in the atmosphere as long, it more has a short-term influence on the rate of climate change. See also this news release by NOAA for more details. Wetlands have been one of the major drivers of methane in the atmosphere, acting as source instead of a sink while not being stable, including water stress as well as renaturation." assertion.
- 1cbd78cb-3300-45d0-9fcd-9f9323b0b14e description "Poster and associated video on Climate Science with Galaxy. It provides a short information about the status and roadmap. The goal is to demonstrate we are shifting from using Galaxy for answering scientific question to using Galaxy for answering societal issues. In particular, we are aiming at providing a way to monitor the progress of a given climate action undertaking at local, national or international levels." assertion.
- aa831010-4c65-4d28-a423-7cb5f877ac09 description "Youtube video explaining the poster. Poster and associated video on Climate Science with Galaxy. It provides a short information about the status and roadmap. The goal is to demonstrate we are shifting from using Galaxy for answering scientific question to using Galaxy for answering societal issues. In particular, we are aiming at providing a way to monitor the progress of a given climate action undertaking at local, national or international levels." assertion.
- 19f2cf29-c1c7-4abc-8443-354e7698bc86 description "Scientific paper about the application of the hyperspectral camera ECOTONE for underwater benthic habitat mapping in the Southern Adriatic Sea Cited as: Foglini, F.; Grande, V.; Marchese, F.; Bracchi, V.A.; Prampolini, M.; Angeletti, L.; Castellan, G.; Chimienti, G.; Hansen, I.M.; Gudmundsen, M.; et al. Application of Hyperspectral Imaging to Underwater Habitat Mapping, Southern Adriatic Sea. Sensors 2019, 19, 2261. https://doi.org/10.3390/s19102261" assertion.
- 053eea69-7fb7-4a53-a641-06bbb15a0961 description "Figure 1. (A) Location of the two sites, inset shows the position in the Mediterranean Sea; (B) the extension of the Bari Canyon CWC province (from [56]) and (C) the extension of the coralligenous in the Brindisi area (black lines indicate the ROV surveys). Habitat maps produced by the BIOMAP project and further updated within the CoCoNet project. (D) Example of CWC habitat complexity showing colonies of M. oculata and large fan-shaped sponges (from [38]); (E) example of coralligenous characterized by CCA and Peyssonelliales, serpulids and orange encrusting sponges overprinting the calcified red algae." assertion.
- 25cae486-8fcf-4d14-bba4-9dc1bf761318 description "Foglini, F.; Grande, V.; Marchese, F.; Bracchi, V.A.; Prampolini, M.; Angeletti, L.; Castellan, G.; Chimienti, G.; Hansen, I.M.; Gudmundsen, M.; et al. Application of Hyperspectral Imaging to Underwater Habitat Mapping, Southern Adriatic Sea. Sensors 2019, 19, 2261. https://doi.org/10.3390/s19102261" assertion.
- b97348a7-991f-46cf-9834-cf602bacf800 description "The scenario covers the whole Adriatic Sea, including the sources of marine litter coming from the whole of the Adriatic coastline. The water current transport is simulated by the hydrodynamic model under realistic forcing conditions. The dispersal of marine litter is calculated using a particle tracking model developed to take into account the sinking velocity of the particles, as well as the effect of the bottom rocky sea floor on particle bottom transport. Using this numerical approach, we performed simulations that model the dispersal of marine litter, from which we determined hotspots, where high concentrations of marine litter accumulate. The model results were used to screen for clean-up location, where the concentration of marine litter is high with respect to surrounding areas. A crucial aspect of the model is the characterization of the main sources of marine litter in the Adriatic Sea and in the Gulf of Venice. The public litter represents the first source of beached marine litter followed by non-sourced litter, aquaculture and fishing (mussel nets). In case of macrolitter seabed composition, the main sources are public activity (domestic and touristic waste), followed by shipping activity and fisheries. The macrolitter composition of the seabed is derived from the field surveys in the Gulf of Venice and is very similar to the beached marine litter composition. The data indicates a high spatial heterogeneity of marine litter related to a high variability, both in temporal distribution and abundance of each marine litter type." assertion.
- 2ec7a983-b9bd-4f1e-afdf-2e00246c7f62 description "Project deliverable" assertion.
- 67de3cb9-b0cd-4922-b1cf-40cf202b2895 description "Projekt dotyczy....<br>" assertion.
- fe70c5a9-9d7a-41f1-af1e-e0ec8acf79ce description "Tak Nie<br>" assertion.
- dd87ac68-c7b8-4641-a610-5587978d6ff5 description "Global warming and ocean acidification are predicted to impinge on deep sea ecosystems with deleterious consequences on their biodiversity and ecosystem services. More specifically, human-induced global climate changes may pose a major threat to cold water corals which are known to engineer some of the most complex, diverse and charismatic habitats at bathyal depths. Furthermore, these corals may suffer in the future from an unprecedented destruction of their habitat from additional pressures (e.g. bottom fishing, deep-sea mining), which may further modify their structure and function. However, the adaptive potential of cold water corals in response to increasing warming remains largely undocumented. In the Mediterranean Sea, the analysis of radiometrically-dated fossil specimens shows a general decline in the abundance of cold water corals that were exposed to temperatures higher than 14°C in the past. Considering that modern intermediate and deep Mediterranean waters are close or above 14°C, this suggests that most of the Mediterranean cold water coral species thrive today very close to their physiological threshold, , with deleterious consequences on deep-sea ecosystems and biodiversity. This multidisciplinary case study will target those Mediterranean cold water coral habitats that develop under thermal conditions very close to 14°C. Maps of the current cold water coral distribution in the Mediterranean Sea will be correlated to chemical and physical parameters (e.g. temperature, salinity, nutrients, dissolved oxygen concentration) from field data and modelling. The fossil records will be also analysed through U/Th dating and isotopic geochemistry, and the abundance of fossil corals will be correlated to proxy-based environmental reconstructions. Future scenarios will be provided based on regional models (e.g. Med-CORDEX) and will focus on the increase of temperature and consequent cold water coral habitat loss. The role of other parameters such as nutrient concentration and decreasing pH will be also investigated. This case study involves experts in paleoclimatology, paleoecology, physical and chemical oceanography, biology, ecology and modelling. Key hypothesis to be tested: the seawater temperature is the main environmental factor controlling the past, present and future distribution of cold water corals in the Mediterranean Sea." assertion.
).  *Image from [IMO 2020 - cleaner shipping for cleaner air, 20 December 2019](https://www.imo.org/en/MediaCentre/PressBriefings/pages/34-IMO-2020-sulphur-limit-.aspx)* According to the [International Maritime Organization (IMO)](https://www.imo.org/) the new limit should lead to a 77% drop in overall SOx emissions from ships. The Figure below shows the 5 key beneficial changes from IMO's **Sulphur Limit** for Ships' fuel oil:  *Five beneficial changes from IMO’s Sulphur Limit for ships’ fuel oil* ## This Research Object's purpose In this work we look as the **actual impact of these measures on air pollution along shipping routes in Europe** based on Copernicus air quality data. [Copernicus Atmosphere Monitoring Service (CAMS)](https://ads.atmosphere.copernicus.eu/cdsapp#!/home) uses satellite data and other observations, together with computer models, to track the accumulation and movement of air pollutants around the planet (see [https://atmosphere.copernicus.eu/air-quality](https://atmosphere.copernicus.eu/air-quality)). ### Rohub - Adam plateform integration Some of this CAMS data is available from the [Adam platform](https://adamplatform.eu) and can be imported into a [Research Object](https://www.researchobject.org).  *Example of data (here daily temperatures) displayed on the Adam plateform* It is also possible, from the Research Object, to open the resource in the Adam platform, then interactively zoom into a particular geographical area (say to the right of the Strait of Gibraltar, along the track presumably followed by cargo ships to/from the Suez Canal) and change the date (for example between 2018-07-19 and 2023-07-19) to appreciate the change. #### To go further Obviously **a more detailed statistical analysis** would be required to minimize the effect of external factors (meteorological condition, level of cargo traffic, etc.) over a longer period of time to derive meaningful conclusions, however it does not seem that the high level of sulfur dioxide concentration from the pre-IMO regulation was reached after. ##### Looking at other pollutants Besides SOx the new regulation also contributed to decrease atmospheric concentrations in nitric oxides (NOx) as well as particulate matter (PM). ### References - [IMO 2020 - cleaner shipping for cleaner air, 20 December 2019](https://www.imo.org/en/MediaCentre/PressBriefings/pages/34-IMO-2020-sulphur-limit-.aspx)"](?object=%22%23%23%20Rationale%0A%0A%0AFrom%201st%20January%202020%20the%20global%20upper%20limit%20on%20the%20sulphur%20content%20of%20ships'%20fuel%20oil%20was%20reduced%20from%203.50%25%20to%200.50%25%2C%20which%20represents%20an%20~86%25%20cut%20(from%20%5Bhttps%3A%2F%2Fwww.imo.org%2Fen%2FMediaCentre%2FPressBriefings%2Fpages%2F34-IMO-2020-sulphur-limit-.aspx%5D(https%3A%2F%2Fwww.imo.org%2Fen%2FMediaCentre%2FPressBriefings%2Fpages%2F34-IMO-2020-sulphur-limit-.aspx)).%0A%0A!%5BShip%20image%5D(https%3A%2F%2Fwwwcdn.imo.org%2Flocalresources%2Fen%2FMediaCentre%2FPressBriefings%2FPublishingImages%2F2019%2520images%2520pb%2FSulphur%25202020%2520inside%2520pic.jpg)%0A%0A*Image%20from%20%5BIMO%202020%20-%20cleaner%20shipping%20for%20cleaner%20air%2C%2020%20December%202019%5D(https%3A%2F%2Fwww.imo.org%2Fen%2FMediaCentre%2FPressBriefings%2Fpages%2F34-IMO-2020-sulphur-limit-.aspx)*%0A%0AAccording%20to%20the%20%5BInternational%20Maritime%20Organization%20(IMO)%5D(https%3A%2F%2Fwww.imo.org%2F)%20the%20new%20limit%20should%20lead%20to%20a%2077%25%20drop%20in%20overall%20SOx%20emissions%20from%20ships.%20%0A%0AThe%20Figure%20below%20shows%20the%205%20key%20beneficial%20changes%20from%20IMO's%20**Sulphur%20Limit**%20for%20Ships'%20fuel%20oil%3A%0A%0A!%5BSulphur%20key%20changes%5D(https%3A%2F%2Fwwwcdn.imo.org%2Flocalresources%2Fen%2FMediaCentre%2FPressBriefings%2FPublishingImages%2F2019%2520images%2520pb%2F5%2520changes%2520-%2520Sulphur%25202020%2520-%2520infographic%2520web.jpg)%0A%0A*Five%20beneficial%20changes%20from%20IMO%E2%80%99s%20Sulphur%20Limit%20for%20ships%E2%80%99%20fuel%20oil*%0A%0A%0A%23%23%20This%20Research%20Object's%20purpose%0A%0AIn%20this%20work%20we%20look%20as%20the%20**actual%20impact%20of%20these%20measures%20on%20air%20pollution%20along%20shipping%20routes%20in%20Europe**%20based%20on%20Copernicus%20air%20quality%20data.%20%5BCopernicus%20Atmosphere%20Monitoring%20Service%20(CAMS)%5D(https%3A%2F%2Fads.atmosphere.copernicus.eu%2Fcdsapp%23!%2Fhome)%20uses%20satellite%20data%20and%20other%20observations%2C%20together%20with%20computer%20models%2C%20to%20track%20the%20accumulation%20and%20movement%20of%20air%20pollutants%20around%20the%20planet%20(see%20%5Bhttps%3A%2F%2Fatmosphere.copernicus.eu%2Fair-quality%5D(https%3A%2F%2Fatmosphere.copernicus.eu%2Fair-quality)).%0A%0A%23%23%23%20Rohub%20-%20Adam%20plateform%20integration%0A%0A%0ASome%20of%20this%20CAMS%20data%20is%20available%20from%20the%20%5BAdam%20platform%5D(https%3A%2F%2Fadamplatform.eu)%20and%20can%20be%20imported%20into%20a%20%5BResearch%20Object%5D(https%3A%2F%2Fwww.researchobject.org).%20%0A%0A!%5BADAM%20Platform%5D(https%3A%2F%2Fadamplatform.eu%2Fwp-content%2Fuploads%2F2021%2F03%2Fadam-home-platfomr.png)%0A%0A*Example%20of%20data%20(here%20daily%20temperatures)%20displayed%20on%20the%20Adam%20plateform*%0A%0AIt%20is%20also%20possible%2C%20from%20the%20Research%20Object%2C%20to%20open%20the%20resource%20in%20the%20Adam%20platform%2C%20then%20interactively%20zoom%20into%20a%20particular%20geographical%20area%20(say%20to%20the%20right%20of%20the%20Strait%20of%20Gibraltar%2C%20along%20the%20track%20presumably%20followed%20by%20cargo%20ships%20to%2Ffrom%20the%20Suez%20Canal)%20and%20change%20the%20date%20(for%20example%20between%202018-07-19%20and%202023-07-19)%20to%20appreciate%20the%20change.%0A%0A%23%23%23%23%20To%20go%20further%0A%0AObviously%20**a%20more%20detailed%20statistical%20analysis**%20would%20be%20required%20to%20minimize%20the%20effect%20of%20external%20factors%20(meteorological%20condition%2C%20level%20of%20cargo%20traffic%2C%20etc.)%20over%20a%20longer%20period%20of%20time%20to%20derive%20meaningful%20conclusions%2C%20however%20it%20does%20not%20seem%20that%20the%20high%20level%20of%20sulfur%20dioxide%20concentration%20from%20the%20pre-IMO%20regulation%20was%20reached%20after.%0A%0A%0A%23%23%23%23%23%20Looking%20at%20other%20pollutants%0A%0ABesides%20SOx%20the%20new%20regulation%20also%20contributed%20to%20decrease%20atmospheric%20concentrations%20in%20nitric%20oxides%20(NOx)%20as%20well%20as%20particulate%20matter%20(PM).%0A%0A%23%23%23%20References%0A%0A-%20%5BIMO%202020%20-%20cleaner%20shipping%20for%20cleaner%20air%2C%2020%20December%202019%5D(https%3A%2F%2Fwww.imo.org%2Fen%2FMediaCentre%2FPressBriefings%2Fpages%2F34-IMO-2020-sulphur-limit-.aspx)%22)
).  *Image from [IMO 2020 - cleaner shipping for cleaner air, 20 December 2019](https://www.imo.org/en/MediaCentre/PressBriefings/pages/34-IMO-2020-sulphur-limit-.aspx)* According to the [International Maritime Organization (IMO)](https://www.imo.org/) the new limit should lead to a 77% drop in overall SOx emissions from ships. The Figure below shows the 5 key beneficial changes from IMO's **Sulphur Limit** for Ships' fuel oil:  *Five beneficial changes from IMO’s Sulphur Limit for ships’ fuel oil* ## This Research Object's purpose In this work we look as the **actual impact of these measures on air pollution along shipping routes in Europe** based on Copernicus air quality data. [Copernicus Atmosphere Monitoring Service (CAMS)](https://ads.atmosphere.copernicus.eu/cdsapp#!/home) uses satellite data and other observations, together with computer models, to track the accumulation and movement of air pollutants around the planet (see [https://atmosphere.copernicus.eu/air-quality](https://atmosphere.copernicus.eu/air-quality)). ### Rohub - Adam plateform integration Some of this CAMS data is available from the [Adam platform](https://adamplatform.eu) and can be imported into a [Research Object](https://www.researchobject.org).  *Example of data (here daily temperatures) displayed on the Adam plateform* It is also possible, from the Research Object, to open the resource in the Adam platform, then interactively zoom into a particular geographical area (say to the right of the Strait of Gibraltar, along the track presumably followed by cargo ships to/from the Suez Canal) and change the date (for example between 2018-07-19 and 2023-07-19) to appreciate the change. #### To go further Obviously **a more detailed statistical analysis** would be required to minimize the effect of external factors (meteorological condition, level of cargo traffic, etc.) over a longer period of time to derive meaningful conclusions, however it does not seem that the high level of sulfur dioxide concentration from the pre-IMO regulation was reached after. ##### Looking at other pollutants Besides SOx the new regulation also contributed to decrease atmospheric concentrations in nitric oxides (NOx) as well as particulate matter (PM). ### References - [IMO 2020 - cleaner shipping for cleaner air, 20 December 2019](https://www.imo.org/en/MediaCentre/PressBriefings/pages/34-IMO-2020-sulphur-limit-.aspx)"](?object=%22%23%23%20Rationale%0A%0A%0AFrom%201st%20January%202020%20the%20global%20upper%20limit%20on%20the%20sulphur%20content%20of%20ships'%20fuel%20oil%20was%20reduced%20from%203.50%25%20to%200.50%25%2C%20which%20represents%20an%20~86%25%20cut%20(from%20%5Bhttps%3A%2F%2Fwww.imo.org%2Fen%2FMediaCentre%2FPressBriefings%2Fpages%2F34-IMO-2020-sulphur-limit-.aspx%5D(https%3A%2F%2Fwww.imo.org%2Fen%2FMediaCentre%2FPressBriefings%2Fpages%2F34-IMO-2020-sulphur-limit-.aspx)).%0A%0A!%5BShip%20image%5D(https%3A%2F%2Fwwwcdn.imo.org%2Flocalresources%2Fen%2FMediaCentre%2FPressBriefings%2FPublishingImages%2F2019%20images%20pb%2FSulphur%202020%20inside%20pic.jpg)%0A%0A*Image%20from%20%5BIMO%202020%20-%20cleaner%20shipping%20for%20cleaner%20air%2C%2020%20December%202019%5D(https%3A%2F%2Fwww.imo.org%2Fen%2FMediaCentre%2FPressBriefings%2Fpages%2F34-IMO-2020-sulphur-limit-.aspx)*%0A%0AAccording%20to%20the%20%5BInternational%20Maritime%20Organization%20(IMO)%5D(https%3A%2F%2Fwww.imo.org%2F)%20the%20new%20limit%20should%20lead%20to%20a%2077%25%20drop%20in%20overall%20SOx%20emissions%20from%20ships.%20%0A%0AThe%20Figure%20below%20shows%20the%205%20key%20beneficial%20changes%20from%20IMO's%20**Sulphur%20Limit**%20for%20Ships'%20fuel%20oil%3A%0A%0A!%5BSulphur%20key%20changes%5D(https%3A%2F%2Fwwwcdn.imo.org%2Flocalresources%2Fen%2FMediaCentre%2FPressBriefings%2FPublishingImages%2F2019%20images%20pb%2F5%20changes%20-%20Sulphur%202020%20-%20infographic%20web.jpg)%0A%0A*Five%20beneficial%20changes%20from%20IMO%E2%80%99s%20Sulphur%20Limit%20for%20ships%E2%80%99%20fuel%20oil*%0A%0A%0A%23%23%20This%20Research%20Object's%20purpose%0A%0AIn%20this%20work%20we%20look%20as%20the%20**actual%20impact%20of%20these%20measures%20on%20air%20pollution%20along%20shipping%20routes%20in%20Europe**%20based%20on%20Copernicus%20air%20quality%20data.%20%5BCopernicus%20Atmosphere%20Monitoring%20Service%20(CAMS)%5D(https%3A%2F%2Fads.atmosphere.copernicus.eu%2Fcdsapp%23!%2Fhome)%20uses%20satellite%20data%20and%20other%20observations%2C%20together%20with%20computer%20models%2C%20to%20track%20the%20accumulation%20and%20movement%20of%20air%20pollutants%20around%20the%20planet%20(see%20%5Bhttps%3A%2F%2Fatmosphere.copernicus.eu%2Fair-quality%5D(https%3A%2F%2Fatmosphere.copernicus.eu%2Fair-quality)).%0A%0A%23%23%23%20Rohub%20-%20Adam%20plateform%20integration%0A%0A%0ASome%20of%20this%20CAMS%20data%20is%20available%20from%20the%20%5BAdam%20platform%5D(https%3A%2F%2Fadamplatform.eu)%20and%20can%20be%20imported%20into%20a%20%5BResearch%20Object%5D(https%3A%2F%2Fwww.researchobject.org).%20%0A%0A!%5BADAM%20Platform%5D(https%3A%2F%2Fadamplatform.eu%2Fwp-content%2Fuploads%2F2021%2F03%2Fadam-home-platfomr.png)%0A%0A*Example%20of%20data%20(here%20daily%20temperatures)%20displayed%20on%20the%20Adam%20plateform*%0A%0AIt%20is%20also%20possible%2C%20from%20the%20Research%20Object%2C%20to%20open%20the%20resource%20in%20the%20Adam%20platform%2C%20then%20interactively%20zoom%20into%20a%20particular%20geographical%20area%20(say%20to%20the%20right%20of%20the%20Strait%20of%20Gibraltar%2C%20along%20the%20track%20presumably%20followed%20by%20cargo%20ships%20to%2Ffrom%20the%20Suez%20Canal)%20and%20change%20the%20date%20(for%20example%20between%202018-07-19%20and%202023-07-19)%20to%20appreciate%20the%20change.%0A%0A%23%23%23%23%20To%20go%20further%0A%0AObviously%20**a%20more%20detailed%20statistical%20analysis**%20would%20be%20required%20to%20minimize%20the%20effect%20of%20external%20factors%20(meteorological%20condition%2C%20level%20of%20cargo%20traffic%2C%20etc.)%20over%20a%20longer%20period%20of%20time%20to%20derive%20meaningful%20conclusions%2C%20however%20it%20does%20not%20seem%20that%20the%20high%20level%20of%20sulfur%20dioxide%20concentration%20from%20the%20pre-IMO%20regulation%20was%20reached%20after.%0A%0A%0A%23%23%23%23%23%20Looking%20at%20other%20pollutants%0A%0ABesides%20SOx%20the%20new%20regulation%20also%20contributed%20to%20decrease%20atmospheric%20concentrations%20in%20nitric%20oxides%20(NOx)%20as%20well%20as%20particulate%20matter%20(PM).%0A%0A%23%23%23%20References%0A%0A-%20%5BIMO%202020%20-%20cleaner%20shipping%20for%20cleaner%20air%2C%2020%20December%202019%5D(https%3A%2F%2Fwww.imo.org%2Fen%2FMediaCentre%2FPressBriefings%2Fpages%2F34-IMO-2020-sulphur-limit-.aspx)%22)
 at the [BSC](http://www.bsc.es/) & [IRB](https://www.irbbarcelona.org/) for the [European BioExcel](http://bioexcel.eu/), funded by the European Commission (EU H2020 [823830](http://cordis.europa.eu/projects/823830), EU H2020 [675728](http://cordis.europa.eu/projects/675728)). * (c) 2015-2023 [Barcelona Supercomputing Center](https://www.bsc.es/) * (c) 2015-2023 [Institute for Research in Biomedicine](https://www.irbbarcelona.org/) Licensed under the [Apache License 2.0](https://www.apache.org/licenses/LICENSE-2.0), see the file LICENSE for details. "](?object=%22%23%20Macromolecular%20Coarse-Grained%20Flexibility%20(FlexServ)%20tutorial%20using%20BioExcel%20Building%20Blocks%20(biobb)%0D%0A%0D%0AThis%20tutorial%20aims%20to%20illustrate%20the%20process%20of%20generating%20protein%20conformational%20ensembles%20from%203D%20structures%20and%20analysing%20its%20molecular%20flexibility%2C%20step%20by%20step%2C%20using%20the%20BioExcel%20Building%20Blocks%20library%20(biobb).%0D%0A%0D%0A***%0D%0A%0D%0A%23%23%20Copyright%20%26amp%3B%20Licensing%0D%0AThis%20software%20has%20been%20developed%20in%20the%20%5BMMB%20group%5D(http%3A%2F%2Fmmb.irbbarcelona.org)%20at%20the%20%5BBSC%5D(http%3A%2F%2Fwww.bsc.es%2F)%20%26amp%3B%20%5BIRB%5D(https%3A%2F%2Fwww.irbbarcelona.org%2F)%20for%20the%20%5BEuropean%20BioExcel%5D(http%3A%2F%2Fbioexcel.eu%2F)%2C%20funded%20by%20the%20European%20Commission%20(EU%20H2020%20%5B823830%5D(http%3A%2F%2Fcordis.europa.eu%2Fprojects%2F823830)%2C%20EU%20H2020%20%5B675728%5D(http%3A%2F%2Fcordis.europa.eu%2Fprojects%2F675728)).%0D%0A%0D%0A*%20(c)%202015-2023%20%5BBarcelona%20Supercomputing%20Center%5D(https%3A%2F%2Fwww.bsc.es%2F)%0D%0A*%20(c)%202015-2023%20%5BInstitute%20for%20Research%20in%20Biomedicine%5D(https%3A%2F%2Fwww.irbbarcelona.org%2F)%0D%0A%0D%0ALicensed%20under%20the%0D%0A%5BApache%20License%202.0%5D(https%3A%2F%2Fwww.apache.org%2Flicenses%2FLICENSE-2.0)%2C%20see%20the%20file%20LICENSE%20for%20details.%0D%0A%0D%0A!%5B%5D(https%3A%2F%2Fbioexcel.eu%2Fwp-content%2Fuploads%2F2019%2F04%2FBioexcell_logo_1080px_transp.png%20%22Bioexcel%22)%22)
 at the [BSC](http://www.bsc.es/) & [IRB](https://www.irbbarcelona.org/) for the [European BioExcel](http://bioexcel.eu/), funded by the European Commission (EU H2020 [823830](http://cordis.europa.eu/projects/823830), EU H2020 [675728](http://cordis.europa.eu/projects/675728)). * (c) 2015-2023 [Barcelona Supercomputing Center](https://www.bsc.es/) * (c) 2015-2023 [Institute for Research in Biomedicine](https://www.irbbarcelona.org/) Licensed under the [Apache License 2.0](https://www.apache.org/licenses/LICENSE-2.0), see the file LICENSE for details. "](?object=%22%23%20Protein%20Conformational%20Transitions%20calculations%20tutorial%20using%20BioExcel%20Building%20Blocks%20(biobb)%20and%20GOdMD%0D%0A%0D%0AThis%20tutorial%20aims%20to%20illustrate%20the%20process%20of%20computing%20a%20conformational%20transition%20between%20two%20known%20structural%20conformations%20of%20a%20protein%2C%20step%20by%20step%2C%20using%20the%20BioExcel%20Building%20Blocks%20library%20(biobb).%0D%0A%0D%0A***%0D%0A%0D%0A%23%23%20Copyright%20%26amp%3B%20Licensing%0D%0AThis%20software%20has%20been%20developed%20in%20the%20%5BMMB%20group%5D(http%3A%2F%2Fmmb.irbbarcelona.org)%20at%20the%20%5BBSC%5D(http%3A%2F%2Fwww.bsc.es%2F)%20%26amp%3B%20%5BIRB%5D(https%3A%2F%2Fwww.irbbarcelona.org%2F)%20for%20the%20%5BEuropean%20BioExcel%5D(http%3A%2F%2Fbioexcel.eu%2F)%2C%20funded%20by%20the%20European%20Commission%20(EU%20H2020%20%5B823830%5D(http%3A%2F%2Fcordis.europa.eu%2Fprojects%2F823830)%2C%20EU%20H2020%20%5B675728%5D(http%3A%2F%2Fcordis.europa.eu%2Fprojects%2F675728)).%0D%0A%0D%0A*%20(c)%202015-2023%20%5BBarcelona%20Supercomputing%20Center%5D(https%3A%2F%2Fwww.bsc.es%2F)%0D%0A*%20(c)%202015-2023%20%5BInstitute%20for%20Research%20in%20Biomedicine%5D(https%3A%2F%2Fwww.irbbarcelona.org%2F)%0D%0A%0D%0ALicensed%20under%20the%0D%0A%5BApache%20License%202.0%5D(https%3A%2F%2Fwww.apache.org%2Flicenses%2FLICENSE-2.0)%2C%20see%20the%20file%20LICENSE%20for%20details.%0D%0A%0D%0A!%5B%5D(https%3A%2F%2Fbioexcel.eu%2Fwp-content%2Fuploads%2F2019%2F04%2FBioexcell_logo_1080px_transp.png%20%22Bioexcel%22)%22)